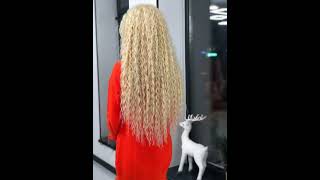
Beach Waves For Curly Hair | How To
- Posted on 13 May, 2020
- Medium Hair
- By Anonymous
Thank you for watching!
*Other ways to find me*
INSTAGRAM : https://www.instagram.com/ireneloveta/...
Thank you for the support. You rock!
This is for the curly-haired girls that just want beach waves, so today, I'm gon na show you how to have beach waves if you have curly hair without looking like an electrocuted poodle, because we have it harder, our hair, if you try to just wand it like The straight haired girls, you just look crazy, so I'm gon na show you two different ways: that's why my hair is parted in the middle. I'M aware that my forehead looks terrible and I'm apart, but you're gon na have to deal with it. One of them is straightening the ends first and the other one is straightening the in second, so really quick. I'M gon na put all of these things in my lap down get my favorite heat protector, because if you know me, then you know, if you don't use a heat protector, I'm gon na harass you about it because it's so important to not melt your hair. This is the Tripoli, Tripoli, Tripoli. I should know how to say this. I use it and I sell it in my salon, but whatever qwertz it is aerosol. It'S very light. I'M gon na try to spray it. I'M usually a little bit more aggressive since my camera lens is right in front of me. I'M gon na be a little more gentle, but I just kind of hold out the back spray. It make sure you get the ends for sure for sure it is a little bit oily. Just beware: it might make your it's a little too oily if you're, naturally pretty oily, I'm pretty dry. So I put a ton so make sure you get that underside by kind of leaving your neck out, I'm just spritzing it then I spray it over the top. Just in downward strokes, don't tell my sister, I'm spraying her plants with stock. Then I pick it up about here. It'S just kind of spraying like what it sprays pretty wide, so just like straight up and down should kind of cast a net over your whole head and then again from like warhead up and then one last spritz on the top for good measure. Normally you wouldn't separate your hair in half I'll explain that later, but for the sake of doing it, two different ways: I'm gon na. Do that really quick? I mean I'm just gon na take one whole side and go through and straighten the ends. I don't have a mirror in front of me, so I'm using my viewfinder if it bothers you that I'm looking to the side. Sorry, and then you just want to take about as wide as your straightener is on the bottom, because any wider and it looks like you just forgot - to take the iron down all the way. This is personally my favorite way to do it because I feel like when you curl it with the iron. You get like more of a variation. Sometimes when you straighten it last, especially if you're here's shorter like mine is, it tends to look like you just didn't. Curl it enough so this one's my favorite I'll, probably time-lapse most of this, because you don't want to sit here for thirty minutes watching me do this also for the curly hair people, if your sideburns are extra curly like that, instead of just wanting those, I do Go over, like my whole, face area with the straightener first, just to keep it a little more there's something about fightin back, I'm gon na tell everyone. You have Corona yeah coffee me in the back of my video. I don't think I can say that word. I think if they, you say that word, I think, it'd be monetize. You have rude, it's only current events. People, let me say the words I'm sweaty here. This is my armpit, sweat, video, okay good. Even if you can I'm a human beating, I sweat people huh. I mean maybe, but it's fine, my parents Erica she's kind of loud. So if you hear the noises, that's what it is. Okay, then I'm gon na take these little pieces on my hairline kind of bump it over like that. So I get a little more volume and then just kind of pull it forward. Okay, so I've one whole side straighten first, this side, I'll straighten. After as I go depending on where you part your hair that doesn't really matter right now you deal with that later. You can take as long as your iron is and as wide as your iron. You don't really want to go much wider than your iron, otherwise the hair inside won't get enough heat to it and then it'll just be fuzzy and messy. So I like to take everything from the top of my ears down and then I kind of zigzag the bottom loosely with my fingers and then just clip all of this up my cabana and then just split it in half this half I straight first, this half All straight and later, you can kind of see how this site is missing. Wish me luck on this iron that I'm pretending not to be judging over, but I'm being a little judge again it doesn't even it's so old. It doesn't even have a temperature gauge on it, so that must be too hot because I'd like melted, my fingertips off and if it's too hot for my fingertips, then it's too hot for my hair. Don'T use that method for you. My fingertips are used to it. For sure anyways, if you're wondering what to put your iron S, never put your iron over 360 360 is the max and I have pretty difficult. I don't know stubborn resistant hair and I still don't go over 360, except for this woman. I can't see the temperature anyways. Let me show you the back really quick. I have my straightener on and my curling iron. You can do this with a wand too, but I've had some people ask me how to do it with a curling iron. So that's why? I'M using the curling iron, so I just took like a messy zigzag back here and then I'm gon na loosely split it in half take a long section. A long skinny section put the iron close to your head and then just go lucky and then don't leave it on very long and then just let it go. The next section, you're gon na, go the opposite direction and then the front piece just goes back and then just hold it on for not very long at all. I like mine, to be pulled down a little bit, so it's more like a straight wave than a really really tight wave. Then take the other side. If you were to straighten it after some people, do it at the very very end. If I was to do it after I do it after each section, but you take it clamp it close to your head turn it a little bit. Let it set for very minimal amount of time, then, the next section, since I did that section back this next section will go forward and I try to space it out so that everything like around the whole perimeter of my head is going away from my head. That way, it's not like curling into my eyeball, then I don't have to push it out of the way when I'm trying to drink coffee and it's trying to fall into my mouth. That'S how that goes. So this one's going away. When I let it go, then I pull it all forward. Take the straightener and then straighten I kind of pull it as far back as I can. If you pull it forward and straighten it, when you look at it from the back, it'll have like a weird pea shape of the straightener. So I try to pull it as close to natural fall as possible and then just get the very ends. But with this method, if my hair was longer it'd be great, but since it's shorter I feel like I just end up straightening half of it and it just looks weird but you'll get to see both sides. They they mostly look the same, I'm just really picky. So, that's why I do it this way. The next section I'll take just above my eyebrow. Is it exact it a little bit until I get to the middle and then just pull this down and forward I'll? Take this side pull down and forward. If you need some control, I usually just leave mine down and kind of crazy cuz, I'm best you can clip that out of the way. So you remember that if you don't you could just let it be, and then I do the same thing. I take this section long and skinny pinch. It turn it turn it and then just hold it for a brief second and then drop it down. Then they take this section, clamp it at the root turn it forward towards my face. Spin. It hold it just a second and then let it down, and then I just alternate directions till I get to the front, even if the section above my ear is back, then I still do the next one's back. So like this section just the way I grabbed it ends up going back and then the whole front will just go back and then I delete typically leave out roughly as much as I straightened. But the reason I like to straighten it first is because you're not always gon na get precisely one inch when you curl it. So if the bottom is already straight, if there's variations like that's a little bit longer, it's okay, it just kind of adds to the texture, belong skinny strand going back. Some of these are a little smaller because I can't actually see what I'm sectioning with the camera. So this section may be a little bit too thick too long. I should say so. Some of my sections are a little short, but that's fine queues are messy beach waves they're supposed to be kind of a mess. Now I'm gon na pull this all under my chin straight just the ends since I didn't get the sideburns before I'm gon na come through and just tap the root with those right now that R, at the top I'm going to turn around and show you mouthing How I do the back cuz, I get a lot of questions about how to connect it back here, take the whole top and then just do a rough zigzag part and pull it down now, I'll split it just so. I can see what I'm doing pick the iron hold it up and I always like to keep my iron up and down for waves for these types of waves. I should say so as close to vertical as you can then, since that one went back this one. A little forward and then I do the same the next session, so once I get to about this part where the top of your head is kind of split in half like that, then I start doing everything from the front instead of focusing on keeping that split In the back, so that means I can't look at you again how you curl the front is up to you. Some people curl it down the middle, whether they flip it to the side or leave it in the middle or not some people if they're gon na part it they part it. First, it's just personal preference play around with the whole front section until you get it to match your own face, I'm gon na probably do it down the middle. Since that's what I started showing you - and it doesn't matter if you start back here up here for the front part, I'm just gon na start from the front. That way, I can make sure I end up with these pieces going back done. I'M gon na probably do the first two sections back, probably you want to clamp it at the root, because if you start on the bottom and roll up, then the bottom it's getting more heat, and that means when your hair just inevitably falls flat because of the Wind or I don't know, naturally it falling flat. The part that has the most heat is more likely to keep the curl and that'll. Give you like a weird flat, Jimmy neutrons, mom kind of look. You know not cute getting sweaty, so my little baby here that I straighten you're already starting to curl. So that's fun. For me, this section will go forward and then the rest of the front will go back and then just look at it in the mirror and if you see any random pieces that didn't curl just go over those again. I'M gon na blame this curling iron. Okay and then before I straighten this side, I don't know if you can see cuz my hair stark but see how this side just looks done. It'S just faster to me personally, you do, however, it's faster for you, but it's faster for me. If I can just straighten all the ends, really quick and then go through because sometimes if you curl it, you get it like this old kind of out-of-date, curly, Shirley Temple, you look if you forget to straighten and paste, and you have one weird curl, it's just Easier for me to pop through the ends really quick, get this fun Beach, wavy! Look without having to break out about hairs. Cuz! If you forget to curl the hair, that's fine, it kind of hides in the waves. If you forget to straighten the hair, it sticks out like that. Well, I'm gon na just grab all this try to get all of the ends with a teeny, tiny viewfinder these ones. I can pull forward because my haircut is weird from all these broken fits. So doesn't matter if I'm pulling forward or back but for the back pieces you want to keep those keeps of straighteners, far back as possible, cut over the top too a little bit and then once you give it a second to cool, you can run your hands Through it, you can use a lightweight either a texture spray or a lightweight hairspray, just to give it some more current, but thankfully, for us curly girls, we don't really need to try the orange keep our hair to stay. Put. I didn't bring any texture spray, so I'm stealing my sisters, it's kenra, I like kena a lot, so I'm pretty sure all of it. So then, if you want a little more pop up here, you can just kind of lift it and spray the roots a little make it a little more messy. I need this smells like you picked it out. Did I pick it out. I trust this brand oops. You get to where you just have brands, you just trust, so you can see how both sides mostly look the same. I just like that this side kind of lays where I want it to at the bottom this side, even though I straightened it, it still has two weird pieces that are wanting to flip up, but the good thing is, since the back-and-forth curling is pretty much the Same once, you run your hands through it, you're really not gon na be able to tell it just looks like fun beach waves and upon looking in the mirror. I see all these weird pieces on this side that are not straight. My professionally licensed stylist opinion is just straightened. First, save yourself the hassle of having to check your hair all the time. Look at that you see it. It looks insane. Also forget back. You see how like it kind of appears that this whole chunk is straight, that just kind of happens. If I had my sister's length of hair, which is like to her hips, you didn't get away with it, looking straighter on the ends, but you're good there's. Judging her snacks, hey, what do you think what this side? I straightened. First, this side, I straightened after the side. First yeah, besides the winner yeah, but just about all the yacht, looks too straight and it stood all right. That is that, then, once it's cooled, you can run your hands through it, go about your day, flip it to the side, have some fun volume. If you have any questions at all, I try to be good about responding to comments, especially when it's about hair cuz. That'S my life, so if you have any questions post them in the comments below I'll get back to you as soon as I can don't forget to hit thumbs up, don't forget get! Oh my gosh. In the words, don't forget to subscribe to see some more hair content. If you have any specific hair videos, you want to see, like my best friend, keeps asking me for a wand tutorial, and I keep saying ok and it's been 3 years since I said ok. But if you have any videos, you want to see post them in the comments below and I will try to do it. My sister's gon na harass me and filming a bunch of videos this week since we're stuck at home, and I have lots of time. So my excuse of no time is gone. Okay, thanks, bye,
Comments
Leny Castro: Exactly what I was looking for. Straight the ends!! What a miracle.
Annie Tomerlin: I knew as soon as you mentioned the electrocuted poodle that this was the video for me SO helpful!!
Kim Taeron: Thanks. Helped alot :)
isabella aragao: really liked this video ! thanks !
Sophia Guadalupe: Can you please do a video about thin hair and how to style it
Antonio Salinas: Nice!
Waiting2soar13: You definately dont need to flat iron ur whole head before curling thats insanity
Nancy 15: Your hair is Not Curley!! Your hair is wavy.. ☺️
LifeIsBeautiful: Holy cow this woman is beautiful. Those eyes though ♥️