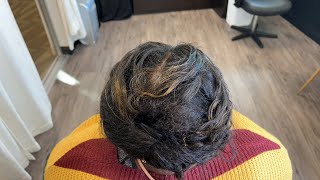
2021 How To Mold Short Hair/Pixieish Molding Mousse
- Posted on 21 January, 2021
- Pixie
- By Anonymous
This step by step tutorial is taught by retired short hair stylist Brandy Lucas.In it she breaks down everything you need to know to mold your short haircut using the Pixie-Ish Molding Mousse.
Products Used:
Pixie-Ish Molding Mousse -https://brandylucasbeauty.com/store/p/...
Today, i'm going to show you how to use the pixis molding mousse to perfect your mold, starting with freshly washed hair you'll just want to condition your hair and then we'll go straight into using our pixie-ish molding mousse to create a mold using the wide angle of Your comb you're going to comb your hair in the direction of the desired style, so if you want to have a heavy bang or, however, you want your hair to lay when it's dry. This is creating the formation for that before you even begin. It also helps you to avoid using too much product a lot of times. People are concerned with what hair goes forward and what hair goes back. This is a perfect way to determine using your ears as a guide. You just want to take your fingers straight up to the midpoint of your head and at that point, you'll go forward backwards into each side, forming your hair around your particular head shape. Now we'll add our pixis molding mousse three pumps is ideal to start with. Once you add the product to your hair, you can determine whether or not three pumps is enough. You always want to start with just enough product and then build if necessary, so you'll see working through the product around your entire head is the effective way to determine whether or not you have enough to flatly mold your entire head, using the wide teeth of your Comb work the product from the top of your hair, where you initially applied it down to the roots of your hair. At this point, you'll be able to decide if there are areas that are not adequately covered. You can add one to two pumps of additional molding mousse and then using the small teeth of your comb. You can take small sections going around your head. Laying your hair flat to your scalp additional product can be laid on the back of your hand and reused in areas where you need extra product move around your head, taking small sections going behind the comb with your flat hand, to lay the hair down the goal Here is to definitely take small sections to lay your hair as flat to your scalp, as you possibly can so use your hand to follow the comb to create a flat base. This is the point where we decide what hair goes to what side using the eyebrow. As your gauge, you want to create what is like a heart shape at the peak of your eyebrow. So you'll see me taking portions of my hair over across my forehead, and this is where you add detail to your mold. Some people opt to lay their hair flat on their forehead. Some add waves, curls personal details. However, you would like your hair to dry and be set. Here is the point where you add that personality it looks a lot harder than it actually is, but it definitely takes practice to create this wave motion. It'S basically creating c's going forward and back around the perimeter of your hair, going back to the other side at the height of my eyebrow. I know that i want to closely keep the hair together, but now i'm swinging that hair back in the other direction, creating a natural part, always make sure to add detail to your sideburns and lay those down because they can be stubborn. You definitely want to use this time to lay them flat, setting your mold using wrap strips wrap around your mold and do not tie a knot for your first strip. Any additional product can hold the strip in place that you may have on your hair, or you may need to add a additional pump, make sure to cover all of the hair around your head. So you want to layer, your strips so that they are overlapping but covering all exposed hair, adding pressure to make sure that the hair is closed, that the strip is closed without me, adding a knot, sometimes knots cause dents in your mold. This is my first tie and instead of tying a knot, i add pressure and wrap the strip around itself. Now i want to make sure that i'm covering my sideburns, so i take an additional strip across my sideburns on both sides and then i'll do the same mechanism where i'm not tying a knot, i'm tying to close. It then wrapping the strip around one another. Today, i don't need to do this, but just so i can show you if you are not relaxed on the top or it's time for a relaxer to get your hair to lay. You can add an additional strip across the top of your head tying under your chin, to add pressure and to get that hair on the top to lay flat. This is a major key if your hair is not freshly relaxed or your natural. On top. This works great to flatten your mold at the top of your hair. You always want to set your hair under a heated. Dryer suggestions are 30 minutes under a hooded dryer or if you don't have a hooded dryer at home, you can use a handheld dryer attachment. After drying, the hair, you just want to be gentle to remove the wrap strips from your head. Definitely don't want to take them off before the hair is dry completely and set, and here you are polished and pulled together. You have the option to go in and heat style, your hair or you can finger style your mold depending on your haircut and you are good to go. Pixie-Ish molding mousse dries with an incredible shine, so you do not have to add a ton of product, just finger style or heat style to your desired style. Thanks for choosing pixish

Comments
Whitney's Kitchen Jamaica: Very helpful. First time actually learning how to mold my pixie and trust me I've watched A LOT of other YouTube videos!! Thank you!!
T K: this was so easy to understand and informative, thank you so much
Shirley: I really enjoyed the tips. I’m a beginner, and this’s so helpful. Thanks for sharing.
Celia Regina Gonçalves Jose: Adorei
Ramona Charles: Hi Brandy, thank you so much for sharing this informative video. I am contemplating going short. I am 43 years old and am thinking of change. Your short hairstyle look so cute and feminine. Have a blessed week.
Towanna Lyles: Hey Brandy sending Love from Kentucky. I'm absolutely excited that I happened upon your channel. I'm a short hair Diva as well. and as you said in one of your videos I'm one with thin hair as well. Thank you for all your tips .
Ayala-j: New subscriber and love this entire tutorial and will be purchasing!
Diane Hands: Thanks for the tips. I will be ordering mine today. Quick question...how do I keep my sides laid through the week?
Leah Davis: I love this Brandy! Trying it tonight
Zendre' Sanders: Pretty! Would this mousse be good for sets such as curlformer sets on natural hair? Thanks!
Shermelle Schaffer: Ms. Brandy is AWESOME! I placed an order and she followed up to confirm some information. Extremely professional!! She has my business forever!!!
DESIRE: I miss my pixie but damn that maintenance
Kathy Green: What is the best shampoo and conditioner to use?
ms ve: Hey Brandy sending love from Bham, Alabama, thanks for the tips.
Jackson O.: I love ur channel…I’ve been short for two yrs…still inlove
Tina Hunter: Do you have a discount code for the mousse
Bridgette Cameron: Great video
Sherian Steele: Where can I obtain the pixie product?
Josie Josie: Love it ma...tks for the video
Bakerdeb Bikerdeb: Thank you.
Ms Chris: Thanx Brandy from Jersey!!! Im a new subscriber
Lessie Davis: New subbie
Tashana Pearson: Can't order on site says not accepting orders
Tae 200: Hello right now how old is ur perm...??