Pre-Colored Ginger Copper Wig | Detailed Gluless Install And & Styling Turorial Ft Unice Hair
- Posted on 18 February, 2023
- Pixie
- By Anonymous
Hello my beautiful subscribers (and non subs) ☺️
Wig sales page - @CAwigss
Personal instagram- @holaa_caro
EMAIL- [email protected]
**********
“Super long standby”wigs with free 48 hours Fast shipping
●▬▬▬▬▬▬▬▬▬▬▬♛#UNicehair♛ ▬▬▬▬▬▬▬▬▬▬▬●
I'm using Copper Brown Body Wave Wig 26 inches: http://bit.ly/3GOMl9u
https://www.unice.com/ ➤RICH 50% OFF lace Wig: http://bit.ly/3jUMtfY
☛☛☛ NEW flash Sale $99 get lace frontal Wig: http://bit.ly/3vGo9AY
Get Extra 10% Off+ Free Robe Use The Special Code: Nicelace
Afterpay & klarna & Quadpay & Sezzle, PAY 4 Equal payment Within 6 weeks!
Natural 4c hair trending kinky lace frontal wig: http://bit.ly/3IvJkxq
Affordable & Popular Glueless V-part Hairstyles: http://bit.ly/3Csmwe7
Aliexpress TOP UNice Hair store➤ https://bit.ly/3HdluVV
Amazon UNice Hair Store ➤ https://amzn.to/3afUszy
[email protected]: https://www.tiktok.com/@unicehairoffic...?
Instagram @unicehair: https://www.instagram.com/unicehair/
UNice YouTube Channel: https://www.youtube.com/c/UniceHair
Facebook @UNiceMall: https://business.facebook.com/UNiceMal...
Facebook UNice Fans Club Free Wig Giveaway: https://st.unice.com/afcc9
#unice #Ariel #thelittlemermaid
***********
This Paypal still work with you, right? [email protected]
After you sure that, we will do the payment to you immediately.
By the way, love, do you have the HD posts with the hair?
Then we can do the full payment to you together.
Waiting for your reply❤
UNice Official Website: https://www.unice.com/
Instagram @unicehair: https://www.instagram.com/unicehair/
UNice YouTube Channel: https://www.youtube.com/c/UniceHair
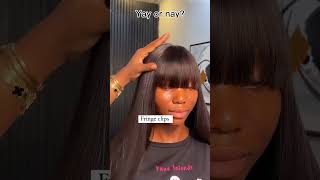
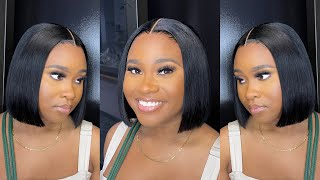
Hello, everyone welcome welcome back to my Channel. It'S Your Girl, Caroline back again with another video in today's tutorial. I'M going to be showing you guys how I achieved this not expected, but totally here for orange bang. Fox layered. Look, I don't know what to call it, but I'm obsessed it's so good. Something about it gives me like 70s Vibes. Am I right? No, but the wig I'm gon na be working with is from unise Hair Company. This is a pre-dyed color from them. It is a 26 inch, wig body wave. I did try like bleaching the knots and all of that, but that was epic fail, hence the bangs, but with that said, if you're interested in figure out how I did this wig and how I styled it, then let's get into today's video. Let'S hop right into it, so I did go ahead and bleach and plug the wig off camera. Like I was saying, the bleaching of the knot doesn't fail and girl. Somehow my knots turn purple, but that's another hair there, but just to reference. This wig did not come plucked or bleached, but you can go ahead and skip the bleaching. I should have done that to tip my lace, I'm using the Maybelline Fit Me Foundation. This is my shade at 356.. I always tape my lace and matter if it's HD transparent, whatever type of lace, I like tinting it to get it to be. The exact batch of my skin tone. Only thing I would say if your lace is a bit darker than your skin, you might want to use something lighter to lighten up the lace. Using your exact skin tone match on a dark lace, will probably make it even darker or make no difference. So something lighter if it is darker than your lace, but not too light anyways. I go ahead and use a nice little fluffy brush to just buff that into the lace and really push it right through and also to kind of help push it through the knots, because you know the knots are a bit lavender from my bleach mishap. So hopefully, putting some Foundation through the lace can help cover that up. I'M going here to show you how to properly use your adjustable Clips got to make sure the wig is fit in nice and tight, and here I am going to put the wig on um y'all know me: I'm not a wig caps girl, wig caps are just. I wear them is to help my wig not get stuck on the braids and stuff, but I generally don't really use wig caps because I do glueless installs if you're doing more of a glue, install, definitely use a wig cap ball cap method. All of that to help protect your edges from the glue, but no glue, no wig cap needed now that my wig is nice and secure on my head. I'M going ahead and just using my scissors to cut around the lace around my ears because the lace is never exactly fitted to my ears. I have a detailed tutorial showing how to cut the lace around your ears, because I know that part can be so annoying. So go ahead and check that out. If you want to get more information on how to do that properly, after cutting off the lace on the sides and cutting the lace into section, it's time to actually cut the lace off and to cut it off, I'm show you guys. The razor abuse thickness is just a standard face, slash eyebrow razor from the beauty supply store. I have a big pack from Amazon, so I can have a fresh one, because a fresh one is going to cut the lace perfect. Every single time face. Razors are best for cutting off your lace, because using them kind of helps the lace cut off with a jagged edge and that raw Jagged Edge really is going to lay a lot more natural than a straight blunt cut. You would get with your standard scissors that raw Edge is just going to lay a lot more naturally upon your hairline and not give it that wig a line of demarcation that we see a lot of the times. Once I have cut off the lace for this section, I like to use my ebben wonderly spray. This is what I'm using to lay down the lace. This is a glueless spray, so it is a temporary hold. You can't wear this on vacation. You can't wear it swimming, none of that because it is water, water, soluble meaning. It comes off of water, but it is great for a glueless long-lasting hold. When I say long lasting. I mean like a couple of days, two three three max some people say more, but honestly, I've only got like two to three days with the spray and the way I use it. I like to spray a good amount under the lace for the side. I can spray under because I can't lift it under for the other sections, but the side I spray under. I use my fingers to tap that product out to spread it evenly and then I go in with a rat tail comb and just pull out some hairs. I'M going to use as a Sideburn, and also I like pulling these hairs out on the side, because it helps me act as an anchor to really pull that side. Lace down the side. Lace is always the hardest part of installing. For me, once I have a nice little good grip on the lace on this side, I use my blow dryer and that same rat tail comb, the tail part to really just push and lock the lace in the glue, whatever spray combination, if you're using the ebony Spray and you're not using your blow dryer to help lock it in you're, not doing it right, I'm conventional. The lace is lifting because the blow dryer is really the key element to getting it to be nice and stuck as well as just using your comb or something flat to push the lace down. That side is finished. Let'S go ahead and repeat the same process on each sections. I just like working in sections, because it's just a lot less to tackle it makes it makes you make sure that I'm getting every piece of lace and sticking everything down when it comes to spraying over the lace for parts. I can't spray under. I just like to make sure I'm spraying as close to the front of the hairline spraying more on the lace and less on the hair and like before, using my finger to evenly spread and tap the product out going back in with that rat tail comb and Blow dryer combination to really make sure I'm really flattening and pressing everything down. Let me get this now we can get into sort of styling. I wanted to go for a very layered, choppy layers, kind of look. This wig initially was 26 inches and the look I wanted to go for was shorter than that. So first, I'm just going to do like a base basic layer cut. I always cut layers in my hair and the way I'm cutting it right now is how I always like cut all my wigs going down in a diagonal angle at first. I wasn't sure if I wanted to do long layers or short, because I still wasn't exactly sure where I was going with this hairstyle when I was filming this so here you can see me, I decided to just do some long layers with a blunt cut at The end, so I just went ahead and cut the ends nice and clean, but then you see the next few Clips. I decided I kind of want a very layered look. I'Ve been really wanting to perfect my layer cutting skills, so this is not going to be really much of a layer cutting tutorial. Once I really perfect my layer cutting skills, I will make a detailed layer cutting tutorial, so it's kind of hopefully through watching what I'm doing, because here, I'm literally learning as I'm filming this I was watching uh. I believe Brad Mondo who's, like a hairdresser. I was watching his tutorial on how to cut layers to help me figure it out what did help a lot was the shears. I got these shears from Amazon. I'M gon na link them down below these cutting scissors. Amazing, literally make a big difference in the regular cheap scissors. I used to cut my hair, but I basically just want to go for lots of layers and that's what I did. I sectioned the hair section by section and created the layers to help me make sure the layers are going in the direction I wanted to. I would use my round brush and flat iron to flip the ends out to make sure the hair was falling. The way that I anticipated it to fall but, like I said it's not like a full detailed layer cutting tutorial because I was learning on the spot, so I'm just going to leave these clips and hopefully visually they will make sense, but don't worry y'all. I got y'all with a very detailed layer cutting tutorial in the future. Thank you, foreign. So here's how the hair was looking after I added all of my layers. I did search up on YouTube: how to do a wolf cut, because it's apparently that's the type of cut that I have going on here. So it's very short and choppy has lots of like short layers and eventually, as you see, I did end up adding a bang. Since I knew I wanted to go for more of a bang. Look I'm just using the hot comb to help flat iron. The front pieces of the hair more towards the front, so it can look like more of a bang than a middle part for the actual styling itself. I use my flat iron and just curl the hair inward. So I bump the ends inwards facing me, and I went in with my velcro rollers. I got from Amazon to just let the curls sit and cool. This way is going to give the hair volume and also get those curls at the end, a nice little flip to it. I know I know I know, do something in love. I went ahead and did my makeup to give the curls enough time to properly just cool down before I took them down, and here I am just taking off the rollers no special technique for taking these down. To be honest, but I'm so happy with the way. The layers turned out, especially towards the bottom of the hair, because adding glares to your hair can really just give it so much attitude and movement like look at how these curls are just falling because of the layers like you can really just see every flip properly, Like the top, yes, a lot of confusions going on around the bang area, but below the bangs, the hair was definitely given like what the bangs were. Stressing me out. I had to figure out what to do. I initially wanted to do more of a side. Part bangs not a side, part bangs, but middle part bangs. I didn't want full front facing bangs initially, but I think it's the way that I cut the hair. The bangs were a little bit just sticking up way too much for my liking. So I went ahead and just put everything to the front and cut some front facing things, so that was more easier to tame. I am so sad that the side, the middle part bangs I wanted to work out because y'all saw the vision it really could have eaten. If I got those middle part bangs the way I wanted it, but I think I cut it way too short for it to fully be a middle part, bang, because it's a little bit um curtain, bangs, that's the word, I'm looking for. I wanted curtain bangs and if I hadn't cut it so short in the front, then I could have probably gotten some really deep curtain things anyways. So here I am just trying my best to cut bangs. I wanted them to be really thin. I didn't want big bulky bangs, so I did a straight across chop and then I did some um pointed Cuts. You know, like you, go up like this right here and cut in between just to kind of help thin it. So it's not super rough and one length in the front and of course less is more. I always like to make sure I'm cutting less than what I want my bang to be, because you can never go back once you've cut too much so I'll just cut a little bit, see how I like it, go back and cut some more until it feels Like that's the length I'm going for and voila here, we are with the bangs, I'm rocking with them too. The bangs was unexpected, but I like them just as equally just as equally that's a lie, but I like them regardless curtain, bangs front things. So now I went ahead and just used this round brush that I got from Amazon. I have so many new hair tools from Amazon if you guys want an Amazon, favorites, hair favorites video do comment down below, because I got y'all on that, but I'm using this round brush that I got from Amazon. It might blow dryer to kind of just helps. Smoothen the bangs to give them more of a curved bump on the end, without giving it too much of a bump, because I didn't want it to because if it had too much of a bump, it was going to start lifting too up high and then voila. Just like that here we are with the final look. It'S so funny. I literally did not know what I was gon na do with this wig starting off with it. I started to figure out what I was doing then. I changed my mind changed my mind again, but I'm so happy with this end result never saw it coming, but I'm happy she is here like it was giving retro Vibes. I felt like I was in the 70s with these layers the things it was so cute very different, but I feel like with the color and everything it just worked out perfectly and I'm really happy with it. How do y'all feel about it? Y'All digging it yay, nay, comment down below, but with that said, thank you guys so much for watching. We'Ve made it to another great install. We made it to the end of another great install, and you already know the drill like comment and subscribe and I'll see you guys another one. Peace out, Girl Scouts, good, bye,

Comments
SlimJim123: This came out beautiful!! I love layers!! They bring so much body to hair and give sultry vibes lol. Can’t wait for your layering video in the near future. That’s the one thing I’ve always wanted to learn.
MARY ODE: Yesss I love the wolf cut!! Looks so cute with this colour, the curtain bangs would've been cute but the fringe is deffo giving tooo
Brooklyn Gabriel: This look is giving sza
Judith Enu: A true beauty!
Tori time: One word!! Beautiful!
alese: So how long do your wigs normally last since you don’t do the wig cap glue method ?
prettygirlraqi: Now Carolineeeeeeeee you did that fren ❤
renaeè: I don’t think there’s a colour you can’t wear!!!!
Tori time: Gurl I don't use blow dryer when using my ebin and it comes out perfect everytime lol
zoee:
MARY ODE: I was waiting for this video since that pic gurlll
Tori time: Here watching love!
Alyz: ughh ginger is def your color
Tiahanna Lawrence: Second