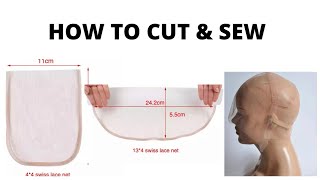
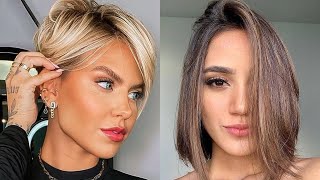
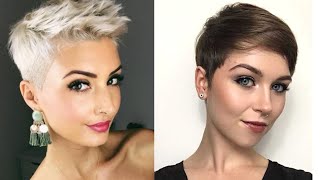
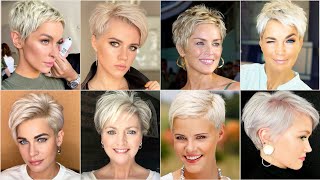
How To Cut Short Hair - A Pixie Haircut Tutorial
How to Cut Short Hair in a Step by Step Guide with this in-depth Pixie Haircut tutorial for beginners.
In this video, The Pixie Haircut Tutorial we:
- take you deep into creating a short pixie cut from a beyond shoulder length bob haircut.
- take you behind the scenes of not just learning a haircut, but you will learn 7 top tips for creating any type of design in the salon.
- will give you a great example of how you can use various tools and techniques to implement any cut that your clients desire.
__________________________
GREAT TOOLS FOR CUTTING ANY HAIRSTYLE:
♀️For an affordable and easy to use Razor for beginners or even seasoned hairstylists this is my ultimate favorite, THE FEATHER RAZOR, I've used for over 20 years.
Check it out here: https://amzn.to/2NguuNA
(At the time of the video my feather razor was completely out of razors so I used a back up.)
♂️Interested in an affordable blow dryer option with a low investment, amazing heat control, lightweight, and durable? It's the RUSK W8less Professional 2000 Watt Dryer
Check it out here: https://amzn.to/2TezfuP
(I used this blow dryer in the video)
Need questions answered about the tools above? Feel free to leave me a comment and I'll be sure respond in a timely manner.
____________________________________
Welcome to our VIRTUAL Salon Experience. The SalonCHAT.
Where we have Real Talk With Real Individuals from ‘behind the chair’ to the client experience on various salon industry topics.
Also, check out our NEW SalonCHAT Apparel and
Purchase Your Hair Apparel Tshirts and other apparel
https://the-salonchat-apparel.myshopif.../
CLICK HERE TO FIND LEARN MORE ABOUT YOU GIRL, SHARRON
* Hair, Style & Design Expert
* Salon Owner and Educator
* Certified Style Coach (UKs Style Coaching Program)
* YouTube Content Creator - The SalonCHAT
* Home of SalonCHAT…The MasterMind
Be sure to watch out for New VIDEOS EVERY WEEK
________________________
DOWNLOAD OUR FREE RESOURCES FOR HAIRSTYLISTS
* WANT TO GET FASTER IN THE SALON?
* THE DIY VIDEO/PHOTOSHOOT GUIDE
* TOP 10 RULES FOR SUCCESS
HERE’S HOW YOU CAN STAY CONNECTED TO US…
Subscribe to our channel http://bit.ly/thesalonchatonyoutube
IF YOU LIKE THIS VIDEO, let me know https://www.instagram.com/thesalonchat...
FACEBOOK: https://www.facebook.com/thesalonchat
LINKED IN: https://www.linkedin.com/in/sharron-mi...
Website: http://www.thesalonchat.com
EMAIL US AT: [email protected]
_______________________________
P.S. We love comments especially positive ones. However, Negative Comments, Channel Promoting, and URL Links are PROHIBITED. If you DO NOT prefer to support and love on our channel please do find others that are aligned with your career path.
There are tons of other amazing hairstyling content creators out there.
THANKS AND WE APPRECIATE THOSE OF YOU WHO SUPPORT AND LOVE ON The SalonCHAT
#thesalonchat #howtocutshorthair #pixiehaircuttutorial #haircuttutorialforbeginners #haireducation
Welcome back to my channel, if you are new to my channel, I am sure I'm guilty. I am the creator and founder of hair bins from trash. We are an emerging platform on YouTube that helps you. This is some professional launch grow in scale. Your new salon business, I decided to start 2020 off with a video of execution and what I mean by that is being able to say something today that you can use in your business the 7 top tips that are included in this video. You will be able to implement into your salon business Tuesday. You can implement them anywhere on a client if a client is giving a short haircut, a long haircut, a bob haircut any length of hair, any texture of hair. You can take one of these techniques and use them in your haircutting experience in the salon. Other videos will be based on implementing your designs in the salon. How to dissect different haircuts I'll show you pictures and we can dissect how to start a particular haircut off and also your prosperous pricing strategy, how to actually price your hair, so we're just going to get right into the video. So welcome guys to this pixie haircut tutorial and guess what this will be a series of three to four videos that will be in a playlist in and on my channel hair base from scratch. So this first video will be the full video the pixie haircut tutorial. So watch out for the next 3 videos that will belong to this series, a pixie haircut to Tori. There are seven key tips to learn from start-to-finish throughout this video, so be sure that you watch the end so that you don't miss out section. Eight is of the utmost importance, especially for new salon professionals and for anybody for that purpose. If you want a really precision design, then please be sure that you take time to section your haircuts and your designs so that you can have control over the hair. The hair is not all over the place and you can see your design coming to life when you section the hair first here you can see the result of the over directing that was done in the very beginning of the video holding this back section at a 45 degree angle and extending the bottom of the nape area, hair up to that area directly under the occipital ball. This is a result that it gets a longer length on the bottom at the nape of the neck. Here'S where the excitement begins. We are using our razor, as well as our texturizing tools, to create a shorter length in the back of this pixie haircut and to create softness in the overall cut at the nape area. So we'll bring down the next section that we have parted off to blend. With the previous section right at the occipital bone, so small sections are taken and we will follow our guide throughout this complete section to make sure that we blend the nape area section. With this section right above the occipital bone, we will continue to bring each section down all the way across at the occipital area to blend with the section underneath the occipital area, for a complete look in the back of our haircuts, we will begin to incorporate the Blending of the side, sections of our haircut we're working on the left side now and blending it with a small section of the back area of the haircut so that it creates more softness in our design and we'll be using our tools, such as our texturizing shears. To create some extra softness so that there are no heavyweight lines present and you have a total look of softness throughout the design, especially in the side area and behind the ear. There are three reasons that tip number two is of the utmost: important: do not cut beyond the second knuckle. When you cut beyond the second knuckle one, you can cut yourself number two. You leave space where the haircut is uneven and creates an imbalance in your haircut and number three. You can completely lose control of the hair that you are holding when you cut beyond the second knuckle, because beyond the second knuckle there is space and you do not have control over the hair. In that particular area. We now move to the right side of our design to create the exact look that we created on the left side of our design. A twist cutting technique is used above the ear, so we take in a very small section above the ear twisting it between our fingers and in the center. The hair will be short and on the right side, which is the front of the ear and on the left side, which is the back of the ear. The hair will fall perfectly around the ear so that the ear is cut out and it creates a softness. Throughout the ear section, after this little twist cut section has been created, it helps to give the hair in front of the ear it's guy and also the hair behind the ear it's guy in tip number three. Creating small sections to cut is very important in any design and shape that you achieve on any head of hair. Creating a smaller section to cut gives you a lot more precision and a lot of more and a lot more control over your haircut and in this section, you'll see me using the razor on the right side of the hair as well, and the best razor that I really love it's a feather razor and it gives so much ease and potential, especially when you're cutting around the neck area. It'S not easy to cut yourself, it's it has a guard on it, so it really protects you as well as the client, but gives you an amazing look of softness and edginess to any design. At this point, I'm just basically cross-checking the haircut making sure everything is the size to everything and splendid well, and then I go into creating more softness with my texturizing shooters, again removing bulk, creating more texture so that the hair has more flow to it. And it has more of a creative, creative design, as opposed to a very hard look to the hair, so the texturizing she has really helped to remove bulk. It helps to give really a creative look and creates a lot of softness along with the feather razor you. This is the part I love extremely because, as the herons air-drying, you can start to see the shape come alive and also taking an extra added drying method with the blow dryer just kind of switch drying, the hair it helps you start to be able to create More texture, you can see the look coming to life and you can determine exactly what tools you need to use to create even more softness in the haircut. I always like to say that the haircut is the foundation of your design and if you want to curl it and style it, then that is the icing on your cake. So, for instance, if, if your haircut is your cake, then the icing is just that added took that added extra touch that you add to your foundation, but first you need to have a foundation and with the foundation and a creative cut, you don't need a lot Of creative curling you, as you can see, we are continuing to blend the nape area and the back section with the sides, and also the overextended and length of the fringe is being created. At this point, you will see us further in the video using our notching technique using our point cutting technique, also working more with the texturizing tears to continue to create more softness in the hair blend. The hair checking the haircut as we go along and continue to just give this a very creative feel and continue to create our design and watch our design come to life. You this step of the molding process that you see me doing with a little bit of foam on the client is not absolutely necessary. It'S just an extra added step that we like to use because she has a cowlick on the right side of her nape area. I really wanted that hair to just lay down and create a more smooth effect. So that is why you see me actually molding the hair. She goes into the dryer for about five to ten minutes and she comes out and we complete the design again. We truly. We truly believe in creating a cream. We truly believe in creating an amazing foundation with a precise and creative haircut, so that you are not actually having to do a lot of flat ironing to the hair. If you notice, I'm just taking the flat iron to just smooth the hair and it's really just creating a bevel in the hair, so there's not a full curl and you still can see the softness of the haircut the blending that was done with all of the Tools that we use in the haircut and just one soft creative look in this particular design. If you can see at the top of her head, she has a swirl and we did a great job by not cutting that hair too short, so that it doesn't stick up. So this is pretty much the final look of our pixie haircut design and there are so many techniques in this design. So many tools used in this design and please let us know if you have any questions, if you have any comments, be sure to leave them in the comment section also be sure to check out all of the description. There'S some downloads, some free downloads that you can actually take advantage of, and also, if you want to chat about what you're creating in the salon business in your salon, business then feel free to reach out and create or actually schedule a free, CEO success call with Me Chiron, so I'm so excited that you are here watching this video and let me know if you have any questions comments and let us know how you loved it so be sure to like this video subscribe to our Channel. We love subscribers and also comment. We love comments and we also love to connect with the community in hair base from scratch.
Comments
Tami Williams: Love this look! Great tutorial and attention to detail.
Richard Stadler: Great new look.❤️♀️Excellent scissor work. Love seeing long wet hair hit the floor, so satisfying! How fun was that?
Татьяна Тимчук: Очень красивая стрижка!
The Nia Way: