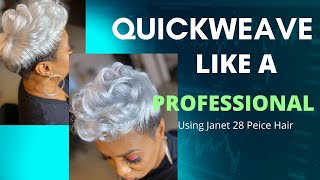
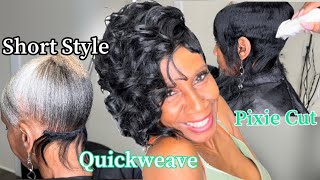
How To: Pixie Cut *Quickweave*
HEY LOVE! WELCOME 2 MY CHANNEL :)
i’m just here 2 express myself freely & creatively through fashion, beauty, & DIY content.
+ don’t forget to LIKE, COMMENT, & SUBSCRIBE + hit that notification bell so you never miss a video
+ you can keep up with me off of YouTube:
IG/TWITTER: @ NYKUME
*FAQ*
name: Kumē ❤️
from: South Sudan
live: Minnesota ❄️
age: 24
height: 5’9
music: https://youtu.be/BDgYqeEF7dY
Hey y'all welcome back to my youtube channel. Today, i'm going to be showing you guys how i created this pixie cut um wig. Here, i'm going to start by dyeing the bundles. I did use the watercolor dyeing process method to dye the bundles, but i should have just used the old-fashioned dyeing method um, because the color did not turn out as dark as i wanted it to be. So if you're going for like a lighter color um, the watercolor dyeing method should work out for you. But if you want a darker color, i um advise to add more dye and less water so that it absorbs more color. But here i am just adding more dye into the water, so i can dye. The second bundle that i have here. I did end up only using one full bundle for the complete look. I did go back and add more pieces to make the front of the pixie cut more full, but yeah. You definitely will just be using one bundle for this look um, i'm probably going to take the second bundle and dye it like a dark brown or a black, i'm not sure yet to create a another pixie cut wig, because i really like the way that um, The wig looked on me. I just wasn't too fond of the color honestly, but yeah you're, just gon na want to let your bundles soak in the water. So they can so it can absorb as much color as possible unless you're going for. Like a lighter look, then yeah just keep um pulling the bundles out of the water just to check to see if um the color is exactly how you want it. Oh yeah, and also when you add your dye to the water, make sure that you mix the dye really well. I did use two different brands, so i believe, like that's where i messed up at, because the colors didn't really mix well um. When i pulled the bundles out, the bundles were pretty much like three different colors. Some parts were dark, some parts were light um and some were like very bright orange and i did not like that at all. So, in the end you will see me um re-dyeing. The bundles, once i completely um, finish cutting it but yeah. So here i am just squeezing the excess water out. I would recommend you wait until um. The water is not so steaming hot, but i did wear gloves so that helped here. I am just pinning um the pieces that i want to sew. Um make sure you place the wig cap onto your head and mark where your ears are going to be at because you don't want to like sew um too much hair there in that area. Otherwise, you're gon na have to like cut a lot of the hair off and it's just gon na be uncomfortable. So yeah when i placed the wefts down, i did cut the wefts, but you don't have to. If you don't like to cut your wefts while you're sewing so here i am just sewing the track down. I have not sewed a wig in so long. I honestly was trouble was struggling but yeah i pushed through oh and also you can just go ahead and glue the tracks down instead of sewing them. I was not gon na wear this wig um right away, so i decided to sew it so it lasts, but yeah. If you're going to glue your tracks down, you want to um place the cap onto your head and glue the pieces down instead of using a mannequin head, because you will be fighting for your life to take it off of the mannequin head. Once the glue has dried and also another thing um, i didn't do this in the video, but when you lay your tracks down, you should take your razor and begin cutting to your desired length. It will save you so much more time. In the end i honestly spent, i want to say, like a whole day working on this wig, because um i didn't cut as i laid the tracks down. In the end, it was a struggle for me to layer, um the hair to the desired um style that i wanted just so it would look like a pixie cut. It was, it was a struggle so yeah. I recommend you to cut the wefts as you lay down, but um here. You just want to um sew or glue your pieces down in a circle um. I started off with a um, incomplete circle and just gradually um closed the circle until it went around the whole perimeter of my head. If that makes sense, i don't know a little space because we are going to actually glue down the closure so um once you are done, laying your last track that you are going to either sew or glue down. We are going to move on to the closure piece. I don't really know how to explain this. So just watch this part, but you're, just gon na put um hair glue onto the weft and slowly roll it into a circle. I don't know i don't know how to explain it. So yeah just watch all right once you are completely done, gluing you're going to want to take a flat iron and go ahead and straighten out the closure, so it lays down properly now. This is where i began: um cutting layers into the hair to give the pixie cut. Um look and honestly, i struggled so hard. I had to take it off the wig, the mannequin head and place it onto my head to cut just so i can um get the desired. Look that i want um, also you're going to want to make sure the back of the wig is super thin, not like super thin, but more thinner than um the front of the wig. You want the front of the wig to be more full just so you can get that pixie cut! Look all right! So here i am just cutting away and i'm keeping a little bit of the length in the back um but yeah just like. I said it's best to just place the wig on your head and go ahead and cut that way. If you did not cut your wefts as you laid them down. But if you cut your wefts as you laid them down, then um you can just skip to like the styling step, where you just want to make sure that the back of the wig is thinner than the front. And you want to make sure that the layers are kind of visible, so cut in a way that um, the back end of the wig, the hair in the back of the wig, is longer and just kind of gradually move upwards, making each layer a little bit Shorter than the other, so that the layers show, if that makes sense, i don't know all right. Once i got my wig to the desired length that i wanted, i went ahead and took it um. I went ahead and just dyed it. I don't know what i'm talking about. I went ahead and tied it um using some leftover dye that i had because i did not like the color at all but yeah. So here i am just waiting for the dye to process and this is the completed look. I did not put any product in it um i did not plan on actually wearing it out um. I actually took it off right after i was done filming this, but so when i do decide to actually wear this wig out, i would advise to add some mousse into it and also spray some like wig shine or something to make it like a little bit More glossier because it's it's getting very much dead and brittle right now because of the dyeing process, but not too shabby. I really like this look alright, so we have come to the end of this hair tutorial. Thank you so much for watching

Comments
I only sub to the people that sub to me: Hi nyakume auntie
I only sub to the people that sub to me: Hi nyakume auntie