Dying And Adding Tape Extensions To My Short Hair! Sassina Hair Review!
Discount Code!: WRSarah
Product Details!:
https://www.sassinahair.com/60-tape-in...
Website: https://www.sassinahair.com/
Hair Material: 100% virgin human hair
Hair length: 14"
Hair color: #60
Hair weight: 50 grams/set with 20 pieces
Tutorials I used:
https://www.youtube.com/watch?v=MMwsVT...
https://www.youtube.com/watch?v=Hh-0nj...
Thanks for watching!
Want to commission me?? Contact me at [email protected] !
Find me on other social media.
Patreon: https://www.patreon.com/Swandzz
Instagram: S.e.wandz
Deviantart: http://sarah--elizabeth.deviantart.com...
Music by:
Title: Inner Circle
Artist: Dan Darnell
Dan's YT: https://www.youtube.com/channel/UCa8T...
Dan's SC: https://soundcloud.com/dandarnellmusic...
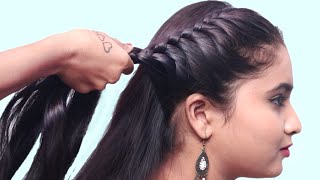
Hey everybody, a swans here, don't mind the poncho. It'S really none of your business. So I'm here today to make a video that is unheard about. My channel never happened before sponsored what this company sistema Scecina hair contacted me and they said. Can we send you some tape and hair extensions for you to review and I said: is it free and they said yeah and I said, ok send it through so here they are. This is what they come with some free little eyelashes cute. Thank you! A comb. Some extra whoop extra tape for the extensions in case you need to replace the tape or you want to reuse them and old. Thank you card, so I got two boxes of blonde extensions and the reason why I got blonde is because I'm going to dye them to match my hair, but I'm going to do a sunset theme super-excited. This is what the extensions look like. They'Re very soft, very nice. I don't have much to compare them to because I've only ever had that other set of black extensions. I got off Amazon, but we're gon na see how they die and what they look like when we, when we get them on. They are 14 inches and I have two sets of those and, like I said, I'm gon na do a sunset, so I'm gon na fade from like this fuchsia color. I don't know if I want to go darker and then go lighter and go into orange. I'M not sure I'll figure it out when I lay them out to dye them, so I do want to say at the top of this video that I wouldn't necessarily call this a tutorial. Okay, it's a review of the product. I will show you how I'm dyeing them and how I'm putting them in, but you really should seek professional help. Not from me. Please don't. Hang your hats on my hat rack. It'S full! My hat rack is actually just a spooky ghost. You know. Sometimes, at night things look like things they're not and like hat, rot, hat racks, look like ghosts but they're, actually hat racks. This is the other way around. So anyway, I am going to start by dyeing these and then we're gon na. Let them died and then we're gon na take them into our head. Super excited okey-dokey, ladies and gents. Here we are with our extensions, which we are going to die like I said in a sunset color scheme which I've never done before, but I think I can manage now. My preferred dye of choice is typically ion. I just you can get it from Sally's. I just think that the color comes out really nice, so I've got some ion, but I also have some splat, which is that cheap drugstore hair dye that I'm also going to try and use actually correction splat is more expensive than I own, because it also comes With bleach, but the color itself is not as good as ion now. When dyeing these extensions, we are going to try and avoid the tapes. You can dye all the way up to the tape. However, if you get them wet, you're gon na have to replace the tapes. So I'm going to give myself a little bit of a buffer because I don't want to have to replace the tapes and we're gon na see if we can do it without having to change them afterwards or get them wet. So without further ado, I'm going to angle the camera down and I'm just going to get started dyeing here are the completed sunset guide, color extensions. I actually use a crap ton of different dyes. I used yellow, pink blue purple and I mix them all together to get the right gradient. Now I am going to heat them with a blow-dryer to help the color set and we are gon na leave them to basically just die and I'm gon na clean up. My area, while they are cheering and then we're gon na wash them out and below dry them. Alright, friends now comes the part where we may or may not just completely ruin everything. Okay, so I'm gon na use this comb to section my hair and it's really simple to install these. I would recommend using a tutorial that goes in-depth. I will link to some in the description so that you can really see how to do it, but you're, basically gon na brick lay them so like one. Two three went like that: okay on your head, you want to make sure that the piece of hair that your sandwiches - let's just do this as an example. Okay, it's like, let's just say like that's my section: okay, the piece of hair that you're gon na sandwich within the within the extension needs to be the same width as the extension itself. You don't want it to be too thick. If it's too thick, then the two sides of the extension will not adhere together. So something like this is a good size to sandwich in between. So now, I'm just gon na get started. Adding in my extensions, the orange didn't come out as well as I would have hoped, but I think it looks good and I'm the kind of person who just likes to go with whatever so we're still gon na put them in and don't mind my ugly face. Let'S get started so because my hair is short. This is gon na be easier for you if you have long hair, but because my hair is short, I need to make sure that I keep enough length to cover up all of the extensions. So I need to keep enough length that I'm not going to put any extensions in. So I think I'm just gon na go ahead and section that out first, so that none of this is going to have extensions in it, because I need it as my top layer to make sure that all the extensions are hidden. And actually, I might just take a little tiny bit more than that. Actually look. I exposed myself look at look at it good job. I did dye my hair, you guys. Oh my gosh got my two extensions, peeled and ready to go. What I'm gon na do is take the first section that I want to use. I think it looks pretty good so far I mean, thankfully, the top part of the extensions blends pretty well with the color that my hair already was, so I think they will be. I think it'll all be well blended and hidden by the time we're done, which i think i mean we're almost done. I don't have a lot of hair, so I have to really fit as many of them in there as I can to try and get like a full head of hair. But if you have longer hair, you won't have as much of a problem as I do. However, I do want to show you guys that it is 100 % completely possible to have tape and extensions with short hair. I actually did one other video before this, which was the first time I ever did tape in extensions, and that will also show you that I put them into my really short hair, so it's definitely doable okay, so I just placed the last sandwich, and now I Need to go back into the bathroom, so I can cut some layers into the hair so that it will blend in with the length of my actual hair better. So, let's go do that once again, ladies and gentlemen, hair you haven't, I think it came out really cute. She looks really really nice. I like how everything blended together, it's a nice moment. What do you guys think? The only problem I ran into is, I did not save enough for right here on the back of my head and that's because I was concerned with fitting them in on the top, but I could have saved the sandwich or two for right there, and that probably, Would have been good, but besides I I mean I really like how it came out. No complaints here, I think the colors blended together really really well looks really cute with a little curl to it, and these were 14 inches. So they're not too too long and again I had two packs, so it was definitely enough to do the top of my head. If you had hair, it would be enough to do your whole head like to give yourself some layers and some length, but because I don't have a head of hair like I need, probably more than you would need. I think I'm super excited to play with it and take some pictures and yeah. I really really like how it came out. I'M thinking I could probably also try to wear it up, because I think I'd put the extensions in in a way that I could hide them, but we'll see I'll play with it some more later, but yeah. Let me know in the comments what you guys think about how it turned out and remember: there will be just count: codes down there, that you can use to get some percentage off I'll, write it in there, because I'm not exactly sure what they are yet so I'Ll put them right here so that you know the exact amount. So thank you guys very much for watching. I hope this was helpful, even though it's not supposed to be like an educational tool like a tutorial, but I hope it was a helpful review of Sistina sestina hair and I will also link to their website below as well and yeah. I think the hair. Actually, you know, I think it was really nice. It took the dye really well and it's still nice and silky and smooth, even though I processed it a little bit. I am now going to take a moment to thank my patrons. Thank you guys so much for all your love and support. I look forward to mailing things to you guys this month and I will to you to try and put new exciting stuff up on there to bring you the value that you deserve now I will verbally thank my diamond chair patron. Thank you so much Lindsay. You are awesome and I will catch all of you guys in the next video bye. Okay, you click all my little buttons, you click my subscriber circle or the video or playlist that is listed below. You will also find a link down there to my patreon, where you can support me for as little as one dollar a month.

Comments
Sara A: They are perfect for you and I love the colors! <3
Aaliyah Bowling: You are so gorgeous! And you’re wearing these colors so well!
robert smith: love it very cool i always wondered about tape ins and how they work looks very easy for one to do it by themselves thanks :)
Vera M: Omg you did an excellent job. You would be a great beautician too.
BabyKrogan: It turned out awesome!
Volo Antique Malls: Can the tape root be dyed to blend into your hair more?
Lea Seberg Fladstad: Has anyone else started wearing extensions also just because you have also had problems having short and thin hair for a long time and not been able to get long and thick hair again which you don't have patience or not even have time to wait for some special reasons as me? How long can tape extensions be on hair before it had to be removed, can it be used again several times on hair, how long can tape extensions be on hair before it had to be removed, how long do I have to be without tape extensions before I can wear it again, how long can it last before it gets worn out, how many tape exensions do I need for short and thin hair when I want long and thick hair, how can I keep it on my hair without it falling off, does it feels natural like our own hair when we wear it, will tape attachment be invisible on short and thin hair, can it make hair worn, how to blow-dry my hair and tape extensions without it being worn if tape extensions have to be blow-dryed every time I wash both my hair and tape extensions and do tape extensions need any other products than just extra tape, remover and another shampoo and conditioner?
Livvie Badovinac: Love it! <33333
Amanda Thomas: i try to always replace the tape right off the bat seems to last longer. im in the process of cleaning all my extensions tape off right now to replace them lol #SUCKS lol
Darkreaperqueen: I love it!!!!
Amanda Thomas: are you heating the tape? i was under the impression that was bad and a dont do? does it work for you?
Mazais Ļenuļis: You Are Beautiful!
mr vigilante: nice look
Jayde Davies: Looks great. But wish the tapes were more invisible