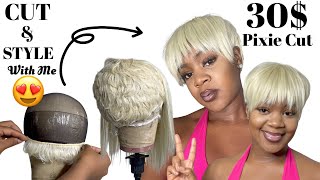
Diy| How To Take Your Hair From Big Curly To A Short Pixie Cut!! Summer Hairstyle
Hey beauties ! Thanks a lot for watching ❤️ if u enjoyed this video please give it a thumbs up if you are new here please hit that SUBSCRIBE ❣️❣️ !!!
Connect with me on these social media platforms:
Instagram➖ naturaljonet (joanette boreland)
Instagram➖ naturaljonet (joanette boreland)
facebook➖ naturaljonet
snapchat➖naturaljonet
email➖ [email protected]
Here’s the link to this unit https://www.wigtypes.com/sensationnel_...
Hey guys welcome back to my channel and thank you so much for checking in with me today. Well, in this video, I'm gon na show you a team that, with which I'll leave all the details in the description below from just a big curly wig, with not much shape to something nice and short and spicy a kind of throw more kind of thing going On you guys will see well, this is what a wig look like before I cut it. It was like I want to speak like two or three times, and I didn't really like it too much so my intention for this video was to cut it down a little bit and give it a little bit more of a shape. So what I did is I put the wig on my 22-inch head on this mannequin head from amazon.com. I try to leave a link to that below and it's the 22 inches. That'S the perfect size of my head. I really do have a big head, guys yep. I know it's okay, but yet what I initially wanted to do with this wig was just the cut it down a little bit, take like 2 or 3 inches off it and that's what I'm doing there. So what I did was, I just cut it down going all the way around, and you always want to make sure that when you're cutting curly here you're old and the scissors at an angle, so that way you don't end up with your straight blonde curls. We end up with something a little more tapered, so that way it looks you know more uniform. It looks better. So that's what I did and I'll just keep turning the head back and for just Lee you guys to see how I'm cutting and what I'm cutting. So that's the first amount that I did cut off and then, after that I just continued cutting so I'll. Let you guys watch and see how I cut it. I want to end up with once you want to make sure that we always want to know where the back of the wig is, because you don't want to cut it too low and cut off too much of it. Remember that you're gon na need a little bit more length in the back just to cover up your little hair is in the back and things like that. Okay, and that is another round of like toward 3 inches off. You see, like I'm doing same thing, going all the way around and there and then that's what I end up with there. I am fitting for the back just to make sure that I know where the back is and I'm not cutting it down too low. Then what I'm gon na do is try to like shape the back a little bit, so I'm gon na go in at its eyes, but still leave in the land still even enough length to cover up my hair, if that makes sense. Okay, but I'm just gon na try to form a shape in the back, so that when I put it on my head, I kind of have a guide and know how to cut it down even more and then what I'm gon na do is just snatch. It off the mannequin head and just put it on to mine now this unit do come with three clips two in the front, one in the back, I'm just gon na secure those clips onto my hair. We still have those two small corners in the front because that's the weirdest, the part, would be like the section of the wig in the front. So I just wanted to lay really flat so that series well put those two small corners there and then I'm gon na continue the cutting process. Okay. So what I do is, after I put it on. I just continue to cut it down even more so I'm just gon na try to take her down the sides, especially a little bit more so here you could see me cutting off like another inch to torso off the hair, especially in the fat and now what I use, as my guide is just to make sure that I cut out the section where my ears is so you could actually see my ears and that's what I use as my guys, I'm just gon na cut away any hair. That'S there until my ears is like totally visible and then I just continue to taper it down after I cut my ears out, okay, and what I did is I try to keep the top a little bit. More polymers are a little bit more fluffy. So I didn't cut down too much at the top, but I made sure the like really cut down the sides as much as I could possibly cut it down without it. Looking you would all cut in too much, so I'm just gon na continue, cutting and shaping until I kind of get this wig, whatever the vision that I add in my head at this point and yeah, so you guys could just cleansing and you guys will see What I hand up with after finish, cotton achievement this week, okay, and so I thought, thought I was finished and I went ahead and I put some correctively and mousse in my hair just to smooth it out just to polish off everything help to form the cross. Even better, especially towards the end where we did all this cutting, so that's what I did and then I thought I was done cutting, but anyway I also put some bobby pins in it. Just extra security, you don't have to bother me and know it may get windy outside and just in case. I want to make sure that this ain't going nowhere honey. So I did put in a few pins. I mean I'll, show you how much I put in but yeah. That'S it and then that's what the void looked like before I went out and came back inside. I thought I was done cutting, but I just went out and came back, and I realized that I kind of want something like a little bang right here. Instead having it like this kind of look. No, I just want to cut a little bit. That'S it! I, like the way with it, looks like that, so what I'm gon na do with this, I'm not gon na cut it big chunks like I was born scissors happy in the rest of it, I'm just gon na. Do it, like you, know, a little stroller, sliced ones or section by section, I think remember when your cotton pros will not hold it, especially for the black area right here you wan na, like you're pulling on it, so you want to cut it like right here. Like really short, because when you let it go, it's going to shrink back up, I don't know what I'm doing, but I'm still scissors after what is here so I'm good cutting yeah. I think I like this better now. You know you're coming to look a little bit, but one of my friends told me I was looking like somebody mama, I'm not trying to look like nobody mama yet so you know I'll make it look a little bit less like somebody's mother gasps. Now, when looking like nobody's mama, so this is the finished look, I think I'm done now, I'm not cutting anymore. You know yeah. I hope you guys enjoyed this video and, while you're at it. I hope you guys don't mind. Checking out a few of my other upload and yeah, don't forget to thumbs up and leave me a comment. Let me know you liked this star. Oh yeah. I really like this so I'll, see you guys in my next one bye, y'all, you

Comments
Bernice B: Hi NaturalJonet, the wig looks good how you styled it. Your makeup looks so pretty! Thanks for sharing!
Phyllis Jones: This is great!!! I'm going to try this. Good job!
Mitchka Leon: pixie cut is a gorgeous look on you.
Renee Martin: You did a great job Joanette
Michael Wife: You done an amazing job looking good!
Tyesha bush: Hair looks amazing!
tamoya simpson: looking gorgeous as usual JB now i wonna wear a wig over my locks! hey, i need styles for my locks!☺☺ love the look hun...
La Familia Feliz: Hi jo ....I just started a new channel and decided to drop by and show some luv i loved this look on u
Dorothy Cox: Wow! Whole lot of cutting this wig!
Lavern Black: Love it beautiful
MsPositive: Hi, new sub here, pls tell me where I can get this wig, ty
Xoily Lynn: Omg I love it
Sogo Smile: Too cute...
ALESSANDRA AKUBUDE: I think the wig looked nicer from the package than that of the pixie.