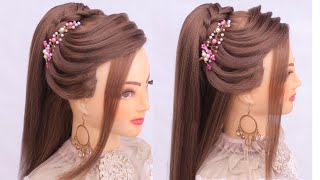
Detailed How To Install A Lace Frontal Pixie Wig With Glue. How To Melt Lace Frontal Tutorial Part 1
I'm demonstrating how I install a short curly lace frontal pixie wig with adhesive. This is part 1. To see part 2 click the link below!
Like and subscribe! :)
Products used
13*4 curly pixie wig
ghost bond
got 2 be freeze spray
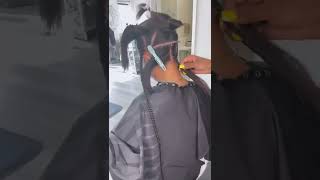
Hey Queens, thank you once again for choosing my channel today, I'm gon na be demonstrating exactly how I need this lace. Frontal, pixie wig, look exactly like my scalp, so this unit was applied with glue today. Normally I do clueless units, but today this is applied with glue. If you want to see how I made this look, so natural continue watching. Thank you for choosing crown latisha do not forget to Like and subscribe okay, so we're gon na be starting with the lace front of pixie wig. The wig is six inches. It is cut shorter at the back. It came already pre-cut. I did not do any cutting to it so now, I'm gon na be bleaching the knots bleaching, the knots assist with making the lace look a little bit more natural, not necessarily the least, but you know the roots of it. If you don't bleach, are not all you're gon na be basically saying is a bunch of black dots so bleaching the knots assists with once you're partying or when you're doing baby ears. It just gives it a much more natural look like Oh way, more natural appearance. So I'm going to have a bleaching in knots, I'm leaving the bleach on for 30 minutes. You do not allow the bleach to seep through you. Try your best not to allow it to seep through. So you don't put too much pressure when applying the bleach. So I'm just showing how I should look underneath - and this is how you know when it's done. You'Re gon na get some pieces will along the front we'll get some bleach on it. That'S fine, so you should be seeing just a little bit of blond at the front. So here I'm just washing out the bleach making sure to get all in between, like the crevices and everything getting all the bleach out and I'm gon na be following it up with some purple shampoo. We call it shimmer lights, a just a purple shampoo once you say: purple shampoo, the people in the supply store know exactly what you're talking about. So I just rub it all: underneath the frontal not in the hair greasy and that is gon na sit 15 minutes, then we wash it out. I didn't include me rinsing it off with conditioner, but I use the Tresemme conditioner to unconditioned my wigs, so they trusted me. I I just put it on my letter washer constantly and I'm also attaching an elastic band to the week, simply because it's easier for me, especially when applying and then if the wig starts, to lift in some places. At least I just feel more secure that it's not gon na fall off and I do remove the combs from right behind the front because they are knocking. They can stick me in my scalp and I don't want that. So I'm just gon na be tweezing straight across the hairline to any stylist to anybody just trying out. Tweezing is trial and error really and truly there's no exact way to tweeze. I can tell you how I too easy. I can show you how its fitted, but when you go ahead and tweeze, it is still trial and error. You just try not to sit in one area too long. We just continue plucking and moving plucking and moving that's the best way. I can I'm say, but it was really really trial and error. Just keep on keep on keep on going, but don't sit in one place because you can cause balding make sure to check your work after you're done. This is why I use my big beautiful bottle. Brush and I keep checking as I go to make sure that I'm not over plucking and I don't sit in front of the hairline when plucking I try to get behind the hairline to take out the density from the back. You don't need the back to go too heavy. No, like I said before, I can't tell you exactly how much to pluck to each his own. I just try to make it look as natural as possible, without over plucking or without under plucking too, because they can just be too clingy. Sometimes I'm satellite, with the look once you're satisfied with how it looks then you're welcome to move to the next step, but keep checking your work to make sure that you as the stylist or you as the just amateur, prefer, whatever we wish to call the person Applying the week make sure you are satisfied with the blocking before you go ahead and put it on so here, I'm just gon na be putting on the weight just to UM line it up. Just to you know where I'm gon na be applying my thoughts and my thoughts. I just mean markers because I use markers to indicate exactly where I'm gon na be applying the glue. The glue doesn't necessarily go on top of the markers they stick. Glue really doesn't really touch the markers, but the the markers are there so that I don't go over where they are so you mark straight across the hairline. At least I do I mark straight across the hairline, and it's easier for me that way and applying the elastic for me is also easier, because once I want to take off put on take off put it on, I don't don't worry about trying to too hard To keep one side down or trying too hard to keep the next side down the lozenges, it is out of the trick. Now, I'm just applying the glue. This is go spawn. I love goes born, it stays on longer. For me, I have a medium skin, meaning that it gets oily in certain places like the t-zone and when you're wearing a frontal. The t-zone is not really a good place to be oily, but the ghost bone really really does hold it for me. So that's the glue that I've been working with from my clients experience the cool spot. It stays on sometimes upwards to two and a half to three weeks before you really need a touch-up, and now I'm just applying my wig over I'm making sure to line up the markers from the frontal to the markets that are still present on my skin. That is very important. That'S why we just don't write the markets off right away. You try to line it up with where the markers are on the frontal to where the markers are on your skin and that way we don't over applied or we don't put glue in the wrong place. Everything and it should be where it should be. So that's just one marker, that's another marker just make sure everything is in place, and this is important to do before we take the or before we rub the glue in make sure it's lined up properly before you rub it in and now I'm just gon na, Be using the cool to rub it in. I use a comb versus my actual finger simply because the fingers have a lot of oil in it and then now so it's kind of hot. So we don't need sometimes didn't you realize that our hands are sweating or it's only and you just rub it into certain places. That would be terrible for rubbing it into the hairline, while you're gluing, simply because when you're gluing it down glue, ticked oil takes our glue. So try not to use your fingertips as much as possible and I'm just gon na be cutting off the lace from the front try to cut as close as possible to the actual hair. We do not need a big line of lys anywhere around the hairline. I know some people say that they cut like half an inch or like just don't. You can actually see the lease in person and it's not cute to have a big gap of lease in the front of you. So try to cut as close as possible to the actual hairline if your hairline is plucked properly and if you're not a bleach properly, then that shouldn't be an issue. So I just continued cutting off the lace and I'm just touching up any areas. What I normally go outside cut the leaves I will just pull around the front just to me like that, just to make sure that everything is glued down, where it's supposed to be anything that lifts when I pull need some extra loving, and I give it that So I just cut the rest of the lace off-camera around the front of the hair lines are several white cats. That is fine, because the glue isn't 100 % dried, so that is okay and that is completely normal, and then there are still markers in some places. So I'll go ahead and clean out of our camera with a 99 % alcohol on a q-tip. I try my best not to get it too close to the drying. Hairline. Okay, ladies, so, if you want to see the Starling video, you can just click the box right here. I'M gon na also include a link right in the description for part, two, that's inclusive of the Starling. How I leave my baby hairs, how I styled the front and everything will be followed in the link below there's, also going to be a link for you to click right on the screen and if it doesn't show up on your device, because I know sometimes on The phones, it doesn't show up, the link will be for part. Two is in the description. Thank you so so much for watching, but we're going to be moving to the next video so that we can see exactly how it should lay these edges.

Comments
Beauty with Nae: Love it. What did you use to mark it?
Michelle Haywood: Where did you get the wig.