Part 1: Diy Affordable Pixie Cut Frontal Wig | South African Youtuber
Hey beauties!
I've always wanted to make the perfect pixie and now that I finally have I'm showing you how to do it all by yourself.
Don't forget to leave a comment below an wait for part 2 to see how I installed it.
Connect with me:
Instagram: Delecia_K
Twitter: Delecia_K
Music:
LAKEY INSPIRED – By the pool
Patreon: https://www.patreon.com/lakeyinspired
» Spotify: https://goo.gl/aLkwM5
» SoundCloud: https://soundcloud.com/lakeyinspired
» Instagram: https://www.instagram.com/lakeyinspire...
Stay safe!
Produced & filmed by
**Daniro Visuals**
IG: Daniro Visuals
Email: [email protected]
#DVisuals
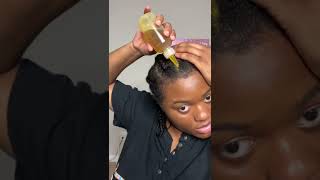
Hi guys welcome back to my channel. Thank you so much for watching and tuning in today, I'm going to be showing you guys how to make this beautiful, pixie wig from scratch using affordable products, so stay tuned. First things. First, you're gon na need a mannequin hit. Some training, a piece hair clips or pins dome cap; a frontal you're bonding glue, highlighting kit for a bleaching kit, as well as purple shampoo and your styling, and sewing utensils as well as clothes that you don't mind missing up, so try to wait. Some old coats, okay, unboxing the 28 piece. Here it comes with this little closure which we're not going to use because you've got our frontal. And then you just take the hair out of the box, and you see that it comes with a little stocking cap as well as a vinyl cap, we're going to use the vinyl cap, the stocking cap we're not going to use because we've got our dome cap. The vinyl cap, which is basically a plastic cap that is going to help protect our mannequin head from staining from the bonding glue. So we just gon na put that first before we put our dome cap onto the mannequin head, so once you've fitted your dome cap onto the mannequin head and you make sure that it's in the correct position, we're just gon na, take some pieces off the hair And we're gon na take one strand or one row of the 28 piece here just to show you guys what it looks like then you're gon na take your frontal, and this is how I usually set my front toes. I pulled them about one centimeter through in front of where the dome cap begins and then I pin it in the middle, and I pin it right at the back just to make sure that it's secured and that it's in the right position once I've pinned it At the back and make sure that I pin it on the sides, but in a straight line, so you don't push you don't push the frontal to the side or backwards. You try to make sure that it's straight in line with the middle pin. So your frontal needs to make an M shape in the in the front. When you look at it once you've pinned your frontal down, you can then take your needle and thread and start sewing. So I use a normal straight needle curved needles are apparently better, but this is what I use and I'm okay with it. So I loop my thread twice or three times depending on I don't know if the Sun is out, and I do that throughout the entire thick black pen and then when I get to the normal part of the dome cap, I just saw one. Oh, I just not one or two times then you're gon na take a piece from your 28-piece hair and you're gon na measure it at the back of your head to make sure that you're going to clue down the correct size once you're done cutting it. You just want to apply some glue. You want to make sure that you are putting your first piece of hair up slightly above with a elastic band of the dome cap is simply because you want to make sure that there's no bulkiness at the back of your hair. Remember it's a pixie! So, the next week there is at the bottom or at the back, the better. This glue applicator made me so mad guys and I'm gon na show you guys just now what it looks like and why it made me so mad that Decatur is very impractical. It didn't have a normal opening like in the middle at the top. It had two openings on the side, so basically I had to wait for the glue to run down for me to be able to apply it, which was a very frustrating and tedious thing to do, but we move so you're, just gon na literally paste your piece Of hair on the dome cap - and you don't need any heat - you just press it on and include in it dries down within 30 seconds, and it's stuck on. I want to continue doing this process for all of the bundles, going up just making sure that there are fingers worth a pot and taking it all the way to the top. Remember at the bottom, you don't want any bulkiness cuz, then you're gon na spend hours trying to taper it did you guys see the applicator yeah yeah that applicator? So if you got some of the glue on the hair, don't worry about it. It does become like a rubbery kind of texture, so you can easily just take it off and I'm going to continue to just add those rows of heel, all the way to the top, using a makeup marker to mark where I want to lay the hair. So this is the tricky part. Cutting here is definitely not my favorite, because I always wing it and you never know how it's gon na come out. So you just swing it literally cut. I would suggest they could get a shearing comb and, like just appear scissors, maybe some clips. This is the part where I realized that the frontal and the 27 piece hair are not the same color, so I went and bought an affordable dye and literally just mixed. It and died only the frontal. You want to make sure that you're mixing the tube as well as the liquid. Please make sure that you only die your front and I'm not the 27-piece here, because you've glued it and if it gets in touch with water, then the glue will just dismantle. This is the part where you see me trying to be Rambo or something you need to wear gloves. Please don't be like me anyway, gloves and we're now gon na, take out the vinyl stocking cap or the plastic cap, and it's obviously glued to the dome cap because of the glue used for the bonding, which is good because that protected our mannequin head. I'Ve now watched the die off and I'm just going to cut the extra dome cap. You want to make sure that you cut this, or else you just end up you're gon na end up looking crazy. Your frontal won't be as beautiful as it should be at home, yeah just cut it off girl cut it off. You want to make sure that you're cutting a centimeter away from where it meets what the front, or else you might just cut some of your tracks and then you're gon na start reaching your frontal again. I don't know if I sit this, but please make sure you do the bleaching as well as the dyeing before you make it into a wig. I think I was just so excited to do a pixie that I did everything in the reverse motion. I'D suggest you do this first before it even becomes a wig, so I'm just gon na use some of that teaching powder, as well as the peroxide mix it and use a butter knife to mix it, because I'm going to use a butter knife to apply the Bleach on to my frontal, you want to make sure that it's a perfect consistency, not too runny in not too thick. I'Ve set a timer for 20 minutes for the beach to work once that 20 minutes was up. I just washed it off use some purple shampoo and now I am blow-drying my hair and I'm blow-drying just the front row, because all I did was wash the frontal again. Please make sure you wash it on your front. At this point, I realized that I burnt my frontal with the blow-dryer I burnt my frontal guys and I was devastated. What am I gon na? Do look at that big hole that is insane, but never fear when Denis is near just make sure you stay tuned to watch part 2, where you see how I cut the lace, so you can see how I got around cutting the lace where I burned. The frontal so yeah there is a part to please make sure you stay tuned to watch that so now, I'm just styling the frontal making sure that it blends in with the 27-piece hair. So I'm gon na take one row at the back of one row of the frontal and try to make sure that it blends in with the 27-piece hair and flattening it to make sure that we don't have a wrap, a line of thread. It just looks like scalp, which is actually the frontal. Then I'm gon na use some of my revlon flicks use and I'm going to use that to style the pixie. This is gon na help mold it and give it the shape that it needs. So I'm literally just putting it all over the front. Oh and it is scalped honey. It is molded with the burnt frontal, it is molded. You


Comments
Joys of Anathi: That wig turned out great. Cannot wait for part two!
Lesedi Baloyi: This is absolutely beautiful ❤️ you nailed it.
Ubi Ogulu: loooove this! And you made it look so easy!
Faith M: I’m here , your voice is so soothing. Can’t wait for part two, I need to get a frontal to try this out
Olebogeng Makhutle: I don't wear wigs and all that nice jazz but listening to you makes me want to make this Love the video
Anza M: Hey, there . Would you ever consider selling these wigs. It looks so good
Phiwo Mzizi: Hey Delicia, girl ‘z running low on data.. but none the less, Im here to show you some love.. And plus I LOVE LOVE what you did with this hair
tsaki ❤️: Your amazing
Noxolo khumalo Mashobane: Hi there, Where do you buy your frontal laces?
Nqobile Luthuli: Love this ♥️♥️. Where did you get your mannequin head & stand?
Lesedi Baloyi: What length is your frontal ?
Tapiwa: where do you get your frontals?
Olebogeng Makhutle: Your voice in a voice over Back to the video now
Nyameka Tshangela: I'm scheduling a private lesson after lockdown.