Flip-Over Method + Super Versatile & Easy Quickweave | Natural Girl Friendly (No Heat Required)
- Posted on 25 July, 2022
- Pixie
- By Anonymous
Hi my loves, welcome back to my channel
Hope you enjoy this highly-requested video and be sure to check for links below ✨
BE SURE TO SUBSCRIBE, LIKE, COMMENT, & TURN ON POST NOTIFICATIONS!
HAIR USED - www.twelve22hair.com
Virgin Brazilian Curly (2x16" & 1x18")
https://www.twelve22hair.com/product-p...
Follow us on Instagram for updates: @twelvetwentytwohair
PRODUCTS USED (can be found @ your local beauty supply)
Bold Hold Liquid Gold - https://thehairdiagram.com/products/bo...
Roberts Diamond Bond Protectant - https://www.amazon.com/Roberts-Diamond...
Nairobi Setting Lotion - https://www.amazon.com/Nairobi-Wrapp-S...
Kiss Argan & Macadamia Leave-In - https://redbykiss.com/products/argan-a...
Salon Pro Glue
2 Wig Caps
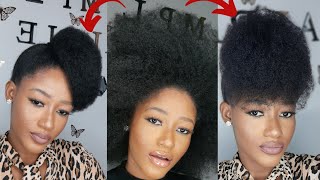
What'S up guys and welcome back to my channel, if you are new here, welcome sis and thank you so much for clicking on my video. So today's video is going to be the highly requested versatile flip over quick, weave um. This one is specifically for all my natural girls out there that don't want to put heat on their hair um, don't want to worry about pressing out their leave out. This is perfect for you, so if you're interested then keep on watching so right here, i'm just sectioning off my leave out now. This part is critical for flip over versatile, quick, weaves um. The reason why you can flip them over or they're so versatile is because you leave a lot of your natural hair out that will cover up the tracks, um, and so i wanted to put like i wanted to have like a section in the middle, not too Much leave out in the middle but something to where i could really make this versatile. So i could do like a flip over method or i could do a middle part um. I i have so many options with doing that middle section. You can also do it by just like leaving hair out around your perimeter, but, like i said, i wanted a ton of options with this hairstyle. So that's why i did the middle part leave out as well um. So, as i go around the perimeter, i'm gon na leave out a lot of hair um. Again, that's what makes this really versatile and, like flip over method e, i guess um by leaving out a lot of your natural hair. It'S able you're able to easily cover up the tracks and it just kind of helps to make this look very seamless, so so now we're going to get into these braids. I give this disclaimer all the time girl. I am not a braider. I am actually not good with braiding, so my braids are going to look like who done it and why? But that don't matter because ain't, nobody gon na, be able to see my braids. You just need some sort of foundation to lay your cap and your tracks over. So don't talk about my braids but they're good enough to get the job done so for this method, i am going to go ahead and sew. The ends of my braids in between each braid just shake a needle and thread curved needle, preferably um. That way, you don't stick yourself as you're, going through the braids, but lift up the end of your braids and place it in between each braid and just sew it down until it's nice and flat. So now i'm going to go in with my bold hold liquid gold. This is actually for lace applications, but i use it for my quick weave methods, um and i actually like to apply this directly on my natural hair because it doesn't have any alcohol in it. So i really like that i'm just gon na apply a thin layer but good enough to protect my natural hair from the glue um, but don't make this too thick because girl you're gon na be trying to dry this for hours. Okay, um just apply a nice thin layer just enough to evenly coat over all of your natural hair and then the next step is to dry that coating that bolt hold liquid gold with blow dryer sit under a dryer whatever you want to do, but you need To make sure this stuff is completely dry before it moving on so now we're going to take our two wig caps and apply them over our braids i've seen some people like sew around the perimeter of the wig cap um with the braid i'm just gon na Place the cap on my head, like i'm, not about to do all that. Whatever method you choose to do is completely up to you, but i find my caps to be nice and secure, because when you go over the caps with the robert's diamond bond protectant once that stuff dries, it kind of like acts as an adhesive for the cap. If that makes sense like it's, what really keeps your cap in place like you, can't really lift your cap up after this stuff is dry, so no need for me to sew down my cap or anything like that um. What i'm doing right now is good enough. So for this look i'm going to be using hair from my line, of course um. This is our newest texture that isn't out quite yet um, but i am using three bundles, so i have 118 to 16. um. I actually preferred to have 218 and 116, but this is what i had so i said i would make it work, and i did so the way that i'm going to lay these tracks, or at least the first few initial tracks is, i'm going to angle them All the way upward, so i'm starting all the way at the top where my leave out is and just carefully laying the tracks around the perimeter of basically where the cap starts or where the cap sits, um and then, like i said, i'm going to do like The next two tracks the same way and this just kind of helps the hair to like fall in my face, instead of like on the side. If that makes sense, and using my blow dryer to help the glue dry a little bit faster and make sure everything is nice and sealed so so for this track, i'm not necessarily going all the way up um, but instead now i want to start to kind Of fill in the spaces in the back um, just so that i don't end up using way more hair than i need to. I felt like if i continued all of my tracks the way my first few initial tracks were laid um. I would just be laying tracks forever so now, i'm just going to go in and start to feel the space in the middle. Until i get to a point where um everything starts to be a little bit even and then i'm going to angle them upward again, wow, so all right. So this is what we're looking like, after laying all of our tracks, a slight mess, but we're going to get it together, um, because that 18 inch was so much longer than the 16.. I just wanted to cut the ends a little bit just to kind of give it more of a seamless, layered look um. I don't know i just felt like it needed to be blended a little bit better. Like i said, if i would have two 18's and a 16, i may have not needed to cut it um, but just gon na go in and cut a little bit of the length off the ends and then, if you notice the way, i'm cutting is kind Of like a downward angle with the scissors, and that just helps to give it more of a layered look instead of like a blunt cut, look so so now we're just going to lay these edges down a bit um for my sides. I decided to wet them a bit to get them to blend with the hair, because my sides are pretty curly. I felt like that would just be the easiest and then for the top of my leave out, i'm actually going to use flexi rods to get that to blend um. But i i don't know i don't know what the difference is. I don't know why i chose to wet the sides, but i did so that's what i'm doing here so so for the flexi rods. I chose the diameter of 5 and 16 inches. I don't even know how you say that, but i'll link them below um. I put the information below and then i'm just going to go in with my nairobi setting lotion to help blend everything together, my natural hair and the weave comb it out to make it smooth and then you're just going to take the hair and just wrap it Around the flexi rods, honestly, this is only like my second time ever using flexi rods, so i don't even know if i was doing it right, but i think i was so once you wrap the hair around the flexi rods. You just want to bend the end. So that the hair can't unravel um and then just bend the top and let it sit there - that's pretty much it um. So i divided my leave out into four sections and it did the same method for all four sections. So so so so now that i have my flexi rod in i'm just going to go in to the rest of the hair and wet it a bit and add a leave-in conditioner, i'm going to be using the kiss, argan and macadamia leave-in conditioner. This will be linked in the description box below, of course, but i'm not going to use a ton because i don't really want a ton of prod like. I want my hair to be a little big and full um. But i don't want it to be super frizzy, so i'm just going to use a little bit to help prevent frizz. But i really like this stuff because it doesn't leave your hair feeling greasy. You know what i'm saying: if y'all have used like curly, hair products or leave-in conditioners, then y'all should know what i'm talking about, sometimes like certain products will leave your hair feeling extremely greasy and just like oily and it's like yeah nah. I don't like that. So um, that's what i really like about this product um again, not using a ton, maybe just like a dime sized amount on each side, all right! So now it's time to take out our flexi rods. Let'S see what we're working with honestly this first one came out perfect, the other one's not as perfect as the first one. They honestly weren't completely dry. They could have dried for a little bit longer, but i was being impatient and wanted to finish filming this video. So went ahead and it took them a loose um. There is a smaller size than the flexi rods that i have here that you can buy, but i think these are good enough um. I think they help kind of blend my hair and the weave together. Well enough, so i'm cool with these um. I used a handheld blow dryer to help speed up the drying process. But if you want to like do these at night and like sleep in them and whatnot, they should be dry by the morning or you can use a handheld dryer like i did or sit underneath the dryer et cetera. But the point is you want to make sure they are completely dry before you take them out. Otherwise, the curl pattern is not going to be exactly right, like you can see with that one right there, but it was good enough for what i needed it to do so. Um, i'm happy with how it came out. Okay and she is cute y'all. I'Ve actually never worn my hair, like this um, never really had a part in the middle, just curly, hair falling in my face. I actually like it, gives me a bit of an idea of how my natural hair would look if i let it grow out. I, like it, it's cute. I think it fits my face. Well, what do you guys think? Let me know in the comments i'm going to show you flip over method like how it would look if you just kind of like flipped it over to one side. So you can see how natural it looks um and then i'm also going to show you how it looks with like half up half down and then just all pulled back into ponytail. Just so you guys can get some ideas um about how versatile this style can be so hope you guys enjoy those styles as well, do and yeah. I think this ponytail is so cute and fun and flirty, and i don't know i'm just in love with the curly look, i'm so glad i decided to film this video um. I usually don't keep my hair in that long. One reason is because i'm always filming, but i actually want to keep this style in for a minute um. I actually really like how it looks how it turned out, etc. I hope you guys enjoyed this video as well make sure you subscribe. If you have not already be sure to turn on your post notifications, give this video a thumbs up, leave a comment and i'll see you guys in my next video
Comments
Jenise Adriana: I'm just realizing that my quality is only uploading at 720p. I don't like that for ussss. Will work on figuring out why it isn't uploading in HD! So sorry my loves
Ms. Green: For the past two weeks I’ve been looking for this exact style Thank you
Jameela Amai: it looks soo natural!!
Kendra Johnson: This is soooo cute! It definitely fits you. I need this texture lol!
Her Dope_Azz: Love this so much. Can I do this flip over method with a side part? Or do you think it’s best to do the middle part?
IeashaBoss: Cant wait to try this style…you did it again
christabella201: Very natural looking
Jolly Gurl's World: Love love this hair I will be buying. This will match my natural hair omg no more heat
Alysia Ntambwe: always giving tape ins , i swear by your method fr!!!
Mercedes Gainor: Is the bold hold enough to protect your hair from the glue, or is the liquid protective cap needed as well?
ThatsSoLea: Yep I’m doing my hair this weekend!! Maybe with a sew in tho
Benson’s Glam Decor: I think you & Keyshia Cole look a like! This style is beautiful.
Oh Hey Reinie: Ugh!!!! So cute that hair is so pretty
Dayna Bledsoe: Love this
Camij: Now I gotta find some good ass curly hair to try this
April K: This hair is beautiful pls tell me this coming out soon !
cris johnson: I clicked like before even looked at the video thank you!
Ronni j: Super cute...i have NEVER worn a quick weave but i would like to try it...how do you remove the quick weave??
Petite C: I like this a lot
Jenise Adriana: Hi my loves! This texture will launch on my site www.twelve22hair.com Saturday, 7/30 at 10 AM / 1 PM ET
Michaela Smith: This is sooooooo cuteeeeee
Nikki Nicole: Beautiful, do you cut your own hair? It’s beautiful
Jade Phelps: Hey, love your videos what type of curl is this?
Karley Foster: Would you suggest this style or any QW style if you work out a lot? Do you It should be able to handle the activities?
Monica W: Can the quick weave withstand working out? I want to try one so bad but I don’t know if I can workout with this style
Vanessa: What setting you blow-dry??
Star Pei: Hi, where is your shop located at?
Petite C: I’m early!!!
nyaaa: what was the intro song frkm
Aliyah Sainte: First again