How To: Diy Draw String Ponytail With Weave/ Extensions| Protective Hairstyle
- Posted on 03 November, 2019
- Ponytail Hairstyles
- By Anonymous
Thank you for stopping by
Just realized this is a 2 in 1 tutorial . How to to a draw string ponytail plus how to sleek low bun on natural hair.
The texture of the hair matches my natural 4c hair. I did not flat iron the hair or add a lot of gel so my hair texture could still be seen an match the extensions so my sleek ponytail isn’t as sleek LOL.
This is a great quick and easy proctective style for natural hair.
These are the products I used for this diy ponytail and products I used for styling my hair .
️ ️ ️ ️
Weave/ Extensions
Noble Synthetic Classic Brazilian Hair Nature Yaki 22″ ( 2 Bundles) in the color 2G202
I bought this hair back home at a local market.You can use any weave you got and follow the steps on the video to make your own draw string ponytail.
Weaving net
measurements: 16cm x 21,5cm
taobao link: https://item.taobao.com/item.htm?spm=a...
Elastic draw string
taobao link: https://detail.tmall.com/item.htm?spm=...
Wig combs
You can remove it from your wigs or just buy new ones
taobao link: https://item.taobao.com/item.htm?spm=a...
Gel
I used got2b glued but you can use your favourite gel, to style you edges and smooth the hair for the ponytail.
Got2b ultra glued invincible styling gel
taobao link:https://item.taobao.com/item.htm?spm=a...
This is the same ponytail I had on my other video, you can check it bellow:
https://www.youtube.com/watch?v=2oXdhr...
Check my social media links and follow me there to not miss a thing
Edna艾达娜:
IG: https://instagram.com/edna_muianga/
SC: edna_muianga
e-mail: [email protected]
xoxo
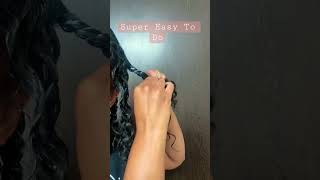
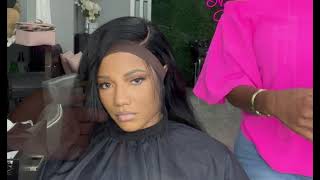
Hello, everyone and welcome back to my channel. Well, if you new welcome, my name is Edna and if you want to know how I did this DIY Charles Frank ponytail, please say so. I used a weaving net scissors thread, a needle and combs measuring tape and a drawstring of course, and we've. This is a yucky texture, synthetic for me. I measured the weighting that he was 16 centimeters by 21 centimeters and I cut this biz out fold it and cut it off. So I'm sewing down one of the sides of the piece I just cut off. I just fold it and like half an inch inwards and I'm now sewing it making sure I leave enough space for the drawstring to pass through and you want to make sure in the beginning he lived like an inch of space. Also, at the end, you leave an inch space go to that space to fold for the next corner, as you guys can see so sorry to so in the corner, making sure I leave space for the drawstring to pass through. This is very important. Do not block that passage and then I'll continue to sew in the other side, I'm not done I'm moving into the third side. It'S all in the same steps - and I already did the last side - and I almost don't know so here we have it now, I'm going to insert the toss frame. It'S just this elastic thing that comes with a black thing. You can pull I'd like it holds the string right, I'm not hurting the ply thingy and I have the combs. I had big and small economies, so I decided to go for the big combs, which I will put on the edges. I will put on the outer part where the threads are not showing and now on the inner side, where the tries are showing I swear. I will sew down my weave, so I'm setting it to two down on the edge and I make sure I don't do it where the dress rule is passing through, or else it will be blocked and the next track. I'M just sewing it opposite. The opposite direction of the first one, so it looks like this open-book kind of shape like so it will create this bump that will kind of hide the tracks. So in the following tracks, I doubled them. There'S also to make you faster, and it also avoids having a lot of shed shed here. So I'm just gon na sue the tracks like a little bit distance from the one or another just to make sure I did it this way. Just to make sure I covered all the leaf area, I set him apart from each other, then I went back and try to fill those gaps which I've folded. Now I had two bundles in this pack and it was enough to make one ponytail and make sure you do a knot at the end and I'm just gon na check where it's kind of balled and I'm going in and filling in of those gaps with more. We need just to make sure it looks fuller. Now we're finished, there's not so many space between his tracks, and this is the reason why I said this hard like this on both sides. It creates this bump and this is it we're all done. I can see how to draw string works. This is where your points out your hair will be you're in the middle in between the columns. Now I am going to put on this honey's on my head. I'M just gon na spray, my hair with some water. Now my hair is freshly cleaned. Now, I'm gon na make the part just making trades me. Okay, I know my hedges are not there don't come for my edges, you just afraid with more water and brushing him now, I'm adding the child. I'M just gon na put that on top of my hair and put it with my hands. First, it's pretty more water, now go back with the brush. Just make sure anything is food. Other part goes and now I'm going to do it. A ponytail with my own hair, just listen using an elastic band and then we're gon na fold. The tape there in the back like so continue just moving it and we're now gon na heading some gel on my edges. It'S very good, more water. I missed some footage, but what I did was just use the toothbrush a clean toothbrush. I just use for my hair and I started styling my edges, as you guys can see like layer by layer, I'm gon na use my hand, my fingers to like direct where I wanted, always to go to the other side as well to partially and whenever the Hair was drying, I just prayed with more water and add a little bit more of gel and continue to do this time till I got the look. I was going for yeah so now we're done just having our edges. We'Re now gon na put on the points hell, I'm just brushing, so I'm gon na insert those combs and then put in the drawstring. The strings was too long, so I just tied it and pin it with a bobby pin and I'm just brushing it. This is how long the hair is is. 22 inches is like weird voice almost on my butt, oh yeah, so this is it. This is the finished. Look. I hope you guys enjoyed it at this moment, I'm just feeling myself. I had already posted this on Instagram. If you're not follow me on Instagram, please go follow me on Instagram. Thank you so much for watching. Please subscribe and turn on the balance. Vacation I'll, listen the description box below all of the products I use in this video, and if you liked it, please don't forget to leave thumbs up or a comment and also share with your friends. I'Ll see you in the next one
Comments
Jay With A Splash of D: Yasss ponyy!! Love how short and simple it was.
LooksbyJas: Yess a ponytail is my back to school style! Very informative video
KiaraNicole: Never seen this done before!
Kay's Kinky Koils: I'm going to try this soon!
Yara Cristiana Guita: Love it
Merveille K: chiiiilllld when i say you went all in! looks beautiful so far with you own hair (still watching)
Merveille K: im so jealous of your sleek bun. mine doesnt turn out like that thanks to the humidity on the island! this was a beautiful video
Faith Bryanna: Greatttt Tutorial !
Hit It Dee: Oohh this is cute!
Maan Cordero: nice ponytail thank u for sharing
K OITSILE'S legacy: You're so creative
K OITSILE'S legacy: you made everything from scratch
Fervil Jean Kenson: Love you bb
Elle Johansson: Like 5. EDNA show me some love. I GAVE YOU LOVE