How To Create Voluminous Braided Ponytail | Hair Styling Tutorial | Kenra Professional
- Posted on 02 July, 2020
- Ponytail Hairstyles
- By Anonymous
Learn how to create this easy & voluminous ponytail hairstyle with @Hair and Makeup by Steph!
If you enjoyed this video, make sure to give it a thumbs up and tell us in the comments below what you'd like to learn next!
Learn more about the Volume Spray Clay here:
https://www.kenraprofessional.com/prod...
WANT TO WATCH MORE?
Easy Textured Ponytail Hairstyle: https://youtu.be/_Tg1pyehJcg
SUBSCRIBE NOW: http://bit.ly/KenraProfessionalSubscri...
VISIT OUR WEBSITE: https://www.kenraprofessional.com
About Kenra Professional
We are a purely professional brand dedicated to understanding and serving today’s stylists. Our passion is developing best-in-class innovations, delivering superior and reliable results. Kenra Professional strives to elevate the stylists’ artistry and craft.
CONNECT with US
FACEBOOK: https://www.facebook.com/KenraProfessi...
INSTAGRAM: https://www.instagram.com/kenraprofess...
TWITTER: https://twitter.com/Kenrapro
How To Create Voluminous Braided Ponytail by Stephanie Brinkerhoff | Kenra Professional
#ponytail #braids #hairstyle
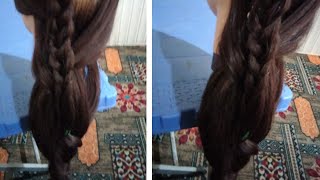
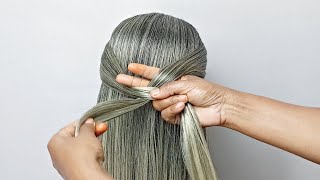
Hey everyone, I'm stuff with hair and makeup, buy stuff, and I'm here with Kendra professional and I'm going to walk you guys through a voluminous, braided ponytail. This is a really good look because it can be dressed up or dressed down, and the technique is fairly easy to master. So the first thing I want to do is get a little bit of texture at her roots, I'm going to go in with the kenra volume dry shampoo, and I'm just going to spray this at her roots all throughout her hair. To give it a little bit more grit, the braids I'm going to do is going to be down the heavy side, and I'm going to do it very less. So I'm just going to section out the hair from the ear forward on this side and clip it aside for later. I want to make sure that I don't include my crown section in this section that I'm setting aside - because I want to leave enough here - to give me some nice shape and nice volume through here and I'm not doing a very harsh line either. I just very softly went through with my tail comb and then I'll get this clipped aside. The next step is going to be adding our texture, so I'm going to do a really loose wave that has a little bit of bounce to it. So I'm just going to start here in the back, I'm going to do a little bit of backcombing at the roots, nothing too crazy and then lock that in place with the volume spray 25 and I'm also going to lightly mist the volume spray 25 through the Ends as well now, there's a couple different ways that you can curl this: I'm going to use the flat iron just to do some really loose waves. Just something like this. If you're not comfortable curling with the flat iron, you can also use a one and a quarter or a one and a half inch iron. This is a one and a half and I'm going to start at the roots. Let that set for a minute and then pull it through the ends so either way works. It should produce a very similar purl. Okay, then, I'm just going to continue that up the back of the head until I reach the crown section as far as what direction I'm curling, it doesn't really matter when you're here in the back. Once I get to the sides, though, I want to make sure to curl both sides away from the face so notice how, as I'm doing this, I'm not taking any back combing through the sides. I am primarily keeping it just in the center back here. Okay, now that I reached the crown area, I'm going to focus a little bit more on the way that I'm curling, I'm still going to backcomb at the root slightly. But this time I'm going to saturate with the twenty five a little bit more, so really concentrating that on the roots gon na do some on the top as well and then slightly work that, through the ends, the reason I'm doing. This is because I want some good texture and separation through the crown. So if I keep the roots too soft, once I get this up in a ponytail, it's just going to look straight. So I'm really saturating these sections so that the curls have a little bit more separation in them. So I'm still using my flat iron and I'm still going to do a loose curl. But this time I'm going to make sure that I'm going all the way to the root and I'm gon na focus a little bit more time on that section and then pull that through the ends. So you can see the difference in these top curls they're, not necessarily tighter, but they go closer to the root and they have more lift and separation in them. Okay, now I'm just going to continue doing those curls in this shallow side over here, curling everything away from the face. So the only difference on this side is that I'm not going to do as much backcombing. I don't want the sides to get too fluffy or too messy looking, and I want the majority of my volume to be in the crown, so I'm just gon na keep these a little bit softer all right before I get this in a ponytail. I want to add a little bit more texture to it and volume, so I'm going to go in with the kenra volumizing spray clay and I'm just going to apply this from roots to ends. This is going to help build bulk and volume, and you can see already the difference that that's making in the texture of her curls once this is looking how I want it to. I can go ahead and get this in a ponytail in the middle back. So I'm just softly gathering this all together being careful not to flatten any of my volume and I'm also leaving out some hair here on the side that I can use to detail. Okay, I'm going to pull on the crown a little bit bring out some more of that texture pull on the sides down here. I'M also going to pull on some smaller sections to give it some peace, eNOS and airiness, and then before I move on, if you're working with extra thick hair like this, it's always a good idea to go in with a hook elastic for extra security. Before I move on to my braid on the other side, I'm just going to get some of these pieces around her face back. This part is very visual. It depends on their face shape and how much you want to leave out. So I'm just kind of stepping forward and making sure this is looking good around her face. Okay, at this point, we are ready to start our braid, I'm going to put a little bit of wave in this, nothing too crazy, and then I am going to go in and apply the spray clay as well. You just want to make sure this section has a lot of good texture before I start braiding. The type of braid that we are going to do is a Dutch lace braid. So basically, it's going to be a Dutch French braid, but we're only going to add from one side. So I'm going to start here along her part line by taking a thin row and everything that I do is going to be over directed to this line. Right here, okay, so this will be directed back and then all of the hair that I add will be directed back. So I'm not including her fringe. That'S definitely a personal preference. You can do either way. I'M going to direct this back divide this into three pieces and then my outside piece is going to cross under my inside piece outside piece under my inside piece. Okay. So at this point, I'm going to cross one more time outside piece under my inside piece and then with this front section before I cross under again, I'm going to add a row of hair. Now I want to be careful that I'm only leaving out the hair that I want left out in the end, it's really difficult to go back after the fact and add hair into your braids if you've left too much out so I've added this row to my Front section, then this is going to cross underneath and then this back piece, I'm not adding hair to so this one will cross underneath same way without adding any hair so notice. This whole time, I'm being careful to make sure I'm over directing back. So now I'm ready to add a new row to my front piece again: okay, that's gon na go underneath then my back piece underneath as well front piece underneath back piece, not adding any hair underneath okay, so I've run out of hair at this point. So I'm just gon na finish out a normal Dutch, braid, okay and before I get this pin I want to soften this and make it bigger and a little bit chunkier, so I'm just holding it very loosely. In this hand, it's very important that you don't squeeze this too tight. Otherwise, once you start pancaking, it's going to get frizzy, okay and essentially, what you're doing when you pancake a braid, is you're taking the extra length and you're turning it into bulk. So it always helps to start at the bottom and work your way up. Okay, I'm gon na go ahead and get this pinned. So I'm just pinning this right into the base of the ponytail and then I can finish hand kicking this with both hands and I'm also going to go in and add a couple pins throughout the parade, as well for security, adding a little bit more of the Spring clay, okay and then the last step is just hiding all of my pins in here. So I'm just going to take a piece of the ponytail underneath wrap this around, to hide all of that and then secure that with a bobby pin underneath alright and then to finish, I'm just going to go in with a little bit more of the spray clay To give this pony a good amount of volume and texture


Comments
Kirsten Johnson: I love Stephanie! She is so easy to follow and current on the trends.
Dolsie Mercado: Love how you explain things in detail. Hairdo
Caroline Bonini: Absolutely love this ponytail!
E: Beautiful well done
Montsergirl: So beautiful! I WISH my crappy fine hair could do that
Cami Bilbo: These are so helpful! I’ve watched like 10 in the past 2 days
Sheila Lefebvre: Love these tutorials...lots of great tips!! Can you show some with shorter hair? For example, your hair length or even a bit shorter?
pooja jidani: Love your tutorials. Does this volume spray works as a heat protector too? If not is it safe to use hot tools on voluminous spray(if using other brands).
Naurin Saba: You are wonderful teacher .You made this so easy and relaxing otherwise hair stylist just rushing make it so complicated .I wish I could learn from you.
Madeline Makeup&Beauty: love your tutorial's <3 big love from poland !
Potato Chop sticks: Very pretty, I wish I could be the hair model
Joanna Wood: Hello I really like the way you style her hair
그냥지금 Just now: You are so good..! I am learning
Nanu Love: Gorgeous but basically spraying alot for volume
Ash Akim: I love Steph!
Khaleel Ahmed: U r lookin like kristein stewart