Diy Kinky Curly Drawstring Ponytail
- Posted on 06 June, 2022
- Ponytail Hairstyles
- By Anonymous
How to make your own drawstring ponytail. Kinky curly drawstring ponytail.
How to crochet an Afro puff drawstring ponytail https://youtu.be/RjlKVDZo75w
Subscribe & Share #KenyanYouTuber
----------------------------------------------------------------------------------------------------------------------------------------------------
WATCH MORE DIY VIDEOS
Headband Wig-https://youtu.be/FuJS0Ov1-eE
Crochet Headband Wig- https://youtu.be/yjeEuB1S3hQ
Braided Hat Wig- https://youtu.be/Idga11EGwc0
Drawstring Ponytail- https://youtu.be/_yB7_pBPSSo
Afro Wig- https://youtube.com/shorts/J6WHyZwLgto...
----------------------------------------------------------------------------------------------------------------------------------------------------
Shop My Designs: https://www.redbubble.com/people/G-Mar...
Shop My Favs: https://istyl.me/shopmyshop
----------------------------------------------------------------------------------------------------------------------------------------------------
SOCIAL MEDIA:
TikTok~ https://vm.tiktok.com/ZSedGbbQD/
Instagram~ https://www.instagram.com/grace_odawo/...
Facebook Page~ https://www.facebook.com/Gr ...
----------------------------------------------------------------------------------------------------------------------------------------------------
OTHERS.
Camera Huawei Y7.
Editing~ Inshot.
*DISCLAIMER
Some links are affiliate. When you click and/or purchase a product/service, I may receive a small commission. There is no additional charge to you. Thank you for supporting my channel!
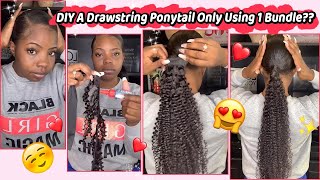
Hey guys welcome to my channel in this video i am making this roasting ponytail from scratch subscribe to my channel for more tutorials, and if you find this video helpful, do give it a thumbs up and share widely. Here are the items that i used: a hair net, which acts as a base, something round to cut out the hair net step measure scissors thread a needle to stitch the hair net weaving thread for the hair, a marker, a wig comb, to attach, at the end, An elastic band which acts as a drawstring and the hair that i used is known as johanna by fashion idol, got it at my local beauty store. I get a lot of questions about this hairnet and in this video i'll answer those questions one. I guess this hair net from the boys road on the boys road. There are two buildings known as peridot center and du bois beauty, dubois beauty. So in each building there are so many shops. I cannot remember the particular shop number, but you will definitely get this hairnet. You can just ask around. You can also go window shopping and you will find this hairnet for my viewers who are not in kenya. I have added an amazon link in the description box below the one on amazon, is ready, made and comes with a drawstring already attached to it about the price it costed around 100 shillings or less? I don't remember the exact price, but i think it was less than 100 shillings about the material. It is firm and soft. It is not the same as the sleeping knit. The sleeping net is hard and rough, but this one is firm and soft and it does not tear easily about the size. It measures, 140 centimeters for the length and one or two centimeters for the width. These are the measurements of the whole net. When i bought it, you can also get a ready-made net in small sizes, with the elastic band already attached to it at peridot center. I preferred to buy the big size because i want to make a lot of different ponytails so subscribe to my channel for more tutorials and to never miss a video so so to sew the hair onto the net. I held two left together and used a weaving thread to sew. The weaving thread is much stronger compared to cotton thread. At the beginning i was using this carved needle and as i kept going, i realized it was hard to pass it through the net, or rather it's because i'm not used to it. This is my first time using it, so i switched from this curved needle to the normal thin needle, but i still use the weaving thread. I sewed the wefts inwards towards the center of the net, and i tried to be as neat as possible, making small stitches so that the stitches will not be visible. I highly recommend that you do it carefully so that you do not prick yourself with the needle. I also recommend that you find a comfortable position while doing this. When i started i was bending and it was hurting my back so find a sitting position where you can lay your back and avoid bending your neck and your back. So so, when i was done, i realized that the space at the center looked big and also the front part where i had started sewing. I had left as big space and i didn't want to leave it like that. So, at the front part i sewed one weft of hair and at the center i sewed two waves of hair, but a small size. Oh, i got one packet of hair which has six bundles from the six bundles. I used two and a half bundles to make the ponytail. As you can see, the stitching is barely visible. It is so neat that you can't tell it's done by hand. I place the wheel comb directly above the closing of the elastic band. Remember the elastic band is attached to the net, so while sewing the elastic band, i sewed it onto the net and not onto the elastic band, and this is how the drawstring ponytail turned out. It looks so full and pretty i love it subscribe to my channel for more tutorials, and if you like, this video, do give it a thumbs up and share widely see you on the next one. You


Comments
Christine mwikali: yea, you made it look easy❤❤
Shãnin Owaya: Thank you for this tutorial and the net details . Where did you get the white pen?
HURRIET NYANTARI: You're my favourite grace