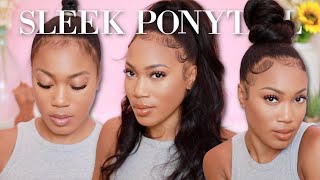
Long Sleek Curly Ponytail Using Natural Hair Clip-Ins | Easy Blend Technique
- Posted on 25 September, 2020
- Ponytail Hairstyles
- By Anonymous
Hey fam! This low sleek curly ponytail was made with normal 18 inch natural hair curly clip ins and is SLAYEDDD! In this tutorial I'm showing you how I did it and trust me, it was real simple! This style is perfect for girls night out, date night, vacation, everything! Watch and let me know what you think about this technique.
*NEW* NATURAL HAIR CONSULTATIONS: One-on-One! The personalized master class!!
BOOK HERE: https://www.curliecrys.com/natural-hai...
I TRIED JHERI CURL JUICE ON MY NATURAL HAIR......and THIS happened - YALL
https://www.youtube.com/watch?v=rBOeMN...
MY AMAZON STORE: https://www.amazon.com/shop/curliecrys...
STAY CAUGHT UP ON MY VIDEOS:
NATURAL HAIR PRODUCT EMPTIES - Will I Be Repurchasing Some of Your Faves?! Lets talk...
https://www.youtube.com/watch?v=UFYtXb...
DOLLAR TREE $1 WASH DAY ON TYPE 4 HAIR - from WASHING TO STYLING *Shook is an Understatement!*
https://www.youtube.com/watch?v=iklqHx...
MINI TWISTS ON STRETCHED NATURAL HAIR - PERFECT PROTECTIVE STYLE
https://www.youtube.com/watch?v=MkzzA-...
LESS SHRINKAGE STRETCHED TWISTOUT on Natural Hair - Lets get into this length!!
https://www.youtube.com/watch?v=dnr54K...
5 THINGS THAT DRASTICALLY HELPED MY NATURAL HAIR
https://www.youtube.com/watch?v=D5lEIG...
BLACK OWNED WASH DAY
https://www.youtube.com/watch?v=-eIyWO...
My Favorite Natural Hair Products Series
https://www.youtube.com/playlist?list=...
MINI TWISTS 101 SERIES
https://www.youtube.com/watch?v=S4mEcK...
TWISTOUT 101 Series
https://www.youtube.com/watch?v=wj-8xV...
TWISTOUT 201 Series
https://www.youtube.com/watch?v=T6A-I2...
Stay connected with me via IG: @CurlieCrys
Don't forget to LIKE, COMMENT, SHARE, and SUBSCRIBE!
Intro Song: Emmy Trish - Damn, He Compelling
FTC: Not Sponsored
#ClipIns #NaturalHair #SleekPonytail
Is crystal aka, curly, chris and guys in today's video we are getting some length. I am doing a super long and sleek ponytail with natural hair. If you are new to your girl's channel, make sure you do one thing for a girl, okay, and that is to smash that button down below smash that button down below. If you are following me on my instagram you've already seen, i did do a super long. Ponytail on my hair, however, i use straight hair and not natural hair, so aka clip-ins i'm going to be using some clip-ins to get this super long ponytail that i am envisioning. I really feel like i'll be able to pull this off and i'm confident in myself. Okay, so we're gon na see how it turns out these clip-ins are. I might i can't remember where they're from they were just all in my pile of clip-ins, that i keep in my bathroom so and i'm also going to be using just some straight braid hair to extend the length of my hair before i wrap the clippings around, Which we're going to get all into that as well um and then some tools that you'll be needing in case you are following along with me, is just a wave brush with a soft and hard side and then a detangling brush of some sort and i've already Applied my leave-in conditioner to my hair and to sleek everything down, i'm going to be using the main choices, gelato gel and lastly, you're going to be needing some scrunchies. I have three of them here and they're like the long stretchy ones um. So three scrunchies for your hair, so in the back i've already, oh, that was wet, oh, that slapped me on my neck looking into my business, so the last thing that you're going to be needing is some type of microfiber towel. I forgot to mention that earlier and the reason why is because you're going to dry off a lot of the excess water in your hair? This is the only time when i recommend drying off excess water. Okay, as you guys know, i'm all about the moisture. So for my ponytail, i am going for a no part at all, so i am going to just be pushing this all to the back i've already tangled in the shower. If you have not detangled, what are you doing make sure you are detangled already before you do this step? Okay, then i'm going to just take my detangling brush and brush once again and just brush take my time and brush on back. So i'm using the main choices gel like i was saying and just applying it at my base for my hair, and it actually may do better to take some of the gel and then rub it into your hands so that you get an even application everywhere. Yeah that works way better like when i tell you guys i have no use for eco anymore, like i don't even use eco styler anymore. Typically, if i was like about three years ago, i would have been maybe even two years ago, i would have been using eco styler to slick this down, but there's so many gels on the market. Now that are really good for our natural hair and get the job done, and i'm also going to apply a little bit back here, because y'all know we got to get the beta beads. Okay, y'all can't be having y'all front looking good and y'all back looking like who did it, and why can't you hear that this is looking good already and now, i'm gon na take my pattern brush one more time and just brush on back make sure everything is Smooth which it is so far and y'all that having a smooth foundation that everything laying flat is really what's going to make your ponytail pop and like blend, really really nice, especially if you're doing natural hair like i am all right. So in the back, i'm going to raise my ponytail up to about right here on my head, i'm going to double one of these and then secure that you want to get all your hair through there. Okay, there we go oh whoa, nice and sleek honey. Do i like it all to the back all right y'all, so i switched it up into the middle part, because i forgot how my hair was shaped and how my ears are shaped and since i don't feel right whenever i don't have no part. So i want to handle the middle part, because my forehead ain't set up that way or my head in general. Okay, so now we're going to braid this on down, okay, but the key part about this is whenever we braid i'm going to be feeding in some of this hair to where it is super long on me and that's how we're going to start the base for Our curly ponytail, it's um 36 inch long, and this may actually be too long than what i need, but we'll see okay fam. So i am going now with my microfiber towel and just getting out a lot of that excess water. And then i'm going to split that ponytail into three pieces and start to braid, so i'm going to be braiding down and then adding in the kinkaline kanekalon hair and the way that you want to do this is just feed in the hair. So the way i feed in i tried to slow it down. I just do what's natural and what feels right to me and my fingers: i'm not a good feed inner at all, literally only my second time doing a feed-in, braid and i just add, hair um into one of the three pieces and then braid over it to Secure its spot in the braid, which i tried to show you guys how i do it here but, like i said, i'm not too skilled in feeding braiding. So there are plenty tutorials on instagram where, like they really are good at it and they can teach you, but i just taught myself really and just did what made sense in my head. So i went ahead and added some hair in and the reason why you're, adding hair and, of course is because we're going to be clipping the clip ins onto this braided hair. So you have to make sure that your hair is long enough. In order for you to get this super sleek and long ponytail so and then i'm going to just go ahead and keep on braiding, and i also added in some more hair, which i honestly probably did not need because y'all this was so long okay. So i'm going to go ahead and keep on braiding this down and, as you guys can see like it's not neat at all, which it does not need to be neat either, because none of this is going to be seen. So the good thing is this is not the part that most of us are skilled in, but it also does not matter right now, because none of this will be seen. Okay, you're gon na we're gon na be covering all of that up. So when i get towards the end, i'm gon na keep on braiding. Just like that and guys one thing i noticed was: i didn't make my braid too long. So i just like the good thing about it. You can just use your scissors for one to just cut it. However short you want it to be. So that's the good thing. However, i will say i will show you guys one more step, that's important. So once you get towards the end, you're going to cut off the excess hair right, then you're going to add your scrunchie. Now, if you find that your braid is too long, just push your scrunchie up and then cut off the excess hair below it, and that makes it really really simple to where you can just adjust the length of it at any time. If you find that that the braid is too long, so the next thing i'm going to do is take a scrunchie and i'm going to so just place it over. The part where i started to add in the feed in because i didn't want it to fall out or anything which i didn't think it was, but just to make sure you your hair cannot be fallen out. Okay, so i went ahead and added another braid. Another ponytail right there for that part that was transitioning to secure it in place all right y'all. So now that we have the ponytail installed. Okay, now we're gon na go in with the clip-ins and, like i was saying this part does not matter at all like no one's gon na see this part. So, however, it looks it looks, that's fine, the out part, the other part we're about to do right. Now is what really matters now we're going to take the clip ins and starting from the bottom, we're going to clip them around the braid okay fam. So when you have your clip ins, you can detangle them and brush them out. Just so, you can get like a thicker texture um. So then i'm going to just wrap it around the braid. So i'm literally taking the clip in and wrapping it around the braid and clipping it on to the braid okay and that's how you're going to for one hide the braid and for two make your long ponytail. Just that simple y'all like it's so easy. So once again, just brush it on out make sure it's detangled and nice, and you know thick like you, want it and then just clip it on to the braid and you're gon na clip it in an upward motion, so that you are like staggering. The hair. Basically, up along the ponytail and y'all, it's literally that simple like so easy i was so shocked. I was like man. This makes so much sense. Like i love this technique, this is a really really good technique to make an extra long, braided ponytail with clip-ins. Yes, now i do want to make this mention if you find that your ponytail is too long for you do not clip your clip ins. Okay, just make your ponytail shorter and take out some of the clippings starting at the bottom, all right y'all. So i went and finished the ponytail you're ready to see talk to me now. Y'All, look at this lens and it looks so good now. This is another part, that's very, very important. Let me scoot on up, so i can show you guys so the part about wrapping the hair around this part so that it looks very natural, that's very, very important, because you can't have a slate ponytail in a messed up transition. Okay, that ain't cute. You should put an extra clip in right around here by the ponytail. Take that hair, a piece from that clipping. Okay and y'all already know nothing to do. You'Re gon na wrap it around the ponytail and you really want to secure it and disguise it so that no one can see okay. So this is what my ponytail is looking like and, of course, i have some more sleeping to do with my natural hair, but i just wanted to show you guys how good the transition looks, and this is exactly what you're looking for now on to the next Step, which is the blending and define not so much blending but defining of the ponytail, so your ponytail will probably get dry. It'S not it's hair! So it's going to dry out now. You want to refresh this ponytail and make it pop okay. So i'm using water and this design essentials almond avocado mousse, so i'm first going to spray the hair with the water rub it on in and then i'm going to be applying the mousse to the hair, and this is going to define my ponytail. So you really just have to make sure that it is wet enough. You don't want to be too wet, but you do want to be damp and then you want to apply your mousse to the ponytail and when you apply the mousse to the ponytail, you just got ta work it in this is the mousse that i decided to Use - and it really really did a good job for me - um, but just work, the mousse on in um and just define and if you want to be more defined, keep on adding some more water and mousse. But i just added a good bit to where i really did like the definition like y'all. This moose did the doggone thing, but it's ponytail. Okay, like the ponytail, was popping as you guys can see, i'm in the hotel room because i would have somewhere to go. Um for this style, so i have somewhere to be, but i'm gon na keep on working on up with the mousse and water, with defining my ponytail and guys i defined mine every single day that i wore it just because i wanted it to look fresh and, Like popping and look the end result was so bomb, it is so bomb. Look how good that looks. The definition - and this is what the entire ponytail looks like after i define the whole thing. It looks so good and it blends so well with my texture. Okay and it's with the front of my hair, is looking like after i went ahead and slayed my edges like edges, popping, okay, popping and hair is sleek and here's the final look y'all with my whole outfit and everything i said. Let me go ahead and put this video in here, so i can show you all. The final looks you know like y'all, the ponytail did the doggone thing, it's exactly what i wanted the length is perfect. The volume of it is perfect everything blended so well. To me, um, here's some more pictures of how everything looks and you guys can just see how well the blend is like it blends perfectly with my texture and everything and the length of it is just so smooth i loved it loved it loved it. Okay, thank you guys so much for watching make sure to like subscribe and comment down below. If you enjoyed this tutorial, you


Comments
Judi S: Love the style. It’s very classy! Tfs
Lavishly Bri: So underrated this look was everything
LunaStarss31: My mom LOVES me and my sisters curls and with that thing I like mine more bc it makes my hair way longer❤❤❤❤ also love your hair with and without it❤
Dwana Coulter: Yasssss It’s the whole look for me!
Myesha: I will have to try that gelato gel for slick styles once I grow my hair out.
Bridgette Hunter: Very nice ... classy ❤️
Carol Harper: It looks good. I love it. Your hair and clothes look beautiful. Stylish and classy. Love and Light.♥️♥️❤️
Emily Oliver: That’s beautiful Crys!!!❤️
Alliyah Smith: So pretty❤
Hope Baker: You rocked that Crys!...classy and sassy with sexy..love it
LEA GC: You make it look easy peasy
Saturena Gail: pretty
S Maxwell: luv this video .. thanks Crys
aqua fina: Crys you are the only yter that I know that know about bdbees..lol
hu.7369:
Myrna J: CrysGang!!!♀️Yess that Thumbnail tho!!❤
prettylady818: Can you drop the link to the hair?
LADYOF AK: U look so cute, very nice
Kell B: Cry’s where did you purchase clip ins please
Tiffany Wallace:
Glambae Drew: The day you uploaded this video was my birthday 25th
Latanya China Rhodes: Cute