My First Time Doing A Double Frontal Ponytailbeginner Friendly Tutorial
- Posted on 12 September, 2021
- Ponytail Hairstyles
- By Anonymous
I am so overwhelmed with happiness by how this turned out. Like seriously.
So this is pretty easy to recreate, EVEN tho this was my first attempt at doing a frontal ponytail I really enjoyed doing this double frontal ponytail hairstyle this hairstyle was very inexpensive to create and was a quick and easy slay that I will definitely be adding to my GO TO HAIRSTYLES , I hope you enjoyed this easy beginner friendly tutorial,PLEASE THUMBS UP and SUBSCRIBE= *
If you have any questions, leave them down below!
XOXO
FasherThanYou
-------------------
HOW TO CONTACT ME:
Instagram:
Fasher_ThanYou
Snapchat:
Ayshia19
Email:
Category
Howto & Style
License
Standard YouTube License
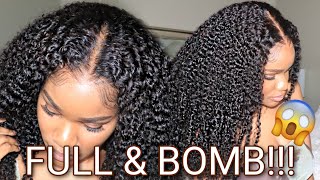
First, things first you're going to want to start out with a ponytail and make sure that your ponytail is exactly where you want your front to ponytail to be. You do not have to have a sleek mode for this hairstyle. Usually, if i would use a single console, my ponytail, my mold would have been slayed. I want to let on my hair and everything, but since none of my hair will be out in this hairstyle, i just put it in a regular ponytail like i didn't use a lot of products so now we're going to be starting off with a stocking power. First, i'm just going to be putting on my head and cutting out just so i can like get like a feel to where i want my ponytail it, but yeah right now, i'm just going to be taking my got to be glued hair, um gel and i Sprayed it with the freeze spray and the reason why i did that just so, it could be extra secured on my head so because, sometimes like, when i do the ball cap method, it tends to like be sticking up and looking like, not as melty as i Would like so that's why i did that part and i made sure to put extra extra extra free spray on my hair. I just better secure it down right, cut down those ears and stuff, so it could be sitting right in your ear and hairline because you don't want it to be bulky. So now i'm taking a blow dryer and i'm just basically trying to dry it, and i usually just let it dry by itself, but today was my sister's birthday, so i was literally brushing to do my hair. So now i'm just going to be showing you guys that i cut off the seam on the front too, which is usually at the back, and the reason why i did that was so that it was it wouldn't give off that bulky effect. So i'm just now noticing that i didn't get like me: cutting off the full cap as far as like recording, but i'm just going back and cutting off the little lace. That'S not lace but stocking cap just left on my head and i'm also going to be going back and putting like smarter gel in the freeze spray on there, because, like you guys, i don't know about y'all. But what i do here is always the ball cap. Getting that right takes me forever like the front two. I can get it on in no time, but it's always getting that ball. Cap melted and that ball cap method right. That'S maybe that for me like that's what take me forever so y'all, don't see me constantly going back, just making sure and ensuring that the cap is secured and also that it looks melted and given what it's supposed to give so now for the frontal, i'm just Going to be putting it on my head just so, i can like size it to see how big is the front on my head, because i already know i'm going to have to cut some off, because it'd always be like that wigs or fronts never fit my Head, like you know, it's my hair game, but yeah so right here, i'm just going to be sizing it just to see how much i got to cut off and, as you guys can see, i have to cut out quite a bit. Then i'm just going to be putting that front on a ponytail, because now it's time to sew this on my head, but before i sew it, that's what i'm going to be doing right here as i get done pinning so after i pin up the frontal to My head, i'm just going to be taking my needle and thread and i'm going to start sewing from my ear towards the ponytail, but i am not going to sew all the way up to the ponytail, because some of that frontal i needed to be loose. So it can go on top of my ponytail and cover my real hair. So that's what i'm going to be doing in this part right here: uh, okay! So now that i'm done sewing the contour, i'm just want to pull the hair back and put it in ponytail just so, i can get prepared to start glowing my concealer on, and i'm really excited about this part, because this is my favorite part right here, like The frontal is on, and i already had to see the look like it'd, be that for me like seeing that transformation and like maybe everything especially when you don't normally do your hair and being able to do this by yourself. I was just so proud of myself because, like i don't do hair, i don't know how to braid. None of that. I just know how to get myself together. So now i'm just going to be pinning this back. Then i'm just going to start putting on my cheap ass glue, which is the ghost bond. I hate this blue, but my real glue is on the way here by erica j. Like you know, you know trying to get that taste like but yeah for now. I'M just using this and i'm just going to be taking a stick, because i don't really like how, when you squeeze out the glue to me too much comes out like every time i squeeze it. I always squeeze so i just like this, because i'd be able to put it on where i need to put it on precisely. I am just going to be putting on like three to three layers, probably not even three layers of glue down, and that was because of my circumstances i was rushing. I was having people calling me asking me where i was so. I couldn't really wait for it to dry to apply as many ladies layers as i would like to so yeah. I am good like too late do better than me. Okay, don't get y'all is done, they fall, but to me i had to go buy my hair. Yesterday, so i at that time, i couldn't start it the same day, i was just tired. I was out that whole day shopping and stuff, so i just waited the next day yesterday at a dinner to do my hair, but yeah i got it done. Okay, so by the glue is drying, i'm just going to be cutting off the back of the cap, and once you put your other frontal on, you will see that. So now i'm just going to be placing my frontal on the glue and, as you guys can see, i'm going to be taking my comb and just pushing it inside i mean not inside but on the glue, because i don't really want to use my fingers because You know like i think you have oil and dirt and stuff, so that would tend to like take up the glue like i don't know why, but it does so. I'M just going to be saving one of you just like to kind of like dab it comb. It in there like, i, don't really necessarily push it. I dab it so now it's time to melt it, but before i tie the um the elastic band around my head, i'm just going to be pouring out what i want to be my baby hair. So, as you guys can see, i'm just going to be going around the mirror, the perimeter of my hair and i'm just going to be pulling out what i wanted to be right here and then i'm going to put the stretch band around my hair and that's Just so um it's a stand place and it helps it melt better when you're, when the glue is still wet. So basically, this right here helps the drying process, help the lace melt into your skin and it looks more like skin. So now i'm just going to be tying an. I just wanted to do it just to ensure that it's super super melting flat, then, after that i'm going to start working on the back front too. So while i got that melting and drying and stuff i'm going to move on to the back front too, and i'm going to start by cutting off that thick seam that you always see on the front yeah. So now it's finally time to take off those stern stretch, bands - and i don't know about y'all but they'd - be feeling like taking off my bra. I just love taking those off it'd, be hurting so bad to me, but now um we're about to start measuring the back front too. Just to see like how much i have to cut off - and i actually had to cut off a lot because, like there was a lot left over as you guys want to see like it, was damn near a hole from the helper front too. That i had once i get done measuring that then i'm just going to be cutting off the front tool to fit my head and once i do that, it's time to sew it and install it. So now it's time to start sewing the contour on and guys like. I'M sorry about the weird angle that i knew i am recording that, but it was so hard to do this from the back because, like i can see nothing, i'm just basically going off filling everything. So once i get that so then we're going to work on the next part, because i could not get this camera angle right. I was trying to get it right for you guys, but hopefully you guys can still see what i'm doing. I'M basically just sewing across from like how i did the first frontal from my ear and then i stopped by the ponytail. Then i start on the other side and stop before i get to the ponytail. So that's basically the same on this part. Now that i'm done sewing, i'm just going to take this clip and i'm just going to clip the center up just so i can ensure that i don't don't get any glue on there because i can't see in the back of my head. So i just wanted to make sure that i got less glue on the hair as possible, so i'm just going to be taking that and putting that on my name all the way in the back and just filling it out. Basically, because, like i didn't, have no help or any mirror that i could look at with this process, so once i do that, i'm just going to be applying two layers of glue, then i'm going to be blow drying it to dry it. Now that i got everything all dry with the blow dryer, i'm going to be placing my frontal on top of the glue, then i'm just going to be taking my tail comb and i'm just going to be pressing it until the glue. I feel like when you press it rather than just place it on there. It makes it melt more better and it also makes it stick longer and better. So i'm just going to be going back and forth pressing it. Then i'm going to put my band on there uh. So now that i have the stress band on the back of my hair melting and drying, i'm just going to take this pressing foam and i'm just going to put it on the toe just for it to heat up. So i can start straightening my ponytail, then i can go over it. So i took the stretcher out and now i'm just pulling it just i'm sure that it's glued in the right direct clips. So now i'm just going to be fixing up my ponytail making sure not to only my baby hair. So i need some baby hair and i'm just going to be trying to get my ponytail straightened. So now i'm taking my pressing comb and i'm just going to be sledding it just to give it a more press down natural look because you don't want the ponytail looking all black, you want to look very natural. So that's what i'm doing right here! Next, i'm going to start parting out my baby hairs in the back of my hair. Just so i can start positioning and start putting my paint. So, as you guys can see, i have lace right there, i'm going to cut out at all at the end, but anyway so um, i'm just trying to place my um like how i would like it to be so i'm just gon na add a little more Glue right there, but not more, but i'm going to add some blue right there. This is my first time doing this out, so i didn't know where i was hooked up with the glue exactly, but i'm going to be putting some glue behind my ears just to make that part of the front. So i don't know, i'm actually going to be sewing it and then afterwards, once i sew it, it's still going to be like a little bit left over and then i'm going to add the glue on there. Now it's time to start cutting out the lace in the front, and i'm just going to be using this eyebrow razor that i have that's just what i find very easy to do because, like the scissors right here, so i sometimes tend to like put my baby Hair or it can't get close enough to where i want to create my hair it sometimes you have to pull so hard that your face, and by the way i had to glue that back down to my ponytail, i kept saying that that was looking, so i Had to just try to do that down, i have time to let the glue get clear and all that stuff, so i'm just gon na. Hopefully you know it's gon na come out right, because once i laid it back down with my baby hairs, it's just going to start sticking how it's supposed so now, i'm just going to tie down my stretch band again around my edges, just like to get it More melty because of the fact that i had to glue down certain spots and stuff and they wasn't as melted as i would have so now - i'm just going to be taking my present home and that just basically helps makes my hair way flatter than what it Already is that's just going to help give the ponytail more of a flat natural look uh uh as much as i can i'm going to be using this lipstick guy. I forgot korean. I forget it's like i'll answer it below, but i'm just going to be using it just to help my hair stick up like stick in place and then i'm just going to be trying to fix my ponytail to my liking, as you guys will see, i'm done With that - and i got my ponytail to my liking - i'm just gon na be putting my elastic on there. I love it so much. It just gives us so much dimension and also it's time to work on these baby hairs. I'M just going to be using some edge control and i'm just well gorilla's not actually, and i'm just going to be trying to comb my baby hair. I find that this works way better for me for me to shape my baby hairs before i curl and cut them because um once i cut them, it gives me like a dimension to like how short the baby hairs need to be, because i sometimes have trouble Cutting too short, so that's what i'm going to be doing right here and i know i'm going to be fixing my baby hair for a long time, and that's because, like this glue, i hate this blue so much it doesn't like once you start doing your baby Hair, it tends to like make your lace come up, so i'm just trying to be very quick. So i'm just going to be doing all my baby hairs as you guys will see foreign uh uh get like a very defined curl. Look because i just don't like them to look like regular baby hair about my sideburns to give like that very fluffy type of look. That'S what i was going for so you're gon na see me going back here because, as you guys will see in the finished results that i got that cut out, i just couldn't cut it off by myself. This style was kind of difficult because i was rushing but other than that. This was a very, very easy go-to style that i will be doing so now. I'M just going to proceed to the other side to do my sideburns and, as you guys can see it's much harder on this side. I don't know why, but it is like it's much harder to gain control on the side, but, as you guys could see, i will definitely do so. So now i'm all done and i'm going to be showing you guys, the hair i really enjoyed making this video. So let me know if you guys, like this video as well, if you got some tips to give a sister. Let me know - and thank you guys so so much for watching this video leave all requests down below what other type of videos you guys want to see, and let me know if this will, if i did a good job, but this is my first frosty ponytail, Like i feel like, i did a great job, especially rushing you guys, you know you can't rush professionally. You just can't. Thank you guys so much for watching again i love and miss you all and i'm back. We already know about the bacon get into this gap. You


Comments
Regenia Staggers: This was helpful,and you did good. However, the music was loud an when you spoke I couldn’t really hear you it was low.
BriFromTheD: This was so helpful! Thank you
The Kings Castle: You did a great job periodt I enjoyed watching the video as well and plus The music was relaxing keep doing ya thang queen
Essential Barbie: You had me laughing. And you slayed boo
Cherry Ivana: How do you maintain it? How long does it last for?
Casdoesitbest: Now the first time is difficult but Girl I was hoping for more. The sides looked unfinished and the baby hairs were too long. Plus it was hard to hear you.
Xi Orbs: Material list? 13x6 frontals?
Narri Channel 😁: What inch frontals did u use
Selena Davis: How did the back look
BlackIsBeautifulHair: I’m sorry but with all due respect this video just irritated the F out of me… 20mins on baby hair & the video is only 29mins…. to only get pics & videos of the final look & we only get to see the front, not the back. I’m disappointed asf. But thanks anyway