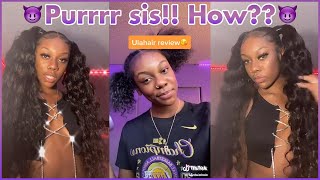
$10???| 30" Slick Back Extended Ponytail On Natural Hair
- Posted on 31 March, 2020
- Ponytail Hairstyles
- By Anonymous
Hi guys welcome back to my channel and in today’s video I will be showing you guys how to do a slick back extended ponytail for your hair! This hair was super affordable it was $10 at my local beauty supply store and you can definitely head over to yours and find the same products ! This was the natural dream 30 inch bundle for 9.99! This hairstyle was super easy to achieve super quick and efficient I hope you guys enjoy! Make sure you subscribe and I will see you in my next video and also make sure you like this video and leave a comment let me know if you like videos like this one. Also don’t forget to turn on those post notifications so you can be notified when I upload content✨
Products used:
Murray’s beeswax
Rat tail comb
Scrunchie
Pump it up Spritz
Hard brush
Natural dream 30” bundle
Business
Send me goodies
PO Box 20816
Macon, GA 31205
Connect with me
Ig: _@KiloKi
Snapchat: Naturalistaa
Link to my Makeup Videos: https://www.youtube.com/playlist?list=...
Link to my hair videos : https://www.youtube.com/playlist?list=...
Learn to be your own Nail Tech : https://youtu.be/7CZm6tGmCck
THE BEST NIGHTTIME SKINCARE ROUTINE EVER : https://youtu.be/aZJpZwg6ao0
Beginner Wig Install : https://youtu.be/Du8gMFJdB4E
THE BEST FULL COVERAGE MAKEUP ROUTINE: https://youtu.be/41MlLGKb0DI
When I see me just know, hi guys welcome back to my channel it's kilo key here and I'm back with another video. So in today's video I will be showing you guys how I was able to create this nice slick extended ponytail. I did a 30 inch extended ponytail. One of my six lacks hair and girl. It only cost me $ 10 at my local beauty supply store. So the first thing I did was take some heat protectant cream, just some random cream that I found you know at the beauty. Supply store honey, a while on the hunt for items that I need to sleep, my hair down, but I'm just taking some of that cream distributing it. On this one section of my hair, then I am going to take my revlon hair dryer and begin and drying all the sections of my hair, repeating those same two steps so adding the cream on my hair and then blow-drying it. But now that I have blow-dried my hair as much as I possibly could I am just partying, my hair. I wanted a lower side bang, so I'm just parting, my hair, for that and in this next clip you are going to see me pull out my Tresemme serum, because I'm about to flat iron, my hair. Now you do not have to flat iron, your hair. You do not have to put any heat to your hair. To achieve this look. I just wanted my hair a little bit sleeker because my hair, it's thick and I am text laxed, so I just wanted to pass the Flatiron through my hair once and get my hair. You know as straight as possible without any tangles, and I really just wanted to achieve that very very sleek. Look so um! I just wanted my hair to be very sleek, so I'm just passing the flower through it again. You do not need to UM use heat to achieve this. Look I just chose to so you can just skip to the part where I start laying my hair down, but again, I'm just showing you guys how I achieved my sleep bag. So I will see you guys in the next clip all right so now that we have passed a flat iron through our hair. What I'm going to do is section my hair off on these sides. I'M going to section off my bang piece, I'm also going to section off a piece in the back as well as a piece in middle of my hair and I'm going to begin laying my hair. So I am going to take the Murrays beeswax. I have the black one and I have the clear one and I am using the pump it up spritz to lay the hair down in place. So again, I'm just parting, the back part of my hair, and now I would advise if you have colored hair, just use the clear beeswax all the way through. I mixed my for some. For some odd reason. It doesn't mix mine together, but if you have colored hair, I would suggest using the clear beeswax and if you have black hair or dark hair, I I would most definitely definitely use the black one. I really like the black one for the consistency in it and it does kind of fill in any kind of sparse spaces that you might have if you have black hair. So I highly suggest the black beans wax for black hair and then the clear one for colored here or darker here, so I'm just taking my hard brush and I am brushing everything into place after I have applied that um Marie's beeswax. Then I'm going to take my pump, it up spray and I'm going to brush everything in place and then I'm going to seal a rubber band on a scrunchie and then I'm going to continue to lay the rest of my hair. Now that I am putting on the finishing touches of laying my hair down, I am going to go ahead and do something about my edges now originally, I wanted my edges to look like something else, but my hair was just saw what it wanted to that day, But this would be the part where I just flicked my edges down, and you know create that nice pattern in the front. This is also optional. If you just want a regular sleep back, you know you can achieve that, but I just wanted to add those little baby hairs because, as you can see, my edges are kind of sparse anyway. So I just like to add those just to you know kind of cover that, but you know we're just going to go with the flow here and I'm using my little mini brush with the comb on the side that you get from your beauty. Supply store for $ 0.99 and I'm gon na pump some spritz on that to lay it all in place now the spritz is going to make the hair a little bit shiny, so I wouldn't be so heavy-handed like. I was with it at least in the front because it is going to be shiny until it dries completely and my hair dry completely, maybe a day it's a good day for that shininess to dole out. But now I am about to braid my pony. I'M going to braid my pony because we are going to be attaching the bundle to our pony, so we're gon na add a rubber band. To that add your rubber bands, so your um, your pony, doesn't fall off. You can also add braiding hair into your pony's. So you can extend that the pony as long as you want, so I'm going to wrap my hair up and let it set in place and let it dry for a little bit and then we are going to attach our ponytails. Well, I am taking this. I think it's called natural dream I am taking. This bundle is a 30 inch bundle in the color burgundy and they had some black roots, and I am just going to put a bobby pin through that track and then attach that bobby pin to my pony and I'm just going to start wrapping that pony tail. All the way around until like it's at the very top so now that we have gotten to the top I'm going to take some of my hair glue and put it on that last bit of track and then I'm going to wrap it around the pony. One. More time the base of the pony one more time so it can be secured and it won't move. So now I'm taking a little piece of hair from the back after I detangle the pony. I'M gon na take a little piece of hair from the back and I'm going to wrap that around the base of the pony and I'm going to start taking my pump. It up spritz spring the hair piece by piece and wrapping it around on each time. So, every time I wrap it around, I spray spritz on it and um. I let it lay down - and I can see you to do that into the base is completely covered. Then, for a little bit of security, I would just take a bobby pin on the back, and I will secure that last bit in place and now I'm just taking the spritz and I'm just going around that knot and I'm just spraying that knot into place. My hair dry a little bit, and this is the finished product. I hope you guys enjoyed this video is super super easy super affordable in the first place, taboo super affordable, and I found all these products at my local beauty supply store. Thank you guys. So much for watching this video make sure you like comment and subscribe and I'll see you in the next one. You

Comments
Darriale Bradley: YESSS MAAM
Brandon Wimbush: Yurrrrrr