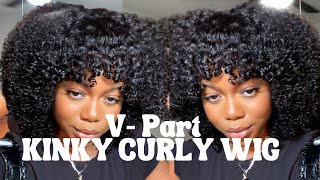
Best Big Kinky Curly Wig Install! How To Customize Your Kinky Curly Lace Wig!| Klaiyi Hair
- Posted on 12 October, 2022
- Ponytail Hairstyles
- By Anonymous
●▬▬▬▬▬▬♛#KlaiyiHair 5th Anniversary Celebration♛ ▬▬▬▬▬▬●
KlaiyiHair 5th Anniversary Big Promotion:17th-23th Oct.
Get 28% off Use Special Code: MY28
Direct Hair Link:➤https://st.klaiyihair.com/crdlu
Hair Info:13*4 lace front wig, kinky curly, 24inch, 150%density
Klaiyi 5th Anniversary Page:➤https://st.klaiyihair.com/cv30u
Affordable Natural Density Lace Wigs:➤https://st.klaiyihair.com/crdm0
Klaiyi Best Sale:➤https://st.klaiyihair.com/crdm1
Klaiyi Hair Official Website:➤https://st.klaiyihair.com/clg7v
Aliexpress Klaiyi Hair Store:➤ https://s.click.aliexpress.com/e/_opNA...
Amazon Klaiyi Hair Store:➤https://amzn.to/3OLRlhL
YouTube "Klaiyi Hair": http://bit.ly/2zpjQhu
TikTok"@klaiyi hair": https://www.tiktok.com/@klaiyihair
Instagram "@Klaiyihair_no1": https://www.instagram.com/klaiyihair_n...
Facebook "@NO1KLAIYIHAIR": https://www.facebook.com/NO1KLAIYIHAIR...
Contact for Wholesale: +8618337492297 Email: [email protected]
#klaiyiwig #lacefrontwig
-----------------------------------------------------------------------------
PRODUCTS MENTIONED:
BW Bleach https://amzn.to/3rOHnCs
30 Developer https://amzn.to/3SUOCVz
Purple Shampoo https://amzn.to/3SSY2Re
Conditioner https://amzn.to/3MEkImd
Wig Head https://amzn.to/3SX0MNF
Wig Tripod https://amzn.to/3MqhuCn
Mousse https://amzn.to/3CPpARW
Spray Bottle https://bedeckbeauty.com/products/fine...
Wax Stick https://bedeckbeauty.com/products/wax-...
Electric Hot Comb https://bedeckbeauty.com/products/elec...
Adhesive https://amzn.to/3RSDqav
Blow Dryer https://bedeckbeauty.com/products/blow...
Edge Control https://bedeckbeauty.com/products/edge...
Lace Tint https://amzn.to/3CyiEHM
Shop Bedeck Beauty: https://bedeckbeauty.com/
-----------------------------------------------------------------------------
Hey Girl Become a Love Bug ✨ by subscribing here: https://www.youtube.com/c/AshleyBedeck...
Email: [email protected]
Monthly Wig Sale: https://ashleybedeckhair.com/
My Amazon Store: shorturl.at/muS15
Let's Stay Connected:
Instagram: @AshleyBedeck
TikTock: @Ashleybedeckofficial
Twitter: Ashley Bedeck
Facebook: Ashley Bedeck
My P.O. Box:
P.O. BOX 52103
Irvine, Ca 92619
#ashleybedeck
-SMOOCHES klaiyi hair tint lace kinky curly texture kinky curly lace wig
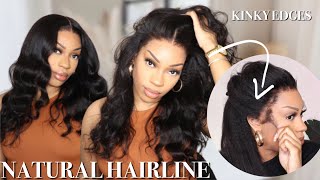
Hey love bugs welcome back to my channel, I'm Ashley for tuning in for the first time, and today you guys already know I am feeling myself so I've teamed up with Kawaii hair to bring you the start to finish, install if you're interested in getting all the Dates keep on watching. So this is the beauty here that we're working on today, she's a kinky curly Lace, Wig 13x4 by Dimension and we are starting off in the kitchen. I love the fact that they designated baby hair for us, so we're going to go ahead and set this one off by bleaching the nuts. Hence why we are in the kitchen, I'm giving you a close-up of everything just so that we are on point and we are able to go from start to finish and I don't miss anything for you guys. So, typically, you can find like foil in your Sally's or beauty supply stores. I just went in my kitchen and got what we already had, because I mean why not I made this mixture and it is BW bleach and the 30 volume developer, which are all sitting in the back, and I went ahead and mixed it in a bowl. In a pla, a plastic or paper bowl and a plastic spoon just to not use my real um kitchenware, I would never ever use real kitchenware. You can have a separate bowl for this stuff, but I had left it upstairs, and this was just convenient. You kind of make your mixture to be a nice thick paste that way it's not runny or drippy. You don't want it soupy or wet you want it thick. A quick thing that you can do is, as it lays on the foil. You can lift it and look at it from the opposite side, as I am now to make sure that the product is not pushing through if it's pushing through the lace. That means the roots on the lace will bleach as well, so be sure to be light-handed with that from there I washed the hair out with a purple shampoo after letting it sit for about 20 minutes condition with just a regular Moisturizing Conditioner. All those details are in the description box and then I did go ahead and put it on a mannequin head. While I multitasked and did other things it did begin to air dry, so we're going to go ahead and just style her up before we install. I want to ahead and took a nice pair of tweezers and just thinned out the hairline. It had a beautiful hairline already, as I did pluck it, but I just wanted to you know I felt like if I was going to do a little bit of customizations and bleach the knots I might as well take it all the way it kind of gives Me motivation when I bleach the knots to really really turn it up a notch if you will - and that was all the hair that I had taken out of the hairline that was tweezed hair, not shed hair at all, just to make sure we are clear next, I'M taking my wax stick from beadekbitty.com and I apply it generously to the hairline as well as The Parting. This is a free part, 13x4 lace wig. So you can do a side. Part curved part, bun ponytail, whatever you want within that 13 by 4 dimension. Again, I chose a center part bust down and I'm just going to go ahead and use the electric hot comb to really really flatten out that hairline, so that it looks like it's growing out of the scalp. Next I went in generously with a mousse. This one is from Target. It was just a quick, easy pickup through Target Pickup app at my local Target. Get, I believe, it's Maui is the brand I'll have it linked in the description box. It'S not like my number one favorite, but again it's easy and on hand, since I can get it from my local Target and you guys are, you know, I'm in and out of Target on a daily basis. I was very generous with this product, although I did go in with a Moisturizing Conditioner as I after shampoo, since I rinsed it out, and I let this one air dry. It did begin to dry, so it needed a little bit more moisture and if I would have started this process straight out, the sink so now I'm going in with a Denman brush. That is key when you are trying to Clump the curls and really really really Define them, whether it's your natural hair or a wig. I highly recommend you have a Denman brush in your bathroom or wherever you keep your hair supplies, because this is going to be a game changer, no matter what and it's going to give you versatility, since this is a kinky curly, textured wig. This made it a little bit more defined, but if you wanted a little bit more like not blown out, I can't think of the word. But just if you want the hair to be more kinky and big, then don't use the denim brush. But again this shows versatility and as the product and the curl wears off, it'll get bigger and bigger if you choose, but if you want to keep it defined, then yeah just use a lot of mousse and it'll stay defined. Now we have the wig on and it fits perfect. It'S a perfect fit for me, and I love that I hate when the wig is big or loose. It definitely tampers with the install process, and it also just doesn't feel as secure. This one did come with the elastic band inside. I did take it out for Comfort purposes. I just prefer not to wear those these days. I don't like it to sit on my the nape of my neck as much, but definitely use it for a little bit of security, especially when traveling or you know, hanging with your kids. For a little bit of security, we went with a glueless install. I am using the ebin and I'm going to go ahead and blow dry on a cool setting from there we're going to just go ahead and clean up the hairline. My sideburns are extra thick these days, so just making sure they go back. I opted to cut off the Taps for side Burns just because to me, a wig is always a lot more low maintenance. When I'm testing with my kids, it doesn't matter how cold or air conditioned anything is just chasing around Toddlers and a three major he's. What is he seven going on 13? My son is just you know every time I do and I try to go throughout the day by the end of the day, those things are lifted. So, for me, it's just easier to maintain, especially a glueless install without those ear Taps for sideburns. Now one of the final steps is just to go ahead and make sure everything blends perfectly be sure to use a lace tint. If that suits you in the beginning process, I like to go in as the icing on the cake at the very end and just add a powder that may be a shade or two lighter than my complexion. I used one powder and I felt like it had a little bit of a white cast, so I'm going on top of that one with a powder, that's darker than that one, and that one was perfect and I also added it to the hairline. And we are good to go. Also: here's a look at the hair as a finished result on as you guys can see it's nice and full super curly, and this robe is from Kawaii. They did send this over in the package, which I love so much. Okay guys so we finished the look and I think it looks super cute. What do you guys think? I went for a little bit more of a clean girl, aesthetic and I did no baby hair, which you guys know is not the normal dress for me and best believe. The beauty of wearing a wig is that, like today, I have no baby hair and I can finish it out this way for, like the rest of the week and then next week I can go in and ADD baby hair. I can switch up The Parting to a side part I can do half a pack down. The possibilities are endless, and I love that about wigs. You can even start off with baby hair and go ahead and send it back after the fact. I am rocking a cute little robe from Kawaii. They sent this over and I think it's so beautiful. So while we're on the topic, let me go ahead and show you the packaging and all the goodies. So this is our packaging, as you guys can see. We'Re matching we're Kawaii twins um also. I did go ahead and bleach the knots, as you guys seen. I did take this out because, typically, if I'm going to take away to the sink, if the, if it does include an elastic band - and it's detachable, I usually will take it out just so that it doesn't get lost in the product and the process and also Like just because, there's no point in it getting wet, they also included a wig band that also matches. So this is like the perfect set to take when you travel, because you can, like you, know, secure your wig and walk around the hotel in your robe um and it all matches and looks really good. A pack of wig caps were included and, of course, you have this cute little mesh bag that has wig cap in there um Lashes in there, another wig band that has like a maybe a cheetah print, there's a makeup brush in there as well and then last, But certainly not least, they included a cute little gift box, so I definitely feel special and inside they have this. Really nice fancy ring. So it's super cute. It'S like this really pretty Snowflake and it opens up here so it gives like a Justin clue or just the the bougie fancy bavari. It gives the vibe of that. But it's a snowflake. So it's perfect for the seasons and it's like a one size fit all, because it doesn't close all the way you'll be able to stretch it out if you want it to fit like a different finger or if your fingers are wider than mine excuse mine, because They are ashy now onto the hair. I went ahead and bleached the knots on the sink. I haven't done that in a while, but I just have been more into customizing and kind of just slowing down and just making sure my wigs are perfect. I also wanted to make sure I shampoo and conditioned this one, because I really wanted to tap into the hair texture and make sure I was getting the most out of it. Typically, it's okay to go ahead and style, your wig straight out of the box. Typically, that's my preference to stylish it out the box and once it gets old, then I'll go into the sink and I'll wash condition reapply and that's how I'll see you know if there's a difference in the texture, the length is perfect with this one, because it's Just not drowned out and too much. If you go like longer like down here with this one, it could need a little bit more shaping, but I think this one's just perfect enough that you don't need to like shape it or add any layers for that matter. Super super cute and fun, even though it's full, you can still put it in ponytails buns and clip it up. If you need your hair out of your way as we get into the colder Seasons, even though it hasn't quite got super cold. Yet when we have the overcast and the fall um, the fog and all of that in the morning in the rain, this one is going to hold up well and looks super beautiful, even like when it gets wet. So let me know what you guys think. Do you like this one, would you prefer this one, would you rock this one and how would you do it it's going to be cute with some twisties and all of that for a little switch up as well. Also, you guys know. I love my wigs behind my ear, so I did not add the Sideburn, because I just kind of wanted it to be a little bit more low maintenance and just easier to apply and to again maintain. So. Yes, I'm definitely loving this one and I hope you enjoying her too be sure to check out the description box for a direct link to her with all of the Deets and everything that I use in the video. Thank you guys so much for watching and as always I'll see you in the next one smooches


Comments
Jackie Randolph: Hi Ashley I love this wig it's so curly and beautiful. ❤️❤️
KellyJelly9976: this came out so good. Thanks for showing the bleaching part as well. Also, your lip combo is cute. Details?
Sara Tadika: Is there a special code in order to get the goodies??
Sara Tadika: Hey Ashley please read your mails
ladetra paul: