Dye Hair Coloring Tips & Techniques | How To Dye Hair Color
- Posted on 20 October, 2022
- Ponytail Hairstyles
- By Anonymous
A Guide to Hair Color Techniques
Dye Hair coloring Tips & Tricks
"I Love Haircut - I Love Hairstylist"
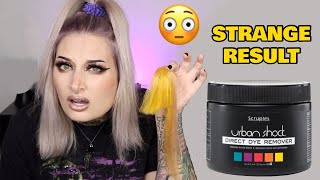
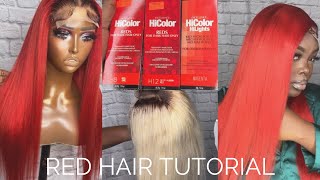
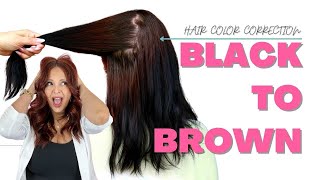
Thank you for everybody who is joining me today and we're going to jump into a super fun technique as to how to use the brand new Matrix coin color that is formulated, especially for curly and coily girls. So you see, I have our lovely mannequin here and we had her beautiful sections for you, but we're gon na pull these out so that you can see what we had going on. Okay, so she is sectioned off into rows of zigzags. We have her entire nape sectioned off into a zigzag. If you can see her zigzag here and we started with the formula we're gon na - do a nice cool and creative placement. Here we started with the formula for RV and 5r, with 20 volume in the root and melted that down into um 6rr in her nape section. So this nape section I'm going to turn it to the side. So you guys can see is about two fingers deep into her nape and it is a big chunky. Organic um zigzag placement that we have going on here. So now, I'm moving into her middle of her head section, which again is a nice big zigzag. Take this down, so you guys can see it different sections together. Okay, so now we have the second zigzag. This zigzag goes all the way from the front of her hairline to the other side. So we can see we have her big chunky zigzag and it's pretty organic with this zigzag, so don't feel like you have to have perfect Peaks and valleys. What we really want to do is create some Dimension and some interest right along with this color that we're putting on and I'll give you guys a little bit of tips and tricks about foil color. Because again, one of the reasons why I wanted to do this on our lovely non pre-lightened mannequin is because that's the beauty of quail color that it is a permanent color that is completely ammonia, free that it has B. It has. It has oils - and it has a coconut oil for added protection - to make sure that the hair process actually stays in really nice condition throughout the coloring process. So we know that our natural hair girls - they care a lot about their curls, so they want to be choosing the best product. That'S going to one give them some beautiful Reflex on some darker colors, like we have going on which this does their shade palette is wonderful, has a beautiful, especially the Reds, have a nice tonality and a really nice shine and reflex when you're working in your darker Levels which a lot of times at least especially for me, my curly and coily girls, exist at like level four and lower so working in our mannequin she's about a level five, and I want you guys to see how beautiful this is going to turn out on Her hair, so working with this lovely consistency, you see how like thick and creamy this is, it stays put, and it's really easy to get great saturation when you're working in your textured hair, um clients. So again - and let's reiterate we're now on the middle zigzag and in this middle zigzag, we are still keeping with the same root formula. So the root formula is five RV and 6r 5, I'm sorry, four RV and 5r. We had a lot of formulas going on here, so guys keep it up with me so for RV 5r and then we're in and we're just applying to her Roots. So because this is a big section, I just splitted down the middle and we're gon na do left and then right just to get her roots on one of the great things I love about. Coil color is how creamy and easy it is to apply. So I'm working with darker levels a lot of times, especially when working with red and darker levels have you ever formulated perfectly and you know expected to get that great four levels of lift and you go in and it's like this is way darker than I thought It was going to be and you're wondering what happened like what happened. Why is my um end product so much darker than I thought it was going to be and a lot of times that has to do with saturation. So we know permanent color has up to four levels of lift right, so we want to know how in the world, can you get those full four levels of lift, and that can depend on a lot of things that can depend on the client's porosity? That can depend on their texture if they have fine, medium or coarse hair. That can also depend on um if they have product buildup on their hair. A lot of different things can affect how much lift we're able to get out of our permanent hair color. But one of the biggest factors, along with you know formulating for their texture and for their porosity is making sure that we get good saturation so not having hair that is saturated enough, especially on coarser um diameters is going to give you less lift so making sure That you have really good saturation on your darker textured hair girls is going to um, really dictate what your results are going to be in coil color, because of its thick creamy richness makes it really really easy to get that good saturation. But you still want to make sure that you're using fine sections taking your time and not skipping spots. So now I did the one side of her head and I'm moving on applying that root. Again, the root is for RV and 5r. It'S equal parts for anybody, who's, just jumping in and I'm using 20 volume. So another good thing to keep in mind we're using a mannequin right now and on my mannequin, I'm going to be using 20 volume on her all over. But one of my uh, my hot tips for doing a single process color a virgin application, especially when we're working with Reds the one thing that you're always trying to avoid is hot Roots right. So I would typically do a deeper level like right now. We'Re working with the four and five! So basically, what like a five and a half and 20 volume and then if she was a real girl who had a Zone one and he coming from her scalp and areas that weren't yet keratinized, because their brand new hair. I would be using 30 volume in her mid shaft and ends to make sure that I really get a good, cohesive lift and that we don't end up with roots that are lighter and brighter. And that's especially true, if say, you're newer to working with textured hair and your applications a little on the slow side. That'S not a bad thing! You just have to formulate for it, because if it takes you more than a half hour to get the roots on a lot of the area where you initially started could have been processing for a really long time. Especially if you started in the front - and you end up with those hot Roots, even though your formula was correct, just because it sat there for so long, so give yourself some leeway while you're playing around with new textures that you may not be working with. In a salon on a regular basis and formulate accordingly so that you have some time, okay, so now we've got her roots on and we talked about in this bottom zigzag section. We did her Roots same color, the four RV and the uh 5r, and then in her ends is six RR. Okay. So now, in this top section, we're going to do her mid, shaft and ends and we're using 6cc so and the same way, I'm taking it right into that root and melting it right on in so taking the next section. That root is for RV and 5r and we're melting into a 6rr into our zigzag here and I'm taking that right down into the ends. So by doing these zigzag panel sections you get highs and lows, you get Peaks and valleys right. So you'll end up with some areas where that 6rr in the bottom is going to end up peeking through and then some areas where the 6cc from the top is going to peek through and we're just going to get this nice conglomerate of warm colors. This is like perfect for foil placement for foil for fall placement, because this is going to give you all of like the beauty of those fall, colors melted into one head, and when I tell you that I love the red tones, how red is super trending now And they show up so well on these darker levels that sometimes can exist in our quilly client. Okay. So while I'm getting this on, I'm just going to take a look at some of the questions that you guys may have Jonathan says his new favorite color line. Listen, it is so fun to play with so, if you've gotten the opportunity to go ahead and it's it's one of those that you'll see that they are not playing when you're talking about that it is, you know, uh 70 oil, because your clients like end up, Look at my look at my gloves. Actually, do you see how shiny that is like it really it's it's kind of like it's. A little greasy like I'm, not gon na lie it's a little greasy, but that addition of that coconut oil. It really gives like a nice added protection. This is gon na, be great on your clients who have sensitive scalps, who, just like everything, burns them that coconut oil in there is just gon na, be so gentle, and it really helps the color to just Glide down those curls, because it's super moisturizing and you Know um one of the most common questions that I get from my first time. Color, clients is how do I keep my hair from being dry after they get color like they're, afraid of that hair color, because they think their hair is going to be super dry afterwards so mind you, of course, we're still gon na have to make sure that Our clients are getting the proper take home um that they know how to treat and care for their hair that they know what their maintenance and upkeep coming back into. The salon is going to look like those things are important conversations to have, but by starting with a color, that's already formulated to keep their curls in tip top shape to keep the moisture in their hair to keep the elasticity in their hair, so um, so that They'Re not starting from this super dry hair after they get it colored and they're, trying to figure out how to put the moisture back in. And we do know that our curly and coily textures are more prone to dryness because of the shape of the Strand and how the natural oils from the scalp really aren't able to travel all the way down to those ends. So it can be prone to being much drier of a hair texture. Hence the addition of all of the oils and moisturizing properties that we have in the coil color. Okay, just checking to see, if you guys have any questions right now, can you also use coil color on straight hair? I don't see why not. To be honest, you know it's not going to um have adverse reactions on straight hair, but we also know that curly hair just needs a little extra care. We know that our curly hair clients need a little extra care. So that's why this color is formulated to just give that extra care when we're adding color to our our curly haired uh clients, absolutely okay, so I am finishing up this middle section with the 6cc on our mid-shaft and end. We'Re talking saturation see how I have like a little bit of just like dry area on this end, instead of just mushing that color down this is an area where I still just need to add more like you want that saturation to be all the way through. Now my client, here her hair, has been her. Curls have been brushed out for me to um, be able to move through her hair quickly. That'S not always necessary um. Some of my tighter curl patterns, their hair Tangles, a lot when being combed or sectioned with your tail comb and it's um, coily state, so I'll, just brush it out gently make sure it's completely detangled before I go in so that I can section with the back Of my brush easily to apply the color um if your client just has curly hair with no product in it, that's fine too. That'S another um. Great call out thing to think about is because this color does have so much oil in it. You really want to make sure that your client's hair is clean before you're, going into application, because that product build up or having that um product on the hair can get in the way from the color actually being able to lift correctly. And you get all of that lift out of it, so you really want to make sure that you're starting on clean hair, because you don't want to start off with somebody with a bunch of product and then use the color. That'S got oil in it. On top of that, okay, so now we've got our our two sections here right. So at this bottom you see we have our um our 6rr at the top. We have six CC, so we're going to be alternating between the 6rr and the 6cc. So now we're going down to our next zigzag section, so these are zigzag horseshoes, all the way around her head. So this is our next zigzag, I'm gon na tilt her. So you can see what that section looks like: let's tilt her back up, okay and same route, so in doing a color like this, where we're alternating different formulas and different um placement like there's, not a straight line placement, you might wonder like how, in the world Do I touch this up? Am I going to be looking for zigzags to go in and touch this up by keeping the root the same color throughout the head? I'M not gon na have to worry about what her root touch-ups are going to look like I'm just going to be able to go in and touch her root up like. I would normally do a regular root touch up on any client, because that root is still the four RV and 5r in every part portion of the head, even though we are alternating what's going on in the midshap and the end that root color is still the Same so it'll make the touch-ups really easy for you to do so. The developer is a cream in oil developer and it has an oil delivery system, meaning that it uses the oil to actually Propel the the color into the cuticle for even more just like strengthening and moisture and keeping that curl intact. So I know, when you say a cream and oil developer. A lot of us are used to working with cream developers. We use cream developers on a regular basis right. The so color developer is a cream developer, but this is actually different than that. So color cream developer that we're used to using it is not the same. It is actually much thicker and much creamier, even though they're both cream. So if we're talking the so color developer, so color developer, it's kind of like a like a lotion. I would say yeah like, like you know that lotion that you get in like the hotel bathrooms. It'S never really like that luxurious yeah! It'S about that consistency right for the so color developer, but the um, the coil color developer is more like that decadent Rich body cream. That comes in a jar. So when you are dispensing this developer, it's definite, especially if you're not using a scale and you're using a um. A measuring cup you're gon na have to go in and scrape the rest of that developer out of the bottom of the measuring cup, because it doesn't just like pour. You know so make sure that you're getting all the developer out of the measuring cup and into your bowl, because it's like thick and decadent, but that also means that you cannot use a different developer with this. So when you're buying the system and say you're just trying it out just grab one of the small developers too, because it's not going to be compatible with your so color developer and it comes in 10 comes in 20 and 30 volume developer, see. If you guys have any other questions, so yes again with the root, this is for RV and 5r for RV and 5 are at the root with my chunky, zigzags and really how you put your zigzag is going to give a different look on each time. So if you were to use a finer zigzag, you're gon na get a much more subtle, um separation between the two colors. If you were to use a chunkier zigzag you're going to get a lot more variation between where the Peaks and valleys are so think about. When you're doing your section that the point at the top of your zigzag is going to bring color all the way up into that section and that your point at the bottom of the zigzag is going to bring color all the way down into that section. So you can play around with that placement, depending on how you want to go and the size of your sectioned can change, depending on, like the length of the hair. She'S got medium length hair so when she wears her curls you're going to be able to see just that different blend of colors and we're still staying in the same level, so we're doing different tonality but same level, because this is a six CC and a 6rr. So we're gon na have that red, but then also the copper and then in the root kind of has that red, violet kind of root Shadow going on so definitely fun, color, definitely fun. Placement that'll look great on curls, but it also will look good if she decides to straighten as well too, because it's really going to be like peekaboos of the other color like coming through in her straight hair and I'm making sure to get really good saturation here. On these roots, taking it right up to the hairline and by keeping that root the same color, also when she goes to pull her hair back in a ponytail, it's not going to look like chunk chunk. Weirdness, it's the keeping the root the same color just gives it a cohesiveness that makes the colors look like it's on purpose and not like it's just random chunks of hair. Now you could do this with like a vivid, color placement, or you could do this with something even higher contrast because we're staying in the same level. But what, if you did want to do this with something? That'S, like you know, a dark brown and a blonde. You definitely could, but by having that root, stay the same color, the entire time. That'S what's going to keep it from just looking really haphazard, even though this isn't really organic placement. Okay! So now that we've got her roots on that was the four RV and the 5r now we're going into her midshaft and for her midshaft. We are doing six RR, so remember, underneath this was 6cc. Now we're going to do 6rr, I'm really making sure that we maintain good saturation, making sure all of those strands get coated with this Rich color. It is ammonia, free, so super super gentle and what I love is. It has like absolutely no smell at all like none, so you know we can be immune to Smells in the salon, like especially chemical smells, but we get our client in our chair and start to apply their color and they're like oh, my gosh, that's Sean and We'Re like what's strong, but with this like they're, not gon na get any of that at all. None of that strong chemically smell that we're a little nose blind too, but then can really affect our clients, especially those who might be a little bit more on the color shy side side. And you see how I'm just making sure that I'm going all the way down to those ends and getting really good saturation on those ends and we're moving right around the head doing that 6rr, I'm using 20 volume here. But if this was a real client, I would have used 20 at the root and 30 on her midshaft and ends really just making sure I don't miss any pieces saturate all the way through, so anybody who's already played with coil color. Let me know have: have you tried it? How do you like it? What are your thoughts on it because I have been loving it and you can definitely see the shine how the hair turns out in the end, and you do not have to worry about compromising any curls. Those curls are like perfectly intact. Yes, so um Melinda. This is brand new. You are welcome to the launch party. This is the launch party for coil color, so um. This is brand new. It just launched um in September and we're really trying to get all the buzz out about it because, yes, this is ammonia. Free hair, color, that's especially for curls and coils, that is infused with oil, has coconut oil. The developer has oil, the color has oil and a super gentle to keep those curls intact. Just adding a little bit more root right here and I am using this 6rr on her mid shaft and ends making sure that I'm maintaining my zigzag, because I don't want to lose my sections and I don't want to like accidentally pick up a piece from underneath And blend it into um what I've got going on underneath. I really want to keep these separate. If you feel like you might have an issue keeping separate, you can always just like lay a foil um in between each section to make sure that you're not picking up from another section when you're going in to add your color turn her around. For you guys see a little bit better and guys feel free to ask any questions that you have about coil lights, because this is brand new. I believe that there is currently a sale going on it's alarm Centric. If you want to grab it and try it out, I'm telling you it's like crazy, how you don't smell this at all and saturating all the way in through the end, just go in section by section with the 6rr. We have six CC in the section before this. I'M just going to create this really fun red. These really fun curls so don't be afraid to really use some color on your curly girls, especially if they have coarser strands or higher density hair. You'Re, just gon na need to make sure that saturation is on point. So I know even now, I'm working on a mannequin head and the mannequins have smaller heads and less hair. I feel like than a real person, and I'm gon na, have to remix some color in a second, because I really want you guys to see what the saturation should look like, especially if you're starting on clean hair. Your client has higher porosity hair. It might even like tend to soak up some of that color a little bit more than you're used to some areas in her roots. That again, I just want to make sure are really well saturated and I'm going I'm blending right into where I stopped the root. Color, so I'm applying right at where I stop the root and I'm really putting some tension and some pressure right into that area. So I can get good blend and then blending it all the way down and when I get to those ends. If I find that the color has not dragged all the way down to the ends, I'm not going to continue dragging I'm always just going to grab a little bit more color to make sure that there's good saturation all the way through, so that we get that Lift that we are going for okay last couple of sections here, saturating with your brush. You want to avoid like taking the color and trying to pull it through to like really get it through there, because you're going to end up wiping color off of a section that needs it, while you're trying to pull it down to the bottom. And then everything is going to be not saturated well enough. So when you get to a dry area, just add more color, but that's why you should have really good tension in how you're working it through with your brush as well. So you see I'm putting it right there at the root with pressure and then cross hatching down to make sure when I'm cross hatching back and forth. It really spreads the section open and then I'm almost pushing the section back together, spread it open, pushing it back together. So I'm making sure that I'm getting in between there and getting all those hairs nice and covered, especially when you're dealing with a higher density um. It can be deceiving like you can end up painting only the outside of the hair and not really getting in there. But when you go back and forth like this, there's no room for Eric, you can get everything nice and well saturated and I'll pull that away. Okay, it looks like I'm gon na need to remix anybody have any questions or what questions do you have about what we have done so far, um Amy says I've been using Color Insider for years, and I love it. It was also ammonia, free oil based great. Yes, so uh color Insider had a very similar type of um, very similar type of platform, so anybody who's, a color Insider user, might really enjoy using curl lights and color Insider was definitely one that could be used on both curly and straight hair, but guys when I tell you: oil, like my hands, are slipping off of this bottle right now, so slipping off of the bottle, but that gives you that slip that is going to be in the hair and really helps you get that good application process here. So now before I mix this, I want you guys to take a look at how thick and creamy that is so you see, the color is actually almost the same viscosity like that same thickness of the um of the developer, they're, almost just as thick. So when I mix that in together it's not hard to mix at all it like mixes instantly, which is amazing, you know some because the color is so much thicker than the developer, sometimes you're, like stirring Stern stuff. Anybody who use high lift color, like you know that color is so thick and you're stirring, trying to get it to mix but yeah. It'S just like a couple whips and like look look at how this is like stuck to my brush like it is not coming off it's so thick and creamy that it just spreads so easily, so that was the um, the fat, the 6rr that I just remixed And going in and just really getting that good saturation, I'm trying to there, we go trying to take a look at you guys comments as well: okay, yeah! So as the color is starting to develop oxidate, you can start to see the difference between what we got going in the roots and the mid shaft and the end how it's all coming together. Now, Okay, so we finished our middle section. I just want to pull this down, so you guys can see so I'm just gon na bring this into a couple of like nice points, so you can see what's going on okay, so this is five. Six, six r, r, six CC 6rr and the root is the same all over, so the whole head clean her up a little bit. The whole head has at the root for RV and 5r equal parts. So now we are at our last section, which is just like a big, very organic zigzag at the top, and I'm going in back with our root color, which is the four RV and the 5r b5r at the roots, equal parts, 20 volume, I'm just tapping that Root right along okay and really just applying the root the root I'm taking about an inch and a half down so inch to maybe an inch and a half down to get that root on, and this is going to make this root touch up super easy. So you're not going to have to worry about trying to find these same sections in order to do the root touch up, because the root is the same, and you can alternate you know you have to think about the amount of sections that you have when you're Doing this placement and with those sections what color you want to end on top or taking into account how the client uh Parts their hair? So, what's going to be the dominant placement of color, if they do a side part, what's it going to look like because of where you're putting these sections in these areas, I'm going to turn her around in a second, so you can see what this section looks Like because it's because it's a zigzag, it's not the exact middle of her head. You know so she's gon na get a different look, whether she Parts in the middle or on the side um when she pulls it back. It'S going to look relatively similar because the roots are all the same. Okay turn her around for you, okay, so looking at this section guys see how this zigzag is like Zig Zig in the center, and this is a little slightly off center. If she were to part on the side, this is all going to be copper, because we're ending with the 6cc on top and then she's gon na have underneath here here is the five: are the five the six RR so six CC on top six RR here, But then also like it'll be a peekaboo of underneath on this side is also the 6cc, so she's got six CC here. Five are are here and then six CC on top, but if she part it down the center, then it's going to be a little bit more cohesive on either side. So it's definitely going to give you like a different feel, no matter what's going on. If she was like, say a side part all the time and didn't want to end up with like one side of her head, one color one side another, you could shift your zigzag to be around her part line so that she would always get that copper or, Whichever shade you decide to choose - and you guys can have fun with this placement, like you - can do this with Color Cult and do pinks or Blues with it, you could do this um with a blonding client as an alternative to say doing a split dot um. This could just be something that could live in so many different spaces. If you decide to be really creative with it, it's really the options are endless. So now I'm going in with 6cc at the top melting it right into that four RV and 5r route melting them right in together, foreign making sure it is nice and cohesive. I see any areas on the root that need a little tap. I just go in and blend that in and just following what is left of this top section of the zigzag melting that all in together with the 6cc same thing right here at the top, and because this section is a smaller section on the top of the Head when she wears her hair, it has so much more variation for the color underneath to like really peek through it. Just has the ability to look different all the time and it really creates a unique custom. Color experience for your guests that they're not going to be able to duplicate with another stylist, so this just creates like client codependence you give them. Customized looks that are so just unique and different. They can't just go and get their hair touched up. Someplace else like they can't leave you so melting that right on in the next section right in through the top, maintaining really good saturation work through the ends, foreign and just blending right into that root, so just don't be afraid to just overlap. One color, on top of the other, that's going to create a really seamless blend for you. I used that four RV in the root, because I wanted it to have a little bit of depth and look like a root shadow. Thank you just moving right on through this section, you see how I'm using my brush to really get that color worked through, and I'm also making sure that my sections are thin because that's going to help you to get great saturation as well back. So it's not hanging in her face. I also pre-established her cut before I went in and did this color so that I could create my placement or choose my zigzags, depending on where I knew her. Hair was already going to fall based on her cut, because this is the type of creative coloring that you want to do and make sure that it really just melts nicely into the cut so that the cut and the color go hand in hand together. Okay. So this is our finished placement. I'M gon na actually grab her off so that you guys can really see like the variations of what's going on here. So we started in the back root color all over so globally. The root color is for RV and five are equal parts with 20 volume and then the first zigzag section down in the nape through her mid shaft and end. We did six RR through her second zigzag section along the um middle of her head. We did 6cc and then, as we got closer up to the crown, we went back to the five, the six RR and then finish at the top with six CC. So you can see the different variations of how they're falling in between each section. Her touch-up is going to be really easy to maintain, looks like my glove must have burst open there.
Comments
Night GAMING 000: Nice mam