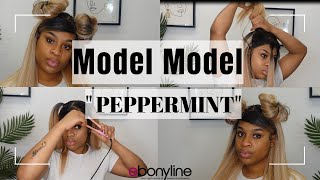
Model Model "Long Vacation" Ponytail Tutorial
- Posted on 19 August, 2019
- Ponytail Hairstyles
- By Anonymous
Hey Dolls,
I picked up this long wavy ponytail for a quick ponytail style for my recent trip to Atlanta!
Visit my blog here for more details on where to find the pony!
Thelushdiva.com/b-l-o-g.html
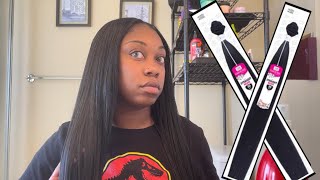
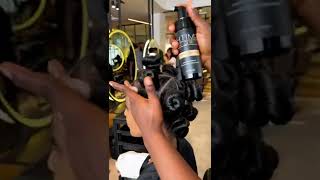
Hey you guys, let's get here and I'm back like I never left whipped, another natural gift. So today I'm doing something different and completely out of my comfort zone. It'S not a wig and you guys know. I live it down by my synthetic wigs, oh hi Greta. I actually went to Atlanta's past weekend and I wanted sunny Knowles on a different side fresh. You know spiced up a little bit, and so I actually did a clip-on ponytail. So I wanted to try this ponytail look. I wonder if I will cause we do supply store and I picked up this ponytail called long vacation by modifier. It'S really kind of it has a natural way so that it kind of matches the texture of my natural hair and seeing that this was the first time that I've done anything to my natural hair in full L. But I'm talking about years, I've just been wearing wigs. I wanted to get something that would kind of make it easier to like blend and look more natural, and so I wouldn't look like you know. My hair was weighted eating my ponytail with straight straight, but get all that so anyway. Today, I'm going to show you guys from start to finish how I did my way you ponytail look and then I'm gon na show you guys how I put it up into a bun. So I know I'm rambling, let's just get. Maybe okay, so first things. First, you want to start off with clean dry hair, so I'm just showing you guys that I have my hair stretched here and I'm getting ready to take out. My four stretch braids. So I just stretch my hair by patting it into four sections and then I let it dry completely. So that way it's detangled and it's easy to comb out and get ready for my bun. So I'm just combing out my hair and making sure that it's like easy to comb through that all the kinks are out, so I can make my bun and slick as I can get it so now, I'm just gon na go through with a little Jamaican black, Castor oil, just so it's not too dry. When I get ready to put my bun in and I'm going to, blow-dry it out using my flat paddle brush and my blow-dryer on the high setting once again just to make sure that it's as straight as it can be for the purpose of this kind of Kinky natural bun we're just combing through once again and now we're ready to go in with my first layer of gel, which is gon na, be the amp pro protein gel the black gel, and I use this first. I don't know why I use this verse. To be honest, it's just I've used this gel. Since I was a kid, it usually gets things fairly slick and I don't like putting too much of the echo styler gel on because it makes your hair very wet. So I did like to go in with this first so now we're just gon na go through with our paddle brush and give our hair a brush through just to kind of get that first layer of sleekness. Now remember. We have a couple other products to go. So don't be impatient, okay, so we have our first level slick down and now we're going to go on with our eco styler olive oil gel. This is the gel that gets your hair really slick, and you need to use a lot, especially if you have my hair type. Do not be shy, keep globbing it on. You see me like do not stop and you see how the waves are popping and my hair is already getting significantly more slick. So now I'm ready to go in and starts licking my hair down for the actual bun, so I'm taking a hard brush that I got from the hair store and I'm just combing or brushing my hair straight up. Just take your time and brush in small sections. Don'T try to brush too much all at once and make sure that you get all the hairs in and now I'm just showing you the back a little bit okay. So I'm using my elastic band. I don't like to use rubber bands, because this requires a really tight ponytail and you don't want your hair to break off. So I do use the elastic bands that do not have any metal clips in them for this. So I'm just showing you it's not perfectly slick, but what is not slick right now will be once we add our got to be glued and we tie it down. So we're gon na go ahead with our got to be glued spray and just give it a good spring all over and use that hard brush again just to sleek down any hairs, and then I'm actually gon na take just a little bit more gel around the Edges just to make sure those are really nice and right and tight honey. Yes, so the next step is to go on with your scarf. I do suggest something silky and something that's wide enough to go all the way around your ponytail base at the front and the back. So you don't want to use like a triangle scarf. That'S gon na leave your hair in the back expose you want that silky covering to be covering all of your hair, and I'm gon na take my blow-dryer at first on high to just set that got to be glued and then I'm gon na turn it down To low to make sure that got to be blue gets nice and stiff and that the hold is really firm. Okay, so let's see what we got all right take our scarf off and, as you can see, we got a good level of slickness here, slick enough to put this ponytail on, so I'm just going to blow dry a little bit more without the scarf, because it's Still a little damp and now we're ready to put on our ponytail, so I had a little bit of trouble with this ponytail with the jaw string. I don't know if it was just mine if it's all of them, but it gave me a lot of issues. So that's what you see me struggling with here, but now that we finally got it. We'Re gon na go ahead and apply our ponytail by sticking in the front comb into the front of our bun and then hooking the back comb underneath the bun. So I'm just getting it hooked down now the drawstring, like I said on this point tail was a little defective, and so it was hard to catch it. So I'm gon na pull that string to tighten up my ponytail. As you can see, it's just a little messy at the top, but we have it attached. I'M gon na go in with a little bit more of the eco styler gel and my little toothbrush edge home. I don't know what it's called my edge brush and I'm gon na get a couple of silky swoops, not so much cuz. You know, like all that crazy. You know chili from you know, TLC swoops, but we just gon na give them a little so use your toothbrush and just get a nice natural level of swoopy swoops and then I'm gon na spray. A little bit of that got to be glued directly on the brush and brush some of those flyaways back up into the bun and that make sure everything's set. So this is styled with the ponytail down. As you can see, the texture of my hair matches very good. It looks super natural, but if you're gon na wear your ponytail down, then you want to take a little piece of hair and wrap it around the base of your ponytail. So it will look more natural, I'm getting ready to put my hair into a bun, and so I didn't do that step for this purpose. So, in order to get your hair into a bun, you want to take all of the hair on your ponytail and start wrapping it around all the way down to the ends. You want to make sure that you have all the hair, nice and tightly wrapped so that you don't get any flyaways or any pieces falling loose. So now you're just going to take your wrapped, ponytail and wrap it around the base of your bun, like a doughnut, make sure you have your bobby pins ready so that you can clip, because this hair can get away from you. It can slip out. So what I really love about this bun is that the texture is so natural that you really don't have to do much to blend your natural hair. It really just looks like you threw your hair up into a bun and you can really fool the baby daddies with this ponytail piece right now, and so I couldn't let my bun sit with the scarf on for as long as I wanted to. But if your natural, you want to let your scarf stay on, I would say at least 30 minutes to an hour. Okay, you really want to give time for that got to be glued, to hold everything down and also for your gel to dry, and then I also like to do my edges again when my gel is dry, but I just don't I'm starting filming this. I got so far and I just get out finish it right now. So what I'm gon na do is I'm gon na put my scarf back on. I'M gon na run my errands, but I just want to show you guys that this kind of comes up with a final look. This is a look for somebody who has natural, hair and kind of wants to keep their natural hair texture with the bun. So this is not a tutorial for like a super sleek. You know anything like that. Like you still got, wale got a couple: OBT B's back there that I need to get um but, like I said, I'm gon na put my scarf back on and go run. My errands and then you know everything will be like thanks. I just got back from one of my earrings real and I did type my hair back up for just a little while longer, so I did just want to show you guys that it does set just a little bit more, especially with that got to be glued. It really gets it down in. There still got a little texture. The edges now that they're dry they're really in place so yeah. You got junk at the point natural blonde natural hair by black girl who doesn't know anything about natural hair.

Comments
Eboni Williams: Super cute !!
Temi SINGFIELD: Go diva!!