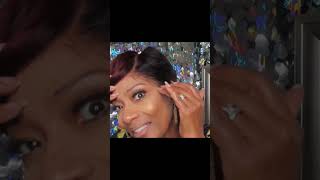
Effortless Wig Install W Edges Tutorial + Bald Cap Method
- Posted on 17 January, 2023
- Ponytail Hairstyles
- By Anonymous
Learn how to install a 24 inch, human hair lace front wig with fluffy edges using the bald cap method. By watching this Effortless Wig Install W Edges Tutorial + Bald Cap Method you will achieve an effortless silky smooth and melted lace front wig install in the end. Please keep in mind during the tutorial that for the bald cap method, start with a cap that is closest to your skin tone. This makes the bald cap method even more easy and reliable .
All product links listed below!!!
__________________________________
Aphogee Style & Wrap Mousse
24 In Wig 13x4
GhostBond Lace glue
Wig cap (tan)
Spritz or Got 2b Glued spray
Please watch: "Labeled Step-by-step Soft Glam Makeup Tutorial For Brown Skin" for more makeup tips and styles at
https://www.youtube.com/watch?v=d0ih1Q...
If you wanna see me more, follow me on!!...
~~~~~~~~~~~~~~~~~~~~~~~~~~~~~~~
♡Instagram @Samiahmariem
♡Tik Tok @Samiahmariem
♡ORRR click my link to find all my socials in one place!!
https://l.instagram.com/?u=https%3A%2F...
FAQ♡:
How old are you? 19
Where do you live? Michigan
What do you edit with? iMovie
What camera do you use? iPhone 11
Disclaimer: I do not own any of the music in this video.
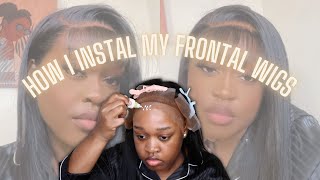
Foreign AKA Maya - and today I am back with another video. I will be installing this 24 inch, 13x4 lace front wig. Now this I did get this wig from Amazon, um link to the wig will be down in the description. I will just say this, though, before the video starts, I did not feel me doing this hairstyle. I'M actually recording this intro about like a week later so yeah. I didn't do the hairstyle, however comma. If you want to also see how I did this hairstyle, please let me know in the comment section below and make sure you hit that like button and subscribe and yeah, I'm not even gon na hold y'all up, let's go ahead and get us right into the Video and uh yeah Friday I'll see you out there. Okay, so before we get started on putting on the wig we're gon na start off um applying our wig cap. So I like to go in with some rubbing alcohol and clean the perimeter of my forehead. That makes sure is that the um, the glue, has a clean surface to stick on, so that your wig cap and your wig will last longer. I also have another video on how I do my ball cap method. It'S more detailed, and you know um slower - to learn just kind of like sped up and fast forward it, but this also should show you're gon na cut out the ears after putting on our wig cap and make sure the alcohol dries. I forgot to say that make sure the alcohol dries and make sure that the surface or cotton swab or paper towel that you're using is also fully clear and clean, but you get done cleaning your forehead next, we're going to start applying the lace glue. Some people during this step use got to be glue spray or like Spritz or like they got to be glue gel you can use whatever you feel most comfortable with, but me personally, I like to go in with um my ghost Bond um lace glue because I, Like to keep my wigs on for like a long period of time, so if you don't like to do that, then you can like use a um. It'S like a softer quote-unquote product. After rubbing that in um I go ahead and use my blow dryer. I usually put it on um, either cool or warm setting, and then I put it on low um. You want to make sure that you dry the glue completely. You don't want it to be like wet, so it's me drying it also, depending on how long you want your weight to last, you can go in with multiple layers. I usually just do one for my wig cap and then I go ahead and put my wig band on that's just going to make sure that the wig cap melts as it's supposed to so. I had just got done washing my wig because I bleached the knots, so I'm going to be blow drying it, while my lace glue dries that way. I have something to do when something's occupied me, while I'm waiting. Yes, I'm in love with your body. Okay. So now we're going to go ahead and take the wig band off, as you can see it's dry and it's melted into my scalp. So that's always a good sign. We'Re gon na go ahead and we're going to start removing the excess. So we can finally get that bald cap look, so I'm going to go in a pair of scissors and I'm going to start from the hole next to my ear and I'm just going to cut straight across now. The the trick is: do your ball cap method? You want to tug and cut tug and cut that's how you're going to get it as close to the scalp as possible. I don't actually cut that excess off. As you can see, I just pull it to the back. That way. The cap is secure and then I go with my like eyebrow razor and, like I said, pull and cut so now I'm going to be installing the wig um I didn't put any like um, concealer or anything like that or powder on my wig cap. But as you can see, it still Blends really really well, so I'm not going to worry about putting anything on my wig cap, and so I'm going to go ahead and pull the hair up. This makes it a little bit easier when you're, laying your lace and also, if you want to use like some Spritz or something glue spray to comb everything back. That also helps so I already measured where I want to put my wig. You want to kind of take note of that, make sure it's like even and make sure like you like, where your wig is sitting. You know not too far back or like too far forward. You want it to be just right now. In all honesty, I do not know where the footage of me applying the lace blue is, I guess it just didn't make it into the video, but I did do about like three layers of my go: spawn, lace, glue and that's juicing me doing see combing the The hair or the lace until the glue so that I could get a nice you know perfectly laid look and make sure when you're, applying your lease glue, that you let it dry a hundred percent before adding on the next layer. Okay, so it applies white and it dries clear. You want to make sure your toe your whole forehead is clear before you start putting on that next layer. That way you get the maximum strength of the glue. Then I'm going to go ahead and I'm going to cut the excess of the lace off that's by my ear um. This is totally normal for people who are like new to like installing their wigs, because you know sometimes your head is going to be either bigger or smaller than others. So you know, sometimes you don't need that extra part um. You just want it right there. Next to your ear, you don't want it hanging way. Past your ear. Okay, it's okay! To cut that piece off! You know you don't need it after cutting that piece off you're gon na kind of want to make sure you know you get it to where it looks natural like your natural hairline, would and you're going to go ahead and just put your wig band on again. So we cannote that lace onto the um, the scalp or your forehead and you're just going to let it sit until it dries completely now, while we're letting it sit, so we can, like you, know, stay occupied, I'm going to go ahead and start styling, the hair. So, just for you know making it easy for you guys, you know to do like the wigging style. I just did a straight. You know um straight hair with the middle part, nothing too hard to do it's not too hard to copy plus. When I first do my wigs um, I just like to just wear the hair straight for a couple days until I feel, like you know, doing something extra with the hair so um, while I'm doing um or I'm styling my hair. I always make sure that I use a heat protectant on the hair because you know like it's, not your real hair. You want to make sure you're protecting the hair because, like you know, it's not attached to a scalp, so it's not gon na be able to heal itself so um. I will be sure to link the products that I used in the description. So I'm going to go ahead and split the hair in half. That'S what I use um. You can also get it from the Beauty Supply, but if you want to get out of Amazon, like I said, links will be in the description. I only take about like a dime size amount, if not like two dive. Size amounts for like half my head and I go ahead and I just rake it through. You want to make sure that you rake it through evenly because you don't want the hair to look like super like oily when you're done in certain spots. You want to make sure you comb it through thoroughly thoroughly and I'm gon na go in with my flat irons. I think they go up to 500. I think, or something like that, I have them like on the max setting that way, good enough that I'm here, I only have to do about like one to two passes depending on you know the section that I get, because some sections as you'll see is a Flat ironing are bigger than others, so you may see me do like one pass, or even so you do two passes just depends on like how big of the section I have, in my hand, is, and, as you can see when I take my time, even though It'S fed up. I did take my time um, it does come out really silky smooth and just just super super silky and pretty and faster than always. Although my heart is okay, now that we are done pretty much styling the hair, um flat or anything else, you can take the wig pan off and, as you can see, it is laid period. So I'm gon na go ahead and just apply some of my styling mousse and I'm just gon na apply it to like the roots. I do try to avoid my lace um just so that, like um, it doesn't start like making lift up. I don't know I just don't trust it, so I just go ahead and like try to avoid, like the lace, just try to get as close to the rooms as possible, and you want to just you know, start combing it back so that we can. You know start um taking off the excess lace so, like I said you could also use spreads or it got to be glue spray, whatever works best for you, but for this part I just like to use mousse because um I usually style the base or the Roots of my hair with mousse anyway. Now this is the part where I start putting makeup on the lace. Now I I will admit that is eyeshadow. However, comma I don't really wear eyeshadow for referral, so if this is what I use it for, whenever I do my wigs, it's like the perfect color or match to my skin. So that's just what I usually use that that palette for and I go ahead and add just a little bit to um the front of my hair or the front of my hairline that way. Um, the lace looks a bit more natural and I'm also going to start cutting the lace into sections. So it is so much easier to remove the lace and, as I said, you're going to pull and cut, you know, pull and cut, and you won't also use that eyebrow razor so that you can get a clean look. So it looks natural and, as you can see, some hair did come off, but that is totally natural. Now I will say you want to try to avoid cutting a whole bunch off. You don't want to cut a whole lot off. You know you just want to cut. You know the part that don't got no hair on it, as you can see, I'm removing the excess lace and it's definitely definitely giving scalp, and that is what you want. I'M gon na make sure I get like that. Little jacket, you know pieces so that you know you can't see the front door now. As you can see, you can see the front door a little bit, but that is okay, because what we're gon na do is we're gon na put a little bit more makeup on the front area where it looks a little. You know a little light from either like the glue residue or like from um just the lace in general Spritz, so you're, just gon na put a little bit on your finger. Don'T Spray it directly to your scalp, just put a little bit on your finger and you're gon na just press it in and believe it or not, but that's going to actually make a super big difference. Um! It'S just going to even out the color of the lace so that it doesn't look like super super bright and it doesn't look. You know super weird, just put a little bit of Spritz just a little bit. I got to use your wig band again and you're gon na just let it sit and kind of melt, um and yeah. That'S how I get like the perfect color for, like my wig installs super easy. You know because I don't own any like lace tint. So that's like kind of, like my DIY lace tip for cheap and for free. So now that we're pretty much you know, like I said, done, styling it I'm gon na go in with my concealer for my middle part. Now um, like I said um, I didn't do like any makeup on my ball cap. So, that's probably why it's not like shining through as much um so and sometimes I don't pluck my middle part - sometimes I just add a little bit of concealer and it does the trick just fine. You can pluck your middle part so that you can, like you know not particular on it, but just put concealer on it and, as you can see, it is giving scalp it's giving it's mine. I grew it out of my head. It belongs to me. So that's how you want it to look and if you're, like, don't like edges and like baby hairs and all that this is like the perfect way to install your wig. So you don't have to know because this looks like Supernatural I like beaches. So I'm going to show you how I do my baby hairs. So, as you can see, I just scooped them out with my retail comb and I flat iron them down. You can hot comb them down as well. Um add a little mousse so that they get that hole so that they always um face downwards. That way, it's super easy to style them. I usually evenly take the wig off. Usually they try to face downwards too, and then what you're gon na do is you're. Gon na take your scissors or you can take your eyebrow razor if you prefer and you can cut them, I like to cut them at my eyebrow. That'S how I measure where to cut it at and usually that's you know, that's just the best measurement for me to know where to cut the mat is at my eyebrows when I style them: they're they're, not touching my eyebrows, but they're like right above right. I usually have my actual edges. I do the same thing for my sideburns. Usually I cut them like a little bit below the ear. Some people cut it at the ear, but I prefer my sideburns to actually be like super dramatic and long. So, that's why I cut a little bit past the ear and I don't have those little baby flat, irons um, for like the baby hairs. I just have my regular flat irons, but, as you can see, it still works just as good. It'S just not as dramatic and curly. I also go in with mousse when styling and my edge control like I said all this will be linked in the pot and all links will be Linked In the description box below Jesus and then I just style as I want. It might take a few minutes that is okay, but it's perfectly normal, but you will get it eventually: okay, yours so after installing the wig and like styling it and stuff all right now I have like an updo on the hair um, but the hair is super. Like I said, it's super soft, it's super shiny right now. I really do not have any product in the hair. I only have heat protectant. I don't have to put like anything in the hair for it to have this nice shine. All the links to like all the stuff that I use in the video will be linked in the description box below also the wig too. This is a wig from Amazon um, so I also will be having that link um down below. I did go back in and do like some more plucking, as you can see like by my middle part, so that it can have a better middle part or like more noticeable middle part. I just love this hair, the Fiat um in the next video and like yeah, like this video, give it a thumbs up if you like the install. If you want to see more wig and styles, let me know by liking this um video be sure to hit that subscribe button. If you are not subscribed to the channel, then what are you doing for real anyways I'll see you next time, bye,

Comments
Samiah Marie: If you guys have any questions about the install, please let me know and I'll be happy to answer!!