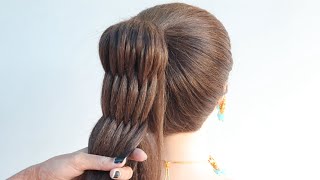
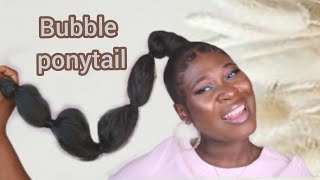
No Heat!!! Sleek Bubble Ponytail On Thick 4C Natural Hair.
- Posted on 06 February, 2022
- Ponytail Hairstyles
- By Anonymous
How to do a sleek bubble ponytail on 4c natural hair without heat. In this video, I'm going to be sharing how I achieved this bubble ponytail look by myself using braiding hair (kinky extensions).
Products used -
- Gorilla snot gel
- Amigos by Darling kinky extensions
- Vatika leave-in conditioner
- Hair wax
Thanks for watching! Please don’t forget to like, comment, share and subscribe.
☆ Say Hi on social media ☆
On Instagram - https://www.instagram.com/thedemarah/
@thedemarah
For business inquiries, kindly send me an email -
♡CHECK OUT MORE OF MY VIDEOS♡:
Natural Hairstyles for 4c Hair
https://youtube.com/playlist?list=PL0i...
YouTube tips & tricks playlist
https://youtube.com/playlist?list=PL0i...
Content creation tips
https://youtube.com/playlist?list=PL0i...
Filming & editing tips
https://youtube.com/playlist?list=PL0i...
Living Alone Diaries
https://youtube.com/playlist?list=PL0i...
Other vlogs
https://youtube.com/playlist?list=PL0i...
#bubbleponytail #sleekponytail #sleekponytailonnatural hair #naturalhair
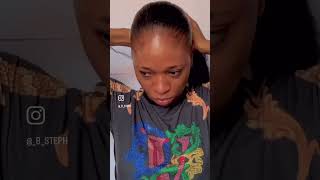
I can do this forever, hey my loves and welcome to another video, where i show you guys how to achieve a sleek bubble, ponytail just like the one you just saw in the angel of this video. So if that looks like something that interests you, it looks sleek enough. Okay, then you want to keep on watching this video. So, first of all we're working in sections, okay and i'm going to be using a living conditioner before actually going in to detangle my section. So this one is from vertica it's um oil-based it has oil. It also has like the leave-in conditioner itself, and my hair was already pre-stretched, because i had like a twist out so yeah you want to work with um stretched hair, it's easier to get like a very good sleep. Like it's easier. I know like it's impossible, but it's easier to get a a sleek bun when your hair is a bit stretched out and when it's just you know like in shrunken state or maybe just had your wash day, okay, so yeah, i like to do my slip bonds On like partially stretched hair, so yeah i had to twist out - and now i'm just going in with a white tooth comb to detangle, okay, so um you're detangling, because you want you want to prevent your hair from having a lot of knots. Okay, so i have this this gel right here and if you are an og on my channel, you know this gel. There are two variations i just found out because i i ran out of the first one i had so i got another one and it has like a different packaging um. It smells the same, but it doesn't um have the same like um. It doesn't have the same um stickiness, because this gel is actually very sticky. It'S called gorilla, it's not gel for a reason: okay, so yeah, but basically um. It still got the job done. So i'm just applying that over my hair, i'm trying to focus more on my roots and um, because you want to focus on the roots. That'S how you get it: sleek, okay, so um yeah. So this is my holy grail. I use this for my sick bones. It'S what is what i can vouch for. So if you want to get like a sleep, one go for this gorilla sludge and it's quite um, it's quite um scarce in the market. I had to go a lot of places to find this particular one. The purple one um, the yellow one, is a bit more common and um. I don't like that one, because it gives a lot of flaking, so i go in with the purple one. The purple one doesn't have any sort of flaking and it has like 10 out of 10 hold okay, so um yeah, i'm just detangling my hair right now. You want to make sure that you're not having any knots, because for this hairstyle you want to get it. Sleek so focus on your roots, because that's where the sleekness comes from okay, when we get to the end of this um, sleek ponytail part, i'm going to show you guys what you would do to the ends of your hair. Like your ends, you're going to have to tuck it in so don't really stress yourself about putting on gel at the end of your hair, okay, so just focus on the roots and get the roots to be sleek, okay, yeah! So do this all the way up to the top, and i was going in for um a center part, so with center parts um, i just feel like it fits me a lot better at the center part of a c cut yeah, but today um i'm just Going in with a center part - and i had to apply my um conditioner once more just so that i could see like where i want to go in with the comb and get like a very clean part - okay, so yeah! This is what we're looking like, and this is the center pattern that i went for so once again, i'm going in with my living conditioner. You can see that i am detangling with my fingers as well as using the white suit comb just so that we have everything you know in check: okay, so yeah when you're using this gel. Please try. If you want it very sleek, you want a very sleek ponytail, avoid trying to minimize the product. Okay, so use as much as you as you as you need yeah yeah use as much as you need. Don'T try to myself. Don'T try to you know minimize usage. Just use what is gon na be enough for you, okay, so yeah! Basically, this is all you're gon na be doing just make sure you detangle, as you go on, add it to the back one. You can see that i am i'm adding gel and then blending it to the bond that i have at the back. Okay, so that's what you want to be doing. You want to be working in sections most times. People just apply the gel, like they pack their hair, all the way to the back first and then apply the gel and just brush it down that doesn't give you like a sleek sleek ponytail, look, okay, so it doesn't also last so. What i like to do is go in sections and blend it blend it all the way to the back. Okay, so now um, once i'm done with that, i'm just going to you know, take out the rubber band and just blend it. Take another section and my gel blend it, you know so yeah. It won't be working in sections, basically foreign foreign. When you get to the front part of your hair, you want to use enough gel as much as possible, just so that you have this very sleek. I go in with this rat tail comb to just sleek everything down to the part that it gets i'm too thick for the gel for the comb to go in so when it gets too thick for my comb to go through. I then go in with my i'm white to comb and just try to blend everything, so you want to also keep like a very firm grip. While you are trying to blend okay and um, once you're done with that just take out the rubber band or the hair band at the back and blend everything together, try not to tie it too tight because you're going to be unraveling it a lot so yeah. I'M just gon na go and do the next part and i'll leave you guys to watch this and just see the visuals okay. So this is what we're looking like right. Now we have the gel in and guess what happened. Yeah i live in nigeria. I live in nigeria, so they took the light um. So i just went on like content must go on regardless, so um yeah. This is what i'm going to be using. This is another staple in my hair. Um routine is another staple in my hair videos. You guys and if you're an og, you know this gel since my hair works and of course you know, i use this for my edges. It keeps them in place, has a good consistency, very thick consistency, and i just love using it to do my edges. So for the edges, i'm going for, like the soup swoop swoop kind of edges yeah. So you want to be swooping, swooping just create sections and you can use um your gel brush. You could use a comb, you know whatever just gets the work done. That'S what you want to be doing, okay, so yeah. Do this, whatever style of um edges you love to do you can use this job to do that, i'm not someone who knows how to do musical notes. So i just do what is basic for me and just basically do this: okay, so yeah um, basically once you're done with this try to blend it in as as much as possible, and then you put the light again. So we had to go back to the original settings and we're back to using artificial light, but yeah. Basically, what i'm saying is just blend everything before you do like the final packing at the top and because i'm going for a bubble, ponytail right, i'm going to um push this up a little bit. Oh, i still apply another gel wow. I applied more gel just so that this can be very slick, so yeah you can see i'm trying to now bring the hair up. So it's no longer like a low ponytail. Remember we actually added some gel at the back of the hair, so bring it up. A bit because for this hairstyle you don't want it to be like a low, a low ponytail. You want the ponytail to start like somewhere at the back, not just like low okay. So take it up a little bit and then next i'm going to be using. My scarf to tie this down, there's a technique that i use to tie my scarf, which i'm going to be explaining right now, so tie it first and then um just this is like in slow motion right now, like actually the same speed that i used to Do this, i'm literally dragging it just so that it gets sleek, i don't need. I feel, like the visuals are going to be more explanatory, i'm going to go over it again, the second time so um. Once i tie that at the back. I bring it back again to the top, but this just depends on the kind of scarf you're using, but for this kind of scrap i just love to slick it using the scarf again. Okay, so it's very tight and um. I don't know how to explain it. I hope the visuals are are really explanatory to you, but it's very tight and it helps to make it sleek. I go over that again with another scarf just for the um, the upper part, okay, so that that part is already is laid down perfectly next up. This is the extensions which i'm going to be using. I think this is amigos um, kinky extension. So it's long, it comes like in two separate um bundles, so i'm gon na be using two separate bundles. This is what it looks like basically, and i wanted to go with like a kinky texture, just because my hair is natural hair, i'm also going to be using these gold strings to accessorize. I think by now. You guys know that i'm an accessories person and i love good accessories, so yeah. Next, i'm going to be using some black rubber bands and i'm saying black because um you don't want um red rubber bands, green rubber bands, protruding out of your bubble ponytail. So you want to use the rubber band to basically create the bubbles. Okay, so just tie tie the rubber band on the kinky extensions. Okay. So, depending on how puffy you want the x, the bubbles to be okay, you can have like long bubbles or you could have it short and puffy. So i went for the short and puffy one, so that means you're gon na be tying the rubber band in, like maybe like the same, the same size. Okay, if you want it like long long long long, then you go in for longer bubbles. So, at the end of the day, this is what it's looking like. Okay, i'm going to show you guys how i basically um handled the bottom part next up we're going to be accessorizing this using the gold strings. So you just want to tie this around the where you put in your rubber bands, okay and make sure that it is visible. The gold is visible, so you want to tie this like multiple times just so that the gold is visible. That'S what makes it visible if you're just going once then you're, probably not going to see the gold um string right there. Okay, so do this and you're good to go! You guys just get the last bubble. What you want to do is just use a black rubber band and tie the end and then simply just top that into the last bubble that you just created and then fluff it out a little bit and there you go. It'S that simple to you know create the last bubble. Okay, so this is time for the review. The big reveal at first i was like okay hold on a minute and then i turned and girl it is giving what it's supposed to give. I just need to fix my oh come on. Please please. I just need to fix my hairline and just blend in my foundation and basically that's what we have. So this is what the ponytail looks like after tying it all the way up and now to attach this, i'm just going to tie my hairband around that okay and just try to place it so because i did not um talk this in you can see it's Going to be too big, so what i did was to separate the puff at the back into like three sections and then twist them all together, just to make sure that the bone at the back is smaller and it doesn't look too puffy when i attach the Ponytail, so with that now i'm just gon na um tuck it at the back. I'M gon na use a bobby, pin and just tuck it at the back. So it's a smaller bun. So next up we just take the the hair band right and then the extensions at the tip. Okay, we had, i had to make it a little bit bigger and then i'm just going to wrap that around my hair so that it's blended, okay, so wrap it around. Take another hairband once you're done wrapping the extension around your hair. You want to secure that with another hair, but now take notes of how i'm going to be securing it. So i'm basically just tying it as though i am tying the extension, so i'm passing the whole extension through it, okay and not just tying it at the top there, i'm gon na do this a second time and pass the whole extensions through that, and we are Good to go so i also went in with some bobby pins just to secure this, make sure that it doesn't fall off and voila. This is this is how i was able to achieve this bubble. Ponytail look! So you
Comments
JS1 JS1: Not me over here thinking that I can do this style and instantly transform my whole self into this stunning queen! You look beautiful, sis! Thanks for the tutorial! I will try it!
Bright Okpoh: Beautiful beautiful tutorial Debbie. I also have 4C hair and I'm definitely trying this out soon
Dear Affoué: I will definitely give this a try. Good job Hopefully mine turns out as good as yours
Emma Zwalde: Wow! This is so adorable and a must-try for me
NicNacAttack: It turned out so cute!!! Great detailed steps in your video and also thank you for sharing the products you use! I like that the pony texture matches your natural wave pattern. Now, will I try this? Probably not LOL my hair just won't slick down!! It always turns frizzy again. Well, I did one time with Ebin edge control on my entire head. It was like cement ! I am convinced that my hair is not too thick, but that my head is too big to fit all my hair together flat. Girl, wish me luck and thanks for sharing
Lucky Archibong: I love how sleek it is ... Val hair is ready
RealEstateWithEvelyn: This is beautiful
Naturallygirlie: Dash me small hair Debby ☺️. Beautiful tutorial. I love it ❤️
Sandy Nanor: Beautiful ❤️❤️❤️❤️❤️
ritzzbitzz: I’m so excited to try this! I have 3b hair that is so puffy I can barely get a tight bun without help
m1m.1uv: Your amazing, your hairstyle is amazing everything about you is amazing !
Bee Mlambo: Gorgeous ✨✨
Through Favranda’s Eyes: Beautiful And creative And that’s what I love about u
Queen Matthew: Lovely
Nthatisi Mphale: Queeennn this hairdo is giving what it's supposed to give I also love your makeup, care to share your tutorial?
🌺 Always be true 🌺: Beautiful lady
Betha Obialor:
Amanda Owusu Twum: ❤❤❤
Goodness Ogechi: Can I use my "Originals Cholesterol Tea tree oil by Africa's best as leave in conditioner?
AdejokeO: You are so beautiful
Timi Ade: musical notes.... so I think the swoop edges is just the easiest
Tellhospitalpeople-eldersharefoodwithpoorneverlie: Processed food has evil intents never lie give fresh food to the poor with friends
Naturallygirlie: First person here