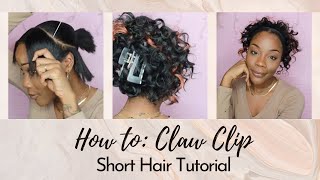
Long Middle Part Blonde Ponytail Tutorial On Short Hair
- Posted on 27 January, 2021
- Ponytail Hairstyles
- By Anonymous
#OutreHair #LongPonyTail #ExtendedPonytail
A step by step guide to going from baldie to baddie with a little color! Slay that pony sis! Don’t forget to like and subscribe XOXO
Please watch in 1080p for best quality
Connect with Me:
Business Email: [email protected]
Instagram: https://www.instagram.com/nessmonae/
Twitter: https://twitter.com/nessmonae
Get to know me on my blog: https://www.letitbebeautiful.co
Subscribe to my channel
Products Used
Rattail Comb
Got To be Glue Spray
TRESemmé Thermal Creations Flat Iron Spray
Conair Single Prong Pin Up Clips, 30 Count
Bonding Glue
Rubber Bands (Recommended for short hair ONLY)
Eco Style Gel
High Beams Intense Spray On Hair Color (to conceal my edges)
2 Outre Purple Packs in 10 or 12 inches
I used 1b/613 ombre hair
Blow Dryer
Wrap Strips (I used 2)
Connect with Me:
Business Email: [email protected]
Instagram: https://www.instagram.com/nessmonae/
Twitter: https://twitter.com/nessmonae
Get to know me on my blog: https://www.letitbebeautiful.co
*Some affiliate links are used, which means I may receive a commission should you decide to click that link and make a purchase. My content is 100% not influenced by brands, PR products received, usage of affiliate links, or brand partnerships.
––––––––––––––––––––––––––––––
On My Way by Ghostrifter Official
https://soundcloud.com/ghostrifter-of...
Creative Commons — Attribution-ShareAlike 3.0 Unported — CC BY-SA 3.0
Free Download / Stream: https://bit.ly/on-my-way-go
Music promoted by Audio Library https://youtu.be/iQw9oH7uISk
So what it's going to be like is a back ponytail like this. Let'S see, if you guys can see the vision, do that. So that's what it is like just added a few blonde pieces in the front, maybe like two like one here and then one there. So i'm gon na take this side and part. It part that out like that right by the ear pretty much, i got these little pins from the beauty supply they're like a dollar they're, usually for like when i do pin curls when i have short hair. We ain't doing short hair right now, so now i'm just going to brush this down to create my little ponytail situation, all right, we'll comb, so it i'm going to take like an oil heat, protectant type of spray and spray this on my hair, just to give It a little bit of oil, not too much, don't mind those scratches, because you won't be able to see that in the ponytail, but it just i needed a little bit of length, so i can braid that down later. So i really like my ponytail to sit right at the base of my neckline, as you guys can see - and this is the most important part, because if this part isn't sturdy, your ponytail won't work. Then i'll take some of my got to be spray right and i kind of spray it down and start forming my ponytail with my hands, i'm just using rubber bands. So now that i got my ponytail i'm going to take my got to be glue spray and make sure my ponytail is nice and secure when you have short hair, it's just sometimes your hair just does not go in. So you have to kind of do what you got to do. You know i feel like this is pretty much as good as it's gon na get honey. I kind of just use my comb to make sure everything is nice and in place, and then i pick up my blow. Dryer turn this on high heat and on the cool setting. Don'T melt your neck off. Okay, use the cool setting. Now it's time to go ahead and tackle the sides, so i'm going to start with my bed side, which is this side over here. So now, i'm just going to start combing, my hair, so i'm just kind of taking it and slowly molding my ponytail down. So i'm just kind of going through and blending that right into the ponytail y'all see that nothing too serious here, i'm gon na spray a little bit of heat protectant, just to give it a little bit of oil, because you still want your ponytail to look shiny And not hard right, see that and then it just kind of would just blend in with your ponytail. That'S why i said make sure you lay your hair, nice and straight okay. Now i wish i had a little slip. Stick i'll probably use that on my hair too, but so now that i have it there, i'm going to take some gossip glue spray again and just slick it down with my fingers like that, be very gentle because you don't want to snag it right. Put a little bit right here: this is the most important part right there. Then i take another rubber band right: okay and i'll go ahead and place the rubber band around that part as tight as you can, but don't be too tight. Now sometimes these ponytails can be a little bit too tight. So you see that now i just have to do the same thing to this side, repeating that same process like this size a little bit straighter. What do y'all think? Okay, so yeah, i'm almost done y'all! I'M just to do the ponytail piece and we're rolling take some of my spray spray, her down and just continuously mold with your hands. Relax i need now. I'M going to do is take another rubber band and go right on top of that voila. We have our ponytail leg well at least the foundational part of it and spray a little bit more spray on top, and then i'm going to go in with got to be and continuously lay any of the flyaways. So this is how the back looks. I'M just spraying it down make sure nothing is flipped. Now that that's done, i'm going to go ahead and use some gel to kind of fix my edges around the front with a little toothbrush just to kind of blend everything i'm not going to really touch my hair, just the edges so that it looks nice and Neat alright, so i got the base of my ponytail down. Didn'T take them, it didn't take much, but this is how it turns out. Y'All look like a chicken head, but we're gon na fix that. So now i'm going to take some braiding hair you're not going to be able to see the braiding hair at all just a little bit and i'm taking a rubber band, and i kind of take it and twist it around the hair like that. Right now, i have something i can just kind of grab grab my little baby ponytail back there with. So i just go back to my ponytail and just wrap that thing around right and braid. It break it any way you want. This is just how i do it don't pull too hard, because again you don't want it to pull on the ponytail, which i'm kind of doing - and i don't want my hair to be that long. So i'm just going to braid it down a little bit more and then i'm going to cut it the longer this braid is the longer your ponytail will be so my recommendation is: if you want a long, ponytail, just kind of measure it and i'm going to Show you guys how to do that in a second remember, when your mom used to do beads on your hair and then she would burn it, that's what i need to do. Let me just go ahead and cut it. I do want my ponytail to kind of hang down my back, so that is how long it'll be not really it'll be a little bit longer. But i noticed that if you do a really long, braid you're going to have a really long ponytail. So this is enough. Let me show you guys my oh detail, so this is the ponytail i literally just took out. Let me show y'all, so this is the ponytail that i literally just took out. It'S the same braid in my head right, except it still has some hair on it. I'M gon na take this hair off and reuse it, because why not? I wish it was a little bit more ombre, so it would have matched with my hair a little bit more, but that's okay, like i'm, not tripping at all. You guys see how my ponytail back here kind of has a little bit of my hair in it. I don't want to get any glue on my hair whatsoever right. So what i like to do is take the strips that i use to kind of like wrap my hair and mold it. I'M going to put two strips together like this right and i'm going to go ahead and wrap those around my ponytail base for one. It helps your base be really strong and it also protects your hair from glue. Okay, just the base of the ponytail, and i am wrapping it tight, because i still want my ponytail to be skinny and then i'll take some of my hair glue and just go ahead and secure it and i just kind of go ahead shut it now. I have my ponytail base nice and secure, so you guys can kind of see where i'm going with it. So what i like to do for the actual ponytail braid is go ahead and start attaching the weave. This is a 10 inch purple pack ouch right here. It'S a 1b mixed with a 613 okay, and so here's the end of my braid. I'Ve already put glue on the track here. So what i'm going to do is just go ahead and take the end there, where i burned it and just start to wrap it again. This is a little tedious, but you'll get the hang of it. I promise and you just want to go ahead and wrap it. I wish i could show you guys more clothes. Let me see if i can so i'm just taking it and wrapping it right, not difficult at all. You just have to be really patient with it because um you do have glue on it and you don't want to get blue on the actual weave. So then, i just go ahead and press it down, while i'm pressing, while i'm pressing i'm going to go ahead and comb get out. So now i have the hair on there. So what i'll do is take my flat iron over the hair and just kind of secure it so that i know the glue and the hair is nice and attached and then i'll kind of run, my flat iron through the weave to make it straight. So i'm doing kind of two things at once here, so when you comb it make sure you hold it because you don't want it to slip. Sometimes it will, and this is how the ponytail will look right. It looks insane right now, but once we're done tracking it all the way up, you'll have a really nice ponytail going down your back yeehaw right. The trick to this is: don't do long pieces, don't glue it all on all at one time. What i found was easiest is to go ahead and cut tracks in about you know, just a handful amount and go ahead and do them piece by piece. Now. I'Ve already used these tracks, so they kind of are a little bit yaki. But that's okay, i'm just going to go ahead and repeat the process. So if you guys want to stick around for that, you can i'm kind of just going to go through it watch and learn. You got this foreign all right. So this is my last little piece here and it's just literally a piece it took a while, but we have made it. It'S probably took me about 20 minutes just to attach the ponytail onto the braid, but i have to be very precise because this is blonde hair and i don't want to get too much glue on the hair which i did. But it's okay! When you're doing your own hair, it's really really hard to do your own ponytail! Okay, it's easier! If you have like a high ponytail, but because i have a low ponytail, it's really hard to get back there. So i'm just adding the glue on this last little piece here also, if you guys hear construction going on like they're just doing a lot in my complex right now, so don't mind that lord, please do not. Let me get this glue on my hair. This is the last track that i'll be adding my ponytail just trying to show y'all. Okay, that's the last piece make sure it's nice and secure probably got some glue on my neck, but that's okay. You can get that off. Then i'm going to take my flat iron and just make sure i seal it nice and tight to make sure everything is nice and on there see that - and this is how much hair i got left yeah i like it - it turned out good for the video. So i'm happy so i'm almost done with the ponytail. I just have to comb it out so now for the fun part, you know how usually you have like the band that goes across the hair. That'S what we're gon na focus on right now. I hope this ponytail lasts me for the rest of the week child because listen all right so now i'm just going to take a piece from the back of the ponytail kind of a thick piece, because i really want it to lay nicely comb it. What i'll do is comb this piece spray it down with some got to be spray that around the ponytail wrap it as tight. As you want to this. Is the finished pony? Look y'all! That'S how it looks right. You can wear it to the side here. You can throw it to the back honey and kind of just go about your day. I'Ll run my flat one through it one more time and remember. This is 10 inch hair. But if you want to you can use a 12 inch. I wouldn't go longer than a 12 inch, because then your point will be very long and if you use longer hair, you don't have to use as much hair. That makes sense, but i'm cheap when it comes to doing my own hair. So this is how it turned out spray a little bit spray on it. So you guys can get the effect of what i was trying to do here and i'll link. Everything that you need for this look in my description box below i know my face is looking a little bit crusty, but we're going to go ahead and get that together so yeah. I love you guys so much and thank you for watching this video sticking through it with me, because if you are a beginner out there and you want to make sure your hair is nice and late, you can do it sis, because if i can sit here And watch tutorials and do it so can you okay? So thank you so much for watching make sure you are subscribed to my channel. If you haven't already and i'll see you guys in my next one peace.


Comments
Beauty by Yaya: I love this technique...first time seeing it being done this way. Thanks for sharing!
Cassondra Renee': Good job!! Looks really good!!
Ladonna Lee: I love you this and you are amazing it reminds me of back in the day when everything was simple it wasn't even that hard I mean creativity was nothing to even think about you bringing that back
Sherry Waters: Great job
Journey To Save: Love it
Ty E:
Mary Wilson: ♥️♥️♥️
Mary Wilson: That's the quietest blow dryer I've ever heard in my life where did you get that from lol