Low Sleek Curly Ponytail On Natural Hair || Lulutress Water Wave Crochet Hair
- Posted on 23 April, 2022
- Ponytail Hairstyles
- By Anonymous
Hey guys! Welcome back to my channel! If you are new welcome and I hope you join the family! I hope you enjoyed this tutorial I did for you guys and I hope it was helpful. Let me know how you think I did down in the comments below and leave video suggestions of anything you’d like me to do for you guys. Thank you for watching and for all your support!
Road to 500 subs‼️
All Items Used:
Murray’s Beeswax
Got2b Glued Blasting Freeze Spray
Bobby-pins
Rat tail comb
Scrunchies
3X Lulutress Water Wave Crochet Hair 20”
Ossion Hair Gel Wax 3
Eco Styling Gel (Olive Oil)
Blow dryer
Follow me on all socials:
Ig- https://www.instagram.com/nickzz.ll/
Twitter- https://mobile.twitter.com/nickzz_ll
Follow my business page:
https://instagram.com/nts_beatkingdom?...
For all business enquires :
Song: Lakey Inspired- City of Angels(Vlog No Copyright Music)
Music provided by Vlog No Copyright Music
Video link: https://youtu.be/HkceAH6EZvE
Song : Jarico - Island
Sleek ponytail for natural hair, curly ponytail, ponytail, natural hair ponytail, lulutress water wave crochet hair, sleek ponytail on shirt natural hair
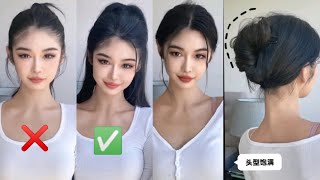
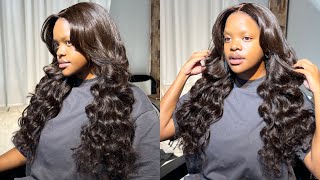
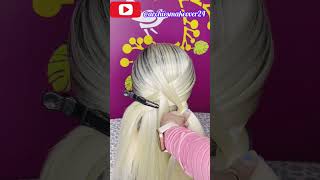
Hey guys welcome back to my channel and if you're new welcome, my name is nikoi terese and i'm back with another video in today's video i'll be doing a tutorial for you guys on how i achieved this style, this curly ponytail. I did this just because i thought it was really good and easy and very affordable. If you know you can't get to be here right now or yeah budget. This is something that you could try very quick, very easy. You can do it all day. So girl remember this: they can do it coming until you, so you can period in the description box. I will be listing every item that i use so in case i forgot to put the item on screen. I will make sure to leave it in the description box, so you can find it there. Please remember to like share comment and subscribe and i'll see you in my next one bye, okay guys, so i'm starting off with my hair partially stretched. I just passed my flat iron through it a few times. You can skip this step if you have other methods of stretching your hair. If you do not want to apply heat to your hair, but just letting you know the straighter, your hair is are the more stretch your hair is the sleeker. The look will be so i'm just gon na go ahead and make a part from ear to ear and section that off from the front now, i'm taking my maurice beeswax to apply to the back of my hair, we're using this like the child edge control. You know to mold the hair in place, so i take a generous amount in the palm of my hands and apply that to my hair. Then i'm going to take a rat tail comb or tail comb to comb that through because girl, if you don't come back through yeah she's gon na look white, okay, okay, now i'm just applying some more because i feel like that. Wasn'T enough! You can apply as much as you would like. Just don't apply too much girl because you don't want it to look white and cast looking. You know casty and stiff and make sure you comb that out. So you have to go back home and comb that out girl comb it out. The next step is to use the gut to be glued freezing spray and just spray that all over, where you apply the beeswax. This is what's going to really hold the hair into place, so spray a generous amount, don't be too stingy, then comb that through then you're going to take your blow dryer and use it on medium to high heat, to set the cut to be spray with the Beeswax, this is going to let it dry faster and really set the hair in place. Next, i'm just going to smooth that out with my hair brush, just to make sure everything is going in the same direction and everything is flat. Then i'm going to add some more spray because it wasn't stiff enough to my liking. I want it to be set so that when i remove the scrunchie it doesn't really move out of place. So i just apply some more comb it through, and i will go in with my blow dryer again to dry that now i am just gently. Removing the scrunchie from my hair. Don'T want to be too rough at this part. You don't want to mess up your masterpiece girl so take your time and remove the scrunchie, i'm removing it just to put it right back in just to see where i'm at just um just see. If i like host, if it is, if not, then i will go in again with the same steps all right. So, as you just saw we're going in the right direction, everything is in the right direction, but uh for me. I think i wanted some more products. So i'm going in again with them more then i'm gon na set that again you can do this as many times as you like guys just to your liking until you get the style that you prefer, if you want it flatter you go and grow. You make that flatter period. Okay, so now i am moving on. I guess i was satisfied with that. It looks very good to me. Everything is straight looking set period now, i'm just cleaning up my part with the beeswax and my teal comb, not using edge control, because the edge control will let my hair revert back to natural natural natural light curly. You know once you apply it control how your hair starts to curl up yeah, not not doing that. So i went in with the beeswax and then i'm going to go ahead and section off one side, two again, so that we can do the process all over again in sections. I just apply the beeswax to that section of the hair and try to mold it in place first before spraying it because when you spray that i mean you're ready to set it right, so just apply the beeswax comb it through mold it to where you would Like it to lay in place, then you go in with your freezing spray and then blow dry it up with your blow dryer all right, as you can see, i'm just adding more and more freezing spray just to set the hair in place. If you feel like it, don't set enough just spray girl and glue it and you'll be fine, and please don't forget the hair that is coming behind it here right. There please just swoop that in and make sure that it's neat as well, because that will add to the overall appearance of the style. So please don't neglect that part very important all right. So now i am gently once again removing that scrunchie you're gon na do this a few times a few times. I mean a lot depending on how much of a perfectionist you are. So i am removing the scrunchie again and then i'm going to um include that pizza here from the side. Yes, i'm going to catch that in it now at first it wasn't in it notice. I was just holding it with my hand. Now i'm going to merge the two okay, so i just removed my edges separating my edges from the rest of my hair place, some beeswax on it. You don't want to use edge control because by the time you're ready to do it. Girl, ah they're gon na be wet oily greasy curled up, and you don't want that. So i use beeswax and now i'm doing the same exact thing to this section of the hair using beeswax and then the freezing spray then blow dry same exact process. This is repetitive, i might just allow you guys to just watch, because everything just is the same. Only thing i did different was to use a scrunchie to hold this section onto the back, because it has a longer distance to go than the laser side that i was doing and i didn't want to hold it. So i just used a scrunchie and that helped with molding it as well, so just comb it through with the beeswax spray. My freezing spray blow dry, simple, okay, guys something i just want to add a little pointer when you're going to blow dry. The hair use one hand to hold the hair down in place and press it put the blow dryer before your hand. So, while you're moving your hand, the blow dryer is following just apply pressure press the here to your head, and that will give you the flat. Look that we are looking for so, okay guys. So now i am moving on to the other side of my head doing the same exact processes taking this section, dividing it in two and taking it section by section i did remove the scrunchies from the back and use only one scrunchie. Then i just keep on adding scrunchies when i need help, then removing them and then using one scrunchie again, it's the same thing over and over. I hope he gets it. Okay, guys. I must apologize for the change in quality. I think i did spray some other product on my camera, but i will fix that shortly. So just please bear with me. So what i'm doing now is using the elastic part of your stocking. You know the waistband to tie my hair. If you know you know, i love to use that to hold my hair, so i use that to hold it here. This is the final tie. I didn't remove that last crunchy because i couldn't bother so you can tie it over that. So i tied that and then we're going to move on. Oh okay, so i'm taking the lucha's water wave here very affordable here and i'm going to use two out of the three bundles. I'M calling them bundles two out of three bundles to do this. Ponytail. Just taking them apart and then we're going to do the rubber band method learn this method from brie hall. She also has a video doing this. So in case i didn't explain it clear enough for you. You can check out her videos and see if that helps, but we're taking strong by strand pulling that through the rubber band, then i'm going to make a hoop and pull the rest of the hair through, as you can see. Hopefully you can understand this by watching. I think it was pretty easy and i'm going to do it a few more times for you guys so just pay attention. I just realized, i said rubber band, but we're actually using a scrunchie to do this, not a rubber band, because you don't want the rubber band to burst on you, you, foreign now i'm finished, adding all the hair to the scrunchie, and this is what we are Working with it's very full and very curly, so i'm gon na go ahead and loosen up some of the curls, so it can look a bit more natural. I mean that this is not human hair, so i'm going in just stretching out some of the curls to make it look a bit more natural. I'M doing this on my hand, but if you can find something to put it on to make it easier for you, you can do that, but i have to use my hand so that you guys can see so pull it out to your liking. I didn't pull it out too much because i didn't want the hair to get too frizzy and remember this is not really yours, so you can't go in with a curling iron and curl this up. So don't don't be going crazy, alright, so i'm all done and as you can see, i clean the camera as well, so yeah, okay, calm down now, i'm just taking the rubber band putting that over my plait and pulling it putting it as close to the base. As possible, then taking majority of the scrunchie towards the bottom, so the hair will be kind of the top and i'm pulling the scrunchie down to the bottom and then i'm going to wrap that scrunchie around my blood. So it's basically me catching up the plot. I'M just sketching it onto the plaid downwards and i'm going to take the blood separate it from the hair. Then take a few strands from the here and wrap that around the plait and secure it with some hairpins or bobby pins so that it doesn't move and that if the hair shifts my plait won't be sticking out, you will be seeing the curly hair. So i'm basically masking the plot with the curly hair, so just pay attention. If you look you'll, see and understand what i'm doing exactly all right, so i'm all done. I used about three or four pins, not too many, because i don't want them to stay clean. Then i'm going to flip the hair over all that and then at the base, i'm going to take about three or four more bobby pins and secure that to my head once it is secure enough and i am pleased then i'm going to go ahead and take A few strands of the hair comb it out a bit not too much, because i don't want it to be too frizzy and then i'm going to wrap that around the base of the hair. That will give it more security. It will feel a lot firmer. It'S not going anywhere, and it also makes it look a lot more neater. You know like a professional ponytail period. I also forgot to tell you guys that i went in with the freezing spray in between just for a little more security and so that wrap i'm doing, can look a little more silly. You know and for more security, because you can't remember the job you're in a public. You can make it you're unraveling the public that is not it sits. So you see that it's looking small and snatched. That is what we are going for, that skinny band. Okay, not not fat, nothing all right, girls. What i'm doing now is adding some freezing spray to the curls, because i don't want it to freeze too much. I wanted to serve it for some time, so just add a little just to avoid the freezing, but not too much grow. You don't want it to be stiff. You don't want to move right that it's the car lift that is not cute. So don't don't. Do too much now it's time for the edges and i'm going in with my asean edge control to do my edges really and truly. If i had a mini flat iron, i would have just flat ironed my edges and used the beeswax, the freezing spray and some wrap strips wrap strips. I think they're called yes wrap strips, but i was running all the time as usual and i didn't have a mini flat iron, so i just went in with my edge control and go over that with some eco gel and then that was it. My and lastly, i just went in with some of my well-grooted oil and applied it all over my head to give it some shine and applied it to my dryer scalp. So my part doesn't look like a dessert. Okay, guys, you have made it to the end of this tutorial. Thank you so much for watching. I hope this was helpful to someone please remember, to give me a like comment and subscribe and i'll see you in my next one bye. Ah

Comments
Johnfi Dmant: Apreciando a una mujer tan hermosa. 2:10 sentadillas son unos GIRLS18.Uno muchas y un buen ejercicio. 5:25 Se deja ver que hay muy buenos resultados Saludos desde la Cd.. de world losc mortales abian apreciado tan hermosa mujer
Shanae Ellis: Definitely ago do this
Ashley Whyte:
shanae reynolds:
Ruth Townsend:
TNN Zone: 1st
Imani Miller: Ere