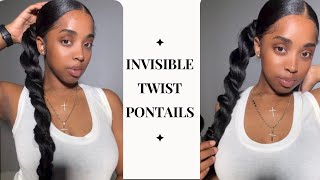
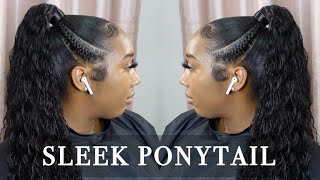
$13 30 Inch Extended Bubble Ponytail On 4C Natural Hair | No Glue
- Posted on 30 December, 2020
- Ponytail Hairstyles
- By Anonymous
Hey sis! In this talk-through genie/bubble ponytail tutorial, I show you step by step how to achieve this sleek hairstyle using 30" hair from the beauty supply store! I have THICK natural hair so I know how intimidating straight styles can be, but trust me if you follow this tutorial you'll get amazing results! I show you how to straighten your hair using both a hot comb and flat iron. I also show you how to mold your hair using got 2b glued freeze spray & a blow dryer. Lastly, I show you how wrap your weave/bundles to achieve the invisible ponytail effect. There is NO glue or sewing required for this look.
Comment below if you like this style! Make sure you watch in 1080P HD for the best quality!
Thanks for watching!! Subscribe for more :)
Hair details:
Zury Hollywood Natural Dream 30" hair in the "Natural Yaky" texture and the color "NATURAL" (purchased at the beauty supply)
$12.95 per pack!
I Used almost 2 packs/bundles
Products used:
Got 2b Glued freeze spray
Got 2b Glued gel (black bottle)
Bed Head TGIN wax stick
Other things you'll need:
Rat tail comb
Bobby pins
Rubber bands
Let's connect on Instagram!
https://www.instagram.com/dahliamonet/...
Bible verse of the day: "Cast your burden on the Lord, and He will sustain you. He will never allow the righteous to be moved" -Psalm 55:22
OTHER VIDEOS YOU MIGHT LIKE:
Knotless Braids Tutorial: https://youtu.be/ePisOT-D8y8
Butterfly Locs Bob Tutorial: https://youtu.be/ZKhxkE-08d8
Slick back on Thick 4c Hair (NO Flat Iron): https://youtu.be/4MwimKe8PPU
Music:
https://soundcloud.com/julian_avila
https://soundcloud.com/lakeyinspired
#extendedponytail #4chair #protectivestyles #sleekponytail #invisibleponytail #naturalhair #got2bglued #bubbleponytail
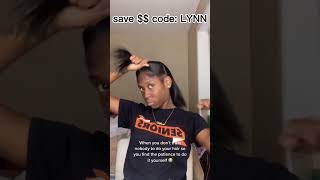
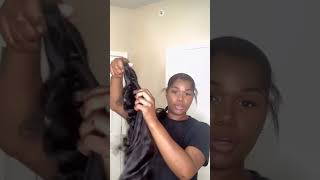
Hey guys welcome back to my channel it's diane monet. Today i have an extended ponytail for you guys and i'm going to show you how to do the bubble. Ponytail effect. So if you want to get this look, keep watching all right, y'all, so believe it or not. This is blow dried hair. It'S honestly giving 4 f's, but it's fine we're going to get it slick, but i just wanted to show you my little gray hair that i found. I was really pressed okay, so i went ahead and straightened one side of it and i'm just going to show you guys how to do the rest, so i'm starting off with a hot comb. You want to start with the ends and work, your way up, just how you would detangling your hair, but be careful because i burn my scalp multiple times and then i'm just going to follow up with this hot comb with a flat iron, and i have both Set to the highest setting so for the flat iron, i think that was like 450 and then the hot comb was like 20, which is the highest setting on the hot comb. So i go on to straighten the rest of my hair, and this is what it looks like, but thank god this is not a silk press video, because baby it's a little stiff. I don't know what happened but yikes. If you got any product recommendations to get a slick, let your girl know so, for this look, i'm doing a middle part. I already went ahead and did that, but now i'm starting at the tip of my ear and making my first section he's going to take that part all the way across to the other ear, and it should look like this. The two main products that we'll be using today is going to be got to be glued free spray and then the tg bed head wax stick for the remainder of my hair. In the back. I went ahead and sectioned it into two sections and then we're just going to start with the bottom section and start applying the wax stick near the part and also underneath my hair by my kitchen. Just to get that smooth and i'm going to go ahead and comb that through so now, you're going to go ahead and grab your hair, like you, would, when you're about to form a ponytail and you're going to start spraying with the got to be free spray. All over the hair just to make sure it's very saturated, you don't want to put the hair tie on yet because you want to be able to comb the product through like this, but you want to try your best to have a tight pony in your hand. Just so that it can start to mold, because once you start blow drying, it will get hard and you're not going to really move it like that. So you're going to want to form your ponytail like this and i'm taking the blow dryer on the highest heat and the highest airflow, preferably you don't want to move your hand, you want to try to keep holding the pony as long as possible, so it can Stay molded, but the blow dryer was too hot for me, so i started moving my hand so once you're sure that there are no more lumps or anything, you can go ahead and put the hair tie on and then go ahead and do another layer of the Freeze spray and then blow dry that again and it'll still be soft enough, usually for you to take your comb and just try to smooth it out a little bit on top of that. So i went ahead and took my wax stick again and went along this part of this top section and i'm just going in again with a hot comb, just to make sure it's very, very flat and then you're just going to go ahead and repeat the same Exact process as before, okay you're going to want to do your baby hairs before you mold the front section of your hair. Just to make sure that you know all those extra hairs on your edges get tucked under that mold. So that's what i'm going ahead and doing now and i'm using the got to be gel the black one. I went ahead and separated out my sideburns and i'll show you guys how i style those later so i'm taking the top section and then separating it into two halves. If your hair is all the same length, you probably only have to do one section, but the hair closest to my part is significantly shorter because i cut it. So i'm going ahead and doing two separate sections, so this section is actually going to be able to reach into the ponytail. So we're going to do the same process. But when we're finished, we're going to put another hair tie on so to connect it to the other hair eat, and you can also use the end of the rat took comb to help smooth it out. Because if you use your fingers, the lighter starts to get really really sticky. We'Ve made it to the last section: praise the lord so since my hair is shorter, we're just going to want to doused where my hair ends and a lot of gel just to make sure that it's very slick because, like i said we're not going to be Able to tie it into the ponytail. So if your hair is also shorter, like mine, just make sure you put a lot of gel and comb that through so that can be flat and then just go ahead with your blow dryer and then repeat the same on the other side. And this is what we're looking like after everything's molded, yes ma'am so now for the fun part, since my hair is shorter, i'm just going ahead and adding some regular kanekalon braiding hair just to make my natural ponytail a little bit longer. So i'm just separating the braiding hair and my hair into three strands and then just combining them and doing a braid and then i'm just sealing it with the rubber band and it doesn't need to be too long. So i'm just going to go ahead and chop. It off right there, but if your hair is already that length, then you're straight. The hair that i'm using today is synthetic. I was not trying to buy virgin hair just for this style. It'S only 13 a pack and it is in the natural yaki, texture and 30 inches long. All the details will be down below in the description box after unraveling the bundles you're, going to want to keep the wefts doubled and you're going to add a bobby pin at the end. This is how we're going to be able to secure the hair onto our ponytail, so you're, going to take the bobby, pin and put it at the end of your braided pony to secure it and then you're going to take a small piece of hair. From the end of the track and we're going to wrap that around the bottom of the ponytail and you're just going to keep wrapping until you've gotten all the way to the bottom of the strand. Now we're going to start wrapping the wefts and you're just going to want to wrap them right above the other one. So you want to keep them close, so that is not any major gaps and then periodically you're going to take a bobby, pin and then secure it by putting one half of the bobby pin through the middle of your braid and then the other. On top of the wefts and then just continue to wrap, going up and make sure you know, take your time and make sure it's secure and tight around your braid, because the last thing you want is for the tracks to slip. Some people like to glue their tracks to their braided ponytail and some people even like to sew them down, but i honestly feel like the bobby pin method is just as secure and is very efficient. So once you reach the end of the track, you're going to take two pieces of hair from both wefts because remember it was doubled and set those to the side and then you're going to take a final, bobby, pin and secure those two wefts to your braid And then like before, we're going to take that strand and then just keep wrapping it around until we run out of hair. I also go ahead and add a rubber band just to secure it even more and then you're going to add your second bundle and right where you finished your first one and just repeat the same exact process and i didn't end up using all of the second Bundles so now i'm going to go ahead and cut the end off and then it's going to repeat the same exact process take two strands from the end and then wrap it around. But i don't put a bobby pin this time since i don't want it. Sticking out - and this part is optional, but i personally think it makes the ponytail look even more natural you're going to take a section out from like the bottom of the ponytail and then you're going to spray it with some got to be, and then we're just Going to wrap that around the base of the ponytail, i recognize there's a part in the back. That'S not really laid down all the way a little lumpy lump. But when i looked in the mirror later i saw it and fixed it and i'm going over it with a little brush just to make sure it's very smooth, and it's going to continue to do that. Each time you wrap it around spray and brush spray and brush. So this is the final product after everything is all smoothed out and you can stop at this point if you want and just wear it straight, but i'm going to go ahead and show you guys how i do the bubble. Ponytail method, i'm just going ahead and brushing the hair to make sure it's straight. If you wanted to straighten it even more, the hair is safe up to 400 degrees. So that is going to take your pack of rubber bands and just start placing them, and you want to make sure you double them up just so that the ponytail isn't limp and it'll hold the bubbles and yeah. It'S pretty simple guys just figure out where it is. You want to place them. You can put them as far apart or as close. You want together and just continue to do that along the length of the ponytail. Now you can go ahead and start fluffing out the bubbles just to make it as big or you know, as small as you like, and i just really really love this look. It gives classy it's getting. I don't know royalty like period. I might enter my birthday pick in here, so i could see when i wore this now for the sideburns, i'm just going ahead and straining them with a little curl, and i was feeling it obviously and then, like i said, the hair is safe to flat iron. So i just flat ironed that a little bit, so it didn't look stiff or anything, and then i'm just taking um a little bit of gel and just molding those to my liking and i'm five, four and three eighths. So just trying to show you all the length of the hair on me and thank you guys so much for watching. If you found this video helpful, please make sure you give me a thumbs up. It really helps small youtubers like me and make sure you subscribe. If you want to see more content like this love, you guys so much bye, um
Comments
Jariatu Jambai: Loved this look!! May try this in the summer
Alyssa Boone: Loved it can’t wait to try on my 4c hair
Nicole M. Long | Multi-hyphenate Being: Ahh this is great. You're stunning and the pony is too. Thanks for sharing. Def wanna try this soon.
Nyajei Vandi: My post notifications are on!! Clicked so quickly Loved this!!
TYRA MONET: Oh yes I’m about to try thiss