360 Yaki Wig Install| Fringe Bangs With A Curled Ponytail | Rpghair
- Posted on 01 March, 2023
- Ponytail Hairstyles
- By Anonymous
The The Skin Melted HD lace wig is from https://www.rpghair.com/
►► https://www.rpghair.com/150-density-36...
****** RPGHair 2023 Tax Return Sale ******
$70 Off Over $349 | $40 Off Over $249 | $20 Off Over $159
Discount Code: TAX
Time: March.1st - March.24th
-------------------------- --------------------------
Invisible HD Lace Pre-plucked 360 Wig Yaki Straight Indian Remy Hair [LFW33]
Length: 18 inches
Density:150%
360 Lace Frontal Wig
★ Skin Melted HD Lace
★ New Clean Hairline
★ Whole Front Bleached
More Popular 360 Lace Wigs: https://www.rpghair.com/360-lace-front...
HOT 13x6 HD Lace Frontal Wigs: https://www.rpghair.com/6-parting-lace...
------------ ------------
Youtube Channel: https://www.youtube.com/c/RPGHair
Instagram: https://www.instagram.com/rpghairwig/ @rpghairwig
Facebook: https://www.facebook.com/rpghair/
Welcome Beauties to IambeautifulhustlerTv ✨
Be sure to THUMBS UP THIS VIDEO✨
Leave a COMMENT BELOW✨
And most importantly SUBSCRIBE TO OUR CHANNEL✨
To Purchase Hair & Products Www.ibhslays.com
Allow 3-14 Business Days For All Orders!
CONTACT & BUSINESS INFORMATION ✨
Instagram:_Beautifulhustler
@thebhslay
YouTube :IAmBeautifulHustlerTV
✨For Sponsorships ,Reviews,& QuestionsEmail:[email protected]
786-571-1313
#miamihairstylist,#miamihair,
#browardhair,#browardhairstylist, #Atlanta #atlantahair,#atlantahairstylist #reels, #explore #trending #tiktok #viral #miamimakeup #miamimua #miaminails
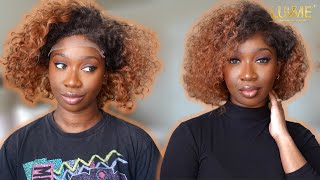
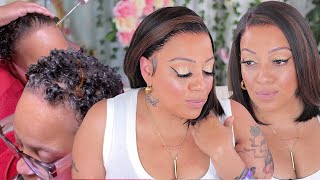
Thank you out of everything you could think why the [ __ ], would you think you finna stress me out on my cellular device. I just want to know what made the thought cross your mind, because now you're blocked thinking about your accents ain't. Nobody safe! I feel like hip-hop Harry, I thought, block a [ __ ] who's next TV. Today we are back with another Spa awesome, video and today's hair is a vital pie. Rpg hair. Now they sent me over this 18 inch, 150 density, 360, Yaki lace, wig and, of course, in our packaging. We got a cap Combs and you know a little elastic or whatever inside the packaging as well and also the card itself. Now, as you know, when working with RPG hair, the wigs always come with the knots already bleached and the wig be plugged to the tee, as you can see very natural looking and like I mentioned it, is a 18 inch, 360 wig. So I'm going to go ahead and glue the wig all the way around and um, I'm gon na do like a updo ponytail, look with some fringe bangs and also on the packaging. They also gave me a matching Yaki bundle and that's going to be the bump that I add in for the ponytail part. Now I went ahead and did my makeup into the ball cap and I did like you know, secure the cap all the way around and I'm going to. Let you guys know now in this video when it came to me Glenn down the back of the wig. I did not have a mirror in front of me in the back of me to really catch all the angles. So when I do the back, I'm just feeling you know just trying to go about what I feel and place the wig down. So if it's not, you know perfect viewing or perfect, you know instructions for you guys. I'M sorry, you just you know letting you know in advance, but this is what the wig looks like fresh out of the box and putting it onto my hair. Like I said, it's already bleached and it's already plucked, so I'm gon na go ahead and um cut some of that extra lace off around the front. So I can see what I'm doing and um you know cut the extra from around the ear. Then I'm going to take my Ruby, kisses Foundation. Add it onto the lace and begin my installation process, foreign 360 wig install today. I will be using two layers all around, so I just added the first layer and I'm just rubbing it out nice and flat and smooth and then once that layer dries clear. I will go ahead and add the same. I mean the next layer also um. Once I glue down the front instead of you know tying it down immediately, I'm going to glue the whole wig around like all around my head and then I'm going to tie it down with the Melt belt. So I'm just going to go ahead and go in with that second layer. Now that the glue is clear and once I go ahead and Tuck that wig down, I will just you know, blow dry it into place for a few minutes and then begin to glue down the back of the wig foreign foreign foreign. So I went ahead and pulled the wig down just to see how much it would cover and, like I said, y'all do not have a mirror in the back of me. So my glue application in the back is not going to be the best, but you know you can kind of get the hang of it. If you do have another mirror that you could place um like in front of you and behind you, you know people do that whole little Dimensions thing with the mirrors. It would probably be best if you could do it that way, but um just try to feel for the hairline as much as possible, and you know just go with the outline of your hair. But that's why I placed the wig down first to kind of see where it lays to kind of get a feel of it, and then I went ahead and placed that wig down as well. So after adding that second layer, you guys I did go ahead and um place that wig down, I just added a little more glue because I couldn't tell you know I couldn't see if I really applied it when they're good enough. So I'm kind of taking my fingertip and going in and now that I'm looking at it y'all. That is a lot of glue so, like I said, y'all just get you a mirror to just so. You can really monitor how much glue you're, applying and everything like that, but um. I ain't put no more on after this, so I'm just going to go ahead blow dry that a little bit because I don't know what it's looking like back here at this point. Y'All, I'm seeing all of this for the first time to actually editing a video, but yes try to get a mirror like I said and place it in front of you and behind you, so you can actually see what you're doing and do a better neater application, Because it looks crazy back here, but it's gon na be secured though, but uh once you apply the glue and everything like that. Go ahead and pull that wig right on down and give it a nice firm press. And then you could go back in on the edges of the wig and just slide one layer of glue to secure it all the way down there. So I'm gon na go in and just kind of filling with the glue and the spacing just applying that glue. In those areas and then pushing you know the rest of the edges of the lace down into that glue foreign, and once I get this last little edge here on the sides, I will go ahead and um, take the Melt belt and then tie the Melt belt. All around my head from the back all the way up to the front, so just gon na be like a one, quick little wrap and try to smooth the glue out as best as you can, and you know let the glue get tacky before placing it down. So I'm going to go ahead and do that take the blow dryer and blow it all the way up. You know blow dry, it all the way up real good, but then I'm gon na, like I said, take that milk out and tie it all around. So we can secure the front and the back foreign extra lace off. We will go ahead and get into The Styling, which will uh consist of me um, pulling out all my sections on both sides of my head for the style, and then you know we'll get into the rest of that when that part comes so I went ahead And razored the hair on both sides, the extra lace off both sides. So now we're going to go ahead and get into The Styling okay, so um! For starters, I'm going to go ahead and just kind of put the hair up in a little quick little messy bun, and I'm going to start by pulling down my size sections for where I'm going to curl these Sideburn areas down so a nice little chunky section. I wanted like some nice chunky Sideburn, so I'm doing like a little smaller curved part and I'm going to do this on both sides and I'm going to pull down a little section on the side of the wigs and the back on each side. And then, of course, the top section for where my Chinese thing is going to be I'm going to pull down two equal parts, I'm doing one half at a time and I'm just going to secure it all the parts that I'm pulling down with the plaid good Foreign and I'm just going to continue to pull both sections down, and once I have both sections down, I will go ahead and, like I mentioned plant that out the way and and then we will go ahead and start focusing on the ponytail, I'm going to take Some whole new spread tap it across the lace and tie down again with the Mel belt, so off camera. I did go ahead and spray the hairline and tie it down with the Melt belt, and now I'm focusing on the ponytail. So for the point of time took some even holding spray and just spread it lightly onto the wig and I'm just trying to comb everything like upward, um kind of to like a high position. And then I secure that with a rubber band and once I secured the wig into a rubber band, I'm going to take some more of a bands and kind of section it out the way, also removing that melt belt. Because that's going to be like our bang section and all that and just quickly combing the hair out, because I just want to get everything prepped so before I um you know actually do um the ponytail part I just wanted to just um. You know get everything pretty much ready to just be styled, so I'm starting with the bang first, I'm just going to hot comb it downward and I'm gon na go in with the eyebrow razor chop it down, leaving a size long because I wanted to curl the Sides leaving my thick chunky sideburns because I'm going to curl that as well and the pull down pieces that I have in the back, that's going to be cut and curled as well. So everything is going to be cut and curled. And I just did my ponytail and a few rubber bands um, because when I do when I take that bundle that they gave me and wrap it around um, I just wanted to be like kneeing out the way and I'm gon na. Let y'all know now. My ponytail um is not perfect and honestly, it really doesn't have to be because most of the hair is going to be hanging down in the back and like we already know, we ain't got no mirror for me to see what's going on back there, but I Am going to for the pieces I do see like messed up in my ponytail, I'm gon na try my best to Sleek it up, and you know make it as neat as possible, but I'm just going to continue to take that eyebrow razor raise it down. That thing uh bump the front curl the ends uh raising my sideburns curl that raising my drop down pieces curl that so yeah foreign foreign good night. So now that we got that part situated, I'm going to go ahead and take that bundle and wrap it around. My ponytail part um and I'm just putting the glue on and I cut that bundle in half um. You know just so it's not too too heavy on my head because I do go working out every morning. Y'All - and you know I don't want to just my head to be like all the way down, so I didn't go too crazy. Plus this wig was pretty thick, even though it is 150 density. It was pretty thick already on its own, so I didn't have to add too too much hair to it. That'S what I want to use have, but I know my head is down y'all, not just because I'm trying to really be careful with not getting the glue on any other part of the wig other than the part I needed to you know wrap around. So I'm just gon na wrap it around just filling it. As I go um and to be honest, y'all y'all know doing your own wig already is a lot of hard work, but really when you're trying to do different styles, especially like a full style like this. It is definitely a lot to manage so just take your time and do the best you can um, but now I'm going to go ahead and remove those other rubber bands that I had holding the rest of the hair together and then I'm going to take my Little wrap around part spray it wrap around and then begin to curl the ponytail foreign is done and I'm just going to take my flat iron and just curl the hair away from the face on both sides. Until every piece is curled and once I'm done curling everything on up, I will tease it all out play with it. Fluff it and then show you guys the finishing look, foreign foreign foreign foreign, my fingers through it fluff it out a bit play with it. Until I get the finished desire, look just finish: finger combing finger coming finger, combing supposed to be like a cute messy Little ponytail. Look so, like I said y'all the back is nice perfect, because I want it to be because I can't see back there, but it still turned out pretty dull, because the hair was covering everything in the back anyway. So overall, this is the look. I hope you guys enjoyed it just add a little holding spray touch it on some areas, catching some flyaways trying to fluff it up. Um yeah, but I hope you guys enjoyed this video. Like I said y'all, it would have been easy if I had that mirror to really help me perfect with laying it down, but just to give you guys an idea on how to do it on yourself, um. You know anyways, but thank you guys for watching. I hope you guys enjoyed this video and stay tuned to the last. You know final. Look, foreign foreign


Comments
TiLi J ☮️: Another slay even though I’m a headband type of woman I find these videos relaxing
Kimberly Smith: Perfectly imperfect which makes it so perfect yess this is why ur the Slay Queen Shay
Ashimary Hair: Great installation!
Kimberly Smith: I’m always smiling when I watch your videos love it slayed by Shay the Slay Queen
lneal2800:
Toyia: ❤❤❤❤❤
Sammy Da Goat:
Lucas Lima: Yaaas