Quick N Easy | Shake N Go Wrap Around Ponytail | Jeweled 32" Yaki Ponytail
- Posted on 23 September, 2020
- Ponytail Hairstyles
- By Anonymous
Hi Sweets!
Who doesn't love a great ponytail? I know I do. In this video, I show you a new super quick ponytail that I've been loving and also show you how to spruce it up with some hair accessories.
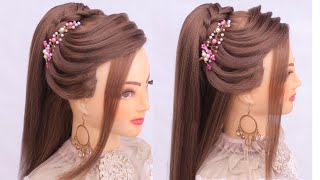
I love how this ponytail turned out, very Princess Jasmine vibes.
How to get a slick ponytail video:
https://www.youtube.com/watch?v=H_Cgjn...
Items used:
Gold string
Wooden beads
Gold hair cuffs
Organique Shake n Go Wrap around Ponytail - 32" Yaki Straight
Hope you like it too.
Be sure to share with your friends, like and leave a comment.
Now i feel like i have not done a hair tutorial in forever on this channel, so i figured why not come put you on with a bomb, ass, ponytail and then take it up several notches, because hello, extra and like excitement like it's, this ponytail is gon Na give you life promise: okay, okay, so let's just get into it. Let'S just go so y'all see that my hair is to the gods and honestly, every time i sleep back my hair, i'm just so impressed because by way talk to me, nice look at diet. I like that for me, i like this for me, so i slipped my hair down. If you want to see how to get your hair to look, this slick you'll be i'mma link your video in the description in the cards, because i have a detailed video showing you how to get this to look snatch. Baby girl, like i got you so now, your hair, snatched, let's move on to the pony tail, so the ponytail that we're gon na be using for this is the shake and go ponytail from sensational anyways. Let me show y'all the ponytail, so this one that i'm using is there it's the straight version. That'S say: yaki street yeah, that's it the yaki straight, so they have like a super straight one. They buy yaki streets and they have a curly one. So this is what it looks like and i've worn this before. So it's not like fresh out of the package, so i've worn this before. So that's what it looks like and y'all can see. It is mad long. I can't you guys kind of still can't see the end, and it is literally just a weft over here with a comb at the end and then an extra piece to wrap around the base. So once you finish wrapping it around, you conceal your width boom period. Pull so i have my hair braided, so it's easy to conceal once i put on the ponytail, so i'm just gon na take the comb that comes with it, anchor it into the base of my ponytail and then just take the hair and wrap around as tight As possible not to be a headache but just to make sure it's secured around the braid and then once i'm finished, i take this part which is supposed to secure, which is supposed to cover and conceal the weft and just wrap it looking cute or whatever. You know, but of course we can't stop there like we got ta use the extra time to be extra okay, so we are gon na personalize jewel eyes, all that just to the ponytail. So, let's take it to the next level, so i really wanted to use gold beads, but i couldn't find that so i thought the next best thing would be to get regular, beads and then put these into gold things over it. So i could still get the gold effect and the same beaded effect right. Smart, i'm a genius. I know. Oh my god, thank you. So i cut the string the length of my ponytail and gave it just a little extra room to play around with in case you know any mishaps, so we're just gon na put the beads on the string and that's it. So we start things off by anchoring the beaded string to the hair and we just use a hairpin and just secure it right above the base of the ponytail. Just so we can have a nice cohesive. Look, you know not just the ponytail has some niceness, but your hair as well now going in with that next piece of gold string we're just going to take a knot to the base of it and then wrap it around almost to cover all of that hair. That we wrapped at the base of the ponytail as well, i would recommend you do this hairstyle with a mirror. You know it is the back of your head. So once you have a mirror, all of this will be so much easier and you'll ensure that you cover all of the pieces all of the hair. So it's one smooth thing and there are no gaps once you're finished wrapping the hair, you just use a tie and just secure it in place. Now, let's go back to the beaded string now this part, i definitely recommend you use a mirror with. So it's easier for you. I was just imagining what it looks like and feels like, because you know that's just how my brain works. So you start with a cross, so we said we're crossing so you're, putting the bead where you want it to be you're crossing at the top of the bead right there to anchor the bead in place. So once you cross at the front you're gon na. Take the string to the back cross at the back as well and then push up your second bead in place and then take the string and wrap an x around the base of that bead as well, so you're, literally just crossing at the front. At the base of the bead and at the back of your ponytail to create that nice x look coming down - and i did this for maybe about six or so beads. My string was really long, so it was really hard to criss-cross at the front and the back, because i had to pull all that string to the other side, and you can see i'm struggling here. But you know if you use a shorter string, it probably won't be so hard. So once i've gone about halfway down the ponytail, i decided that you know we're gon na we're gon na try something else with the rest of the ponytail. So i cut off the excess string and i just secured it with a knot in place and now we're moving on to the rest of the beads. So all i did was stack up the beads to the length of the where to end use a grab, clip to secure it and then taking some string. I tied off to hold it in place and i had some excess string and just to tie the whole look together. I use that excess string to wrap around that almost to the end of the ponytail and just create that same effect that we did at the top of the ponytail. So everything looks cohesive and nice. I kind of created like a little jasmine balloon here effect here. I think it turned out nicely and we just cut off all the loose strings and bam bam. I had to beat my face because this hairstyle it needed a face. You know like it looked too good to be like regular, plain, jane, plain: jade is all right, but can we talk about this facebook? What look can we talk about the drawing of the balls? That'S not why we're here, let's get back, let's sit back okay, nice, but for real, though guys, this is the end of the tutorial, and what i love about this style is that you can get as creative as you want. When i started out the video, i had a whole different style plan but like as i moved along, i was like yo. This could be nice. This could be nice like try different things, get as creative as you want use, different beads used. Listen, you can do so many things all right, if you guys did like this video, be sure to give it a thumbs up. If you are going to recreate this video tap me on instagram, i want to see like i want to see your creations. I want to feed off your energy yeah all right guys if you're not subscribed subscribe now, like am i a scratch record or what like you. This is your like third video in the last 15 minutes, hi chad, let's go we've binge watching subscribe. Alright, guys i'll see you in the next one bye,

Comments
Monique X: Yes ma’am . Things you did: 1. THAT!
Shanda 360 ♥️: Definitely Jasmine vibes! So cute
Flo Knows best: Pure excitement ☺️
Shanda 360 ♥️: First of all...you looking like a goddess in your thumbnail!! Ok lemme go watch
kaykayshocker: Very cute
mick2duniverse: You did the damn thing !!!!
O Reid: Me like it before me even watch it
Jayfill: Gyal yuh luk beauti
Kandice Moncrieffe: And you cyah do my hair