How To: Yaki Straight Goddess Braid
- Posted on 04 October, 2018
- Ponytail Hairstyles
- By Anonymous
Hey loves, welcome and welcome back! Here’s an easy protective style for you for the LOW LOW!! I hope this tutorial is helpful and I’m sure you will look BOMB! Thank for for watching, DON’T FORGET TO SUBSCRIBE XoXo
Share, Like, Comment
FOLLOW ME:
Instagram @itsshytown
Snapchat @shytrillz
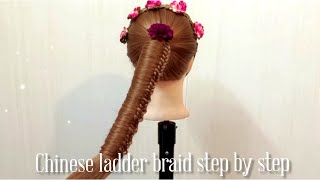
Hey guys welcome back to my channel, so today we're gon na be doing a protective style. Another hair style video, yes, but this time we're going to be adding extensions. I'Ve done that an invisible ponytail before, but I've never done so on camera. So I just decided to go ahead and do a protective style and record it, and what do you know I had these bundles laying around so I'm like hey, let me use it. The brand is forever new. The hair is 18 inches, it was $ 9.99, but your girl got it for free yeah. So I'm not sure if I'm gon na be using both bundles but for sure going to be using at least one. I haven't even like stretched out the bundle to see exactly how long it is yeah I may have to use two, so I may have to use both bundles. This is the start of one bundle, and then it's not that long, so yeah we may have to use two and we're not gon na be using any glue, so the products that you'll need for this hairstyle. Of course, I always like use some coconut oil. Two over here before I do a protective style. I have the eco styler gel and I also have this so I always use this brand with the black, castor oil in flexi to kind of stretch out my hair, even when I'm doing like wash and gos, but I'd love to use the olive oil eco styler. Gel on my edges, cuz, it does leave my edges down without any flakes. So I love that. Of course you need a brush any brush that you may use a comb. I have my edge brush and then some hair ties and then I have like some ghost ring that I may go ahead and just wrap around my ponytail just to make it like more pretty and some hairpin okay. So I've already sectioned my hair. So I have it in four sections and then I have some hair left out on both sides and in the middle for braiding. So I'm gon na go ahead and just braid, but once you have your hair sectioned off and you have your braids in so I have a braid down the middle of my head. I have one going up the side and then I have the other another one. Going at the other side, I'm gon na take my brush and I'm just gon na brush the front of my hair. Only now we want to take our brush and just brush our hair. Okay, now that you should actually because when the ponytail is a struggle, doing a vitality, now that you have your ponytail - and this is the foundation you have your foundation done, your ponytail is in yet your edges, brush style. Your hair has moved up it's late. Now we're gon na get on to adding our extent you're going to do is pull my hair forward eh-eh-eh. Now that we have our braids, I'm going to take one end of the hair bundle and I'm going to take one. My hair pins and I'm just going to clip that on and you just want to put that through, like that or you can hold on to the bundle piece like this. So then, I'm going to take this clip this on to my hair, like going going where the bobby pins, the hair. If it is going to answer mine, don't worry about the end piece, because all of that is gon na get covered. So now that you have that on - and it's secure just push it all the light there, you want to start taking your bundle and just wrap it around, and I'm gon na hold my hair pin down and I'm just gon na wrap this up. So we have reached the end of the road for this one bundle: okay, so what I'm going to do is I'm gon na lay it on top here like so so I just put the actual last piece of the bundle on top of my real hair. Then I'm gon na take a bobby pin and I'm gon na stick the bobby pin into my braid. Okay, just stick it into your braid, see how we got this first piece secure. Okay, now we're gon na take the last bundle. Stick the hairpin like going downward. So, look your hair pans right there, so it should look like this and then I'm going to take the hairpin open. It split it like so look like so and then you're just gon na take that hairpin and stick it down into the ponytail into the braid. Remember that, like you're wrapping hair around it, so that is actually not gon na show, okay and just continue to work to secure the last piece like these and just wrap this around. It'S a cover. I just pull it tight. That'S gon na help secure the hair as well. You just want to take another hair, pin and secure in your wraparound piece. Just stick though this is the finished look, and I am so in love with this brain. It is so cute. I just keep stretching it out because I wanted to be thicker. I love this braid, so the results are a little bit different than what I wanted it to be. The last time I did my Jeannie ponytail, I did use human hair. This is yucky hair. The brand is forever new and this is 18 inches, so I know for future reference. If I do want to go for the Jeannie ponytail look I'll just stick to using human hair, I will be uploading the video to do an actual chibi ponytail using human hair. So stay tuned for that video don't forget to hit the subscribe button, if you guys have any feedback or any suggestions, don't hesitate to leave them in the comment box below and as always I'll see you guys in my next video


Comments
Ama blakrose: I love your hair ! The style came out looking great. I love the bead emballehment.
Jubilee Diming: Okkrrruttt! Love it!