Omg This Red Color Detailed Lace Melting Tutorial + Trendy Claw Clip Hairstyle Ft Curly Me Hair
- Posted on 21 December, 2022
- Short Hair
- By Anonymous
✔Pre-cut Lace Wig Link in the video:
https://curlyme.com/products/convenien...
☛CRAZY SALE Up to 65% OFF, Buy now pay later, 4 or 6 Interest-Free payments➤
https://curlyme.com/?utm_source=youtub...
☛Use my special Coupon: "Caroline" for all products extra 10% off !!!
Wig Name: Wear Go Glueless
Wig Cap Construction: 4x4 Clean 3D dome cap wig
Texture: Mongolian water wave
Length: 30 inch
Lace Type: Swiss HD Lace
Density: 180%
▬▬ Why Wear Go glueless wig ▬▬
✔ Pre-plucked Clean Hairline
✔ Pre-cut lace
✔ Real Invisible HD Lace
✔ 3D dome cap to fit different head sizes
✔ Piano Keys Elastic Band
✔ 5-min install wear and go
#gluelesswig #weargowig #curlymehair #wiginstall
Follow us on Instagram to win free hair: https://www.instagram.com/curlyme_com/...
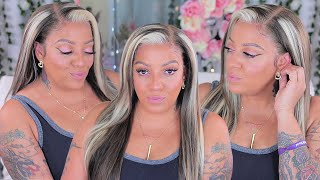
Foreign and happy holidays welcome and welcome back to my Channel, It's Your Girl, Caroline and I'm back again with another wiggin stall. Today'S install, I really wanted to try out this Tick Tock style I've been seeing all over my for you page. I swear everyone in their mom has been doing it so me, and my mom will also be doing this hairstyle, but for today's video I'm going to take you guys start to finish throughout the whole process as well as give you some tips and tricks on just You know how to improve your wig installation game, but with that said, let's get right into today's video okay, so the weather gon na be installing. This is her. It is very, very long. Let me back up - oh oh, my God girl. Okay, this is the wig. It is from curly me, Hair Company. I'Ve worked with them a lot of times, I believe it's 30 inches water wave. I did pluck the wig myself, but honestly I did a very lazy plucking. It'S not even that much plug, so I might have to plug in more to put in my head, but I just went real lazy. It'S the end of the year. You know I'm just chugging along, so I really want to try the what's it called. I really want to do the if you're on the internet be on social media, mainly Tick Tock, that famous Tick Tock, hairstyle everybody, my mom, is doing I'm finally gon na. Do it because I've been putting it off. I don't know why I'm really excited, because it's so cute now I have worked with curly me for a minute and live in. This lace has never looked like this. I don't know if it's supposed to be like a transparent lace, but sometimes if some waves, the lace, come with like this, like greenish tint. I don't know why. So I'm gon na have to do some work to make sure it's gon na. You know blood into my skin perfectly go in with my Maybelline Fit Me Foundation. You already know I'm not just gon na bust that again and since we're really trying to cancel out that color the lace I got ta make sure I'm putting some on top. I normally don't put foundation on top, but it's only. The lace really needs to be tinted. That'S when I'll do it. For example, here she a little tight, that's what he said, I'm so childish. Definitely if you have a big head - and you want to get this wig ask for a larger wig cap, because I don't have - I have a larger than average head, I would say - and it's kind of tight and I usually always can get away with wearing, like A medium so yeah, let's cut the tabs around our ears, try to find the top of my ear, and I just carve around that part that out or section it out somehow. Somebody recently asked me shout out to you babes, a really good question. Is it better for you to cut the lace off before you glue it down or after you glue it down? I do both well, I've done both and I feel like personally, they have their pros and cons. I just recently started going back to doing cutting the lace off before I glue it down like right now, like I like to like just Trace out the shape of the hairline use, a razor. You know cut it off and I like to cut it off of four these days, because I feel like there's less lifting when I do it before, because I feel like we can spray the lace and then cut it off. You get like lots of lifting because you have to, like you know, lift the lace to cut it off, so I feel like I like doing it this way, because this way I don't have to like get all the excess lifting from you know. When I tried to cut out the lace sticking but we're gon na make it stick blow dryer cool setting, I feel like because the wig feels very short on my head and I think it's gon na like not fit the way I want it. I need the size to fit really well for the style. I'M gon na do the sides first, I normally don't do the side space, but just so that it can like stick down the sides and not start shifting around, because I feel like it's. It'S a little tight on the head and I feel like spring release. It'S cutting the lace before and spraying it the way that I do it now, like the you cut the lace spray under or over, depending on what section you're doing. I feel like this method. Also helps the lace be like the hairline itself, be less crunchy, because you're mainly trying to like spray your spraying, like mainly on the lace when you cut the lace before okay, that feels very secure. Now. I feel confident to do these because I know I didn't do it the way I just did it the way it will start it'll be shifting and sliding all right. Now, let's just go ahead and cut these balls. Oh just gon na put this on so that way the lace can have a moment to just fully dry before I try swooping the baby hairs because it's gon na it's not gon na work. Okay, let's get into these baby hands foreign foreign. Sometimes the baby hairs won't hit and that's okay keep pushing let's get on to the rest of the actual hairstyle okay. So for this style it looks like you're supposed to like section off the hair, so I just did like little diagonal part going down this way. All the way to my ear, you see her cone section it off and I'm doing the same thing on the decide all right and I'm gon na take these pieces to the back. Just get out of the way come sweating right now, so I'm gon na put some gel on her, make sure she's, nice and flat I get so nervous doing new hairstyles y'all come on. I don't want to suck at it. Okay and now we're just brushing it real nice and smooth with this hard bristle brush. Okay, I'm gon na use mousse to lay down. I don't feel like there's no point in wetting this part. I don't want the leg to start lifting, so I'm going to use okay. So, basically, what you do now, when you get these two flaps, nice and flat you're supposed to like tie it under your ear, like literally you put it, then you tie it under I'm not gon na make it too tight, because I might need to loosen it Up later, but um, that's good enough! So now we're gon na like right. So we take we're gon na section. Half of the the back part don't have to use too much hair. But since this hair is like really thick, I'm going to use like basically half of it, get you a nice little pony, yeah, yes, her and what we do with the ponytail, make it nice and tight. I feel like the key to this hairstyle. Let'S make everything really smooth and I'm gon na put the pudding tone. Okay, I'm just doing a rough draft y'all, so I can see what I'm doing before I commit to it, and then we have your ponytail right and we get lower. So y'all can see me and then you have your ponytail. Apparently all you got to do is just like flip. It right so Pony flip the ponytail like. So let me get you a little clip, I'm using just like a boring ass and then I'm clipping like up here. Let me see how high do I want it. I think I'm gon na clip it like right here all right. I like that. Let'S see flip her over, I think I got ta use more hair, so I was feeling actually very under the weather when I was filming this video. I don't know if you noticed the sniffling going on, but the worst headache and sore throat just hit me. While I was filming - and I was like you know what I'm not much in a talking mood so here is future me doing a little voice over but, like I'm saying yeah I deadly, I just go back and add more hair to my ponytail, because I wanted To be more fluffier and I did go back and add more hair to the ponytail. Thank goodness this hair is thick enough for that, and then what I also did was I loosened up that middle part. Front section like I was telling you. I don't want it to be too tighteners and probably change my mind to make some tweaks so definitely don't make it too tight until you're, like satisfied with how it looks because I decided I wanted to pull some hairs out in the front. I would just like. I was just like having some hairs in front of my face. I feel like it just kind of like it just adds a vibe to it. So I just went around and pulled some random hairs here and there to kind of just like add some extra little cute front pieces to it. Of course, I wanted to look like very like effortless and light, so you can't pick like fat chunks I'll just try to like get a small random little strands of hair to come out once I was happy with that, I went ahead and flipped the hair back Up to see how I like how the hair is going to look in this final product - and I did so now - I'm just going in and just like - cutting some some layers on the top blue, because I don't want the top part to like fall too low Or I don't want to be too long on the top, so I just cut just a little bit and now I'm going to go ahead and start. You know detangling the hair and defining it. So it can look more clean and I just realized if you don't feel like wetting or defining your curls. If you have like a very tiny curling iron like a little micro one, you can just go ahead and just do a little micro wand. Curls. That'S also a really cute look as well, but I'm going on and putting my last band on to hold this wig down because of the detangling process. It was a process and to Define My Curls, I'm just using literally water and some of that mousse, I'm only using mousse, because mousse dries faster than water. If you don't have time to like wait for your hair to fully air dry, definitely use more mousse than water foreign foreign. By now, as you can see, I was definitely like. Okay, it's coming out it's becoming cute because I wasn't feeling it this whole time unless we got ta, wait till the end to see if you like your hair or not, but for the front pieces. I wanted them to have a very like defined specific type of curl to them. So, like I was saying earlier, I just used my the end part of my curling wand, because my curling wand gets thicker and thinner down the base, so I use the end. The thinnest part to just you know twirl around, to give it a very nice little springy curl in the front I felt like little curls on top they weren't giving the way that the curls I just did wear so. I just picked some random pieces to curl here and there just to like give it more definition. Y'All know me: I'm always obsessed with little details when it comes to getting your hair done, but that's basically it for the style, and I was not thinking it was going to be this cute on me. But I really like it like it's given. I don't know what it's giving is it 2000s early 2000s 1900s is giving something, and I'm here, for it feel like the true star, is the color of this hair. I feel like the color is what makes it pop like make. This look just pop. So much like it's so cute, I love like when I can wear colored, wigs with no makeup and it still gives because sometimes I feel like with colored wigs or I have to have like a beat face for it to make sense. But this color, I feel like my complexion. It makes sense giving y'all a little bonus hairstyle moment. If you want to do something different, just put that clip down and there you go. You got a different style. I like this too, which one I like better y'all like it up or down the up. Just has more attitude, but if you want to be like you know, very cute and Casual look too and in case you didn't catch it, I did do a little random giveaway somewhere in the middle of this video. Whoever won that wig. Congratulations to you because I'm giving away this exact unit the first person to comment down whatever I said to comment gets this wig and if you missed the comment or just relate to the video, that's fine! Because I'm going to be giving away something in every video that I'm dropping this month of December, just you know, because it is a season to give and my love language is giving gifts and I love y'all. I want to give back to you guys, but with that said, make sure you watch the rest of my videos if you want a chance to win something, possibly another wig or money or who knows I'm just giving away anything at this point, but I hope to See you guys another one make sure you like comment and subscribe, and peace out Girl Scouts goodbye and have a lovely holiday. I guess I really don't know what Christmas is all about. Who knows what Christmas is all about?
Comments
MARY ODE: OMG thank you for this tutorial, I've been trying to do this hairstyle!! it came out so cuteeee
Luashern: This look turned out so beautifully!
Brooklyn Gabriel: you make me feel like i can lay a wig!
Zoë Machethe: This wig is poppin'! Tsoo cute!
LadyBug: 3:34 reference - heyyyy girl! Love this color on you btw
Tellisa Daly: Hey girl I want that wig ❤
Mookie Cookie: Damn I want that wig
Keeping up with Toria: I want this wig
Recool Hair: You are so pretty!!! Love your video
Luashern: I want that wig!
Haja-isha: It’s Caroline ( here for it )
Kelsey Woods: how did you get that color
Wiggins Hair: well donepls check email, thank you~
sothatschy: Dang I wanted the wig I came to late.
Katie Parris: Is this wig rlly 4x4? Bc that’s what the description says but in the video it looks like 13x4
LovelySadanya: hey caroline ❣
Kiauanna Stfleur: first
Peace: I was tooo lateee