Diy Quick Weave Using Outre Purple Pack Jerry Curl By Karrill Dadiva
- Posted on 18 May, 2022
- Short Hair
- By Anonymous
You are currently watching DIY Quick Weave Using Outre Purple Pack Jerry Curl by Karrill DaDiva
In this video I made myself a quick weave from 2 packs of jerry curl hair. This hairstyle was very easy and simple to create. Making your own wigs can actually save you not only time but also money from always doing your hair. Making a wig like this give you the option of quickly putting on your wig in the morning times and go about your day and quickly take it back off at night before going to bed. Wearing a wig from time to time can help to keep you hair healthy. Thats because you can wear a protective style under it and the more you stay out of your hair the better.
The humidifier and fan in the video is from amazon and the link is below. I recently found out that a home humidifier can make your hair healthy. Below i will link the article so you can read it yourself.
Hair Used: https://amzn.to/3yHJFrK
Humidifier: https://amzn.to/3Ga1Qbv
Article: https://maneaddicts.com/how-home-humid...
~~~~~~~~~~~~~~~~~~~~~~~~~~~~~~~~~~~~~~~
Please ask any questions in the comment section. Also, leave a comment and let me know what you think.
~~~~~~~~~~~~~~~~~~~~~~~~~~~~~~~~~~~~~~
Thanks for watching. Road to 100K
Remember to Subscribe, Like, and Share. Love ❤️ you guys and appreciate you all so much!!!
I'm Forever thankful
~~~~~~~~~~~~~~~~~~~~~~~~~~~~~~~~~~~~~~
Make sure you watch the video in the highest quality (HD/ 4K) to get the best out of it.
~~~~~~~~~~~~~~~~~~~~~~~~~~~~~~~~~~~~~~
Other ways to support my channel:- https://www.paypal.com/donate/?hosted_...
~~~~~~~~~~~~~~~~~~~~~~~~~~~~~~~~~~~~~~
CONTACT INFORMATION FOR PROMOTIONS ⬇️
Email: [email protected]
~~~~~~~~~~~~~~~~~~~~~~~~~~~~~~~~~~~~~~
Follow me on my other social media websites
~ Instagram- @karrill
~ Snapchat- Karrill
~ Facebook- Karrill DaDiva
~ TikTok- Karrill
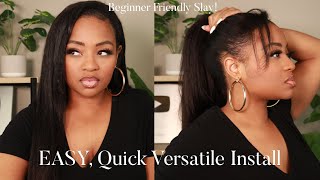
Watch me slay this wig, like a pro today, i'm going to be making this beautiful, jerry, curl wig, and i'm going to show you how i do it hey guys. What'S up welcome back to my channel, it's your girl, Karrill DaDiva. Let'S talk about the things you're going to need to make this wig, we have the ultra premium, purple pack, jerry curl and it's in the color 1b, and i'm going to be using two of them. Next, i have a dome cap which is specially for wig making. Next up we have the super airborne glue and you're. Definitely gon na need that and my scissors for cutting the hair, of course, and finally, my mannequin head now, i'm gon na go ahead and put the wig cap onto the mannequin head. So what i do before i glue the hair onto the mannequin or onto the dome cap is i measure how long i want it and where i want it before cutting it. Now that i have the right length that i want - and i know exactly where i'm gon na put it - i add the glue onto it and then i'm gon na go ahead and glue it on to the area where i want it, starting from the back. Of course, i then hold it in place a little bit, so it could dry a little bit more onto the wig cap and then i use my blow dryer to completely dry it. This glue gets stack here, real quick, so don't worry, you're not going to be standing here forever. Holding it there. I'M going to show you guys again from a better angle, how i add the glue onto the weft of the hair before i go any further. I want to show you guys something so this humidifier i got from lacy doll. I think that's the way you pronounce it um. I keep it in my office space because this is where i am most of the time or sometimes i'll bring it to my room. But what i want to tell you guys is how a home humidifier can actually make your hair healthy, especially around the winter time. In the summertime, this one is very easy to use. It comes with a handheld remote that changes the settings, so i don't have to get up and keep you know hitting the buttons on there. I just use the remote and set it to whatever. I want to add the water to it. You can either open it up. Like you see my sun doing here or you can pour it down through that black grilled lid that you see on the top of it. It is recommended that you use distilled water, but it comes with instruction for you to follow, so that will be very easy on the back of it. It has a little window, so you could see the water as it's going in and at the top. It shows you the max line that you do not want to pass now, i'm going to go ahead and turn it on and then set it on humidifier, because that's what i wanted on now, as you can see there, it's doing its thing and now i'm just Enjoying the air as i work, i also have this beautiful dex fan from that same company, and i really love this fan because of the little things that it could actually do for a small fan like this. As you see me doing here, i could rotate it all the way up and back down, and this is good for if you mount it on a wall, i will show you the wall mount and a few that it came with. This is a piece that you would use to mount it on the wall and on the bottom of the fan. As you can see there, it has a little hole that you would stick it onto to power it on. I press the button right here and it comes with three speed settings, so i keep clicking the same button to change the speed to start the rotation i hold the same button down and to stop it. I do the same hold it down for, like you know, two or three seconds. The instruction will tell you and it will stop so yeah. As i work in my office, i use these and it makes such a big difference with the air i breathe. Also, the humidifier helps to keep my hair healthy and i will leave the article down below so you guys could read it for yourself. I got these off of amazon, which is so convenient, so i will definitely leave the link down below, so you guys could find it if you're interested now back to finishing this wig. So here i'm measuring my second piece which i'm gon na be adding on next and then i'm gon na cut it and add the glue on it and i'm gon na show you guys from a different angle. How i add the glue, adding the glue is pretty simple and don't worry if it gets on your hand, it comes off easy. It'S like rubber and i actually like you when it gets on my hand, because i like rubbing it off and now i'm gon na, go ahead and put that piece on the wig cap and, like i said before, i'm gon na go ahead and hold it in Place a little bit before i start drying it with the blow dryer. So when i'm making these wigs, i like to use spritz or pump it up to speed up the drying time and give the glue a better hold onto the wig cap. In this case, i'm using pump it up. I spray it onto the area where the glue is and then i go ahead and dry with my blow dryer some more now, i'm going to go ahead and add a third piece and then i'm going to speed the video up and get to the top much Faster because i feel like that's the more most important part, you know what i'm saying i want to show you guys how i close the wig. So your wig don't look tacky, especially if you're sitting like say on a bus, somebody's standing over your head they're. Seeing your closure, you don't want that, so i'm gon na show you guys how i do that. Another thing i want to show you guys, especially if you're new to this, i take the wig all the way up to this area. Before i even start adding any in the front, and the reason why i do this is because i don't want it to look too bulky, i want it to look more natural, so i waited until i get to this part before i start to add any pieces At all in the front, and if i was making a straight bang wig, this would be the same way. I make it because the less hair you put that's gon na go on the face, is gon na make it look more natural, like it's your hair, because for real you wouldn't put too much of your own hair down on your face. You would have most of that going to the side or to the back so from here. I'M gon na start going in a circular motion right here. As you can see, i added the glue onto the wig cap. This is another option. You could do it this way too, but i like to add it onto the hair first, but when i get to the top, i like to do it like this, and the reason why i like to add it onto the cap when i get to the top, Is because i usually don't cut the hair, i don't measure and cut the hair like i did in the beginning. I just keep putting the hair on keep going around keep going around. So that's the reason why i feel, like it's easier doing it this way. Watching now, i'm almost at the ending of the closure, so what i'm gon na do is i'm gon na keep doing this and bring it close enough to where a plastic straw could fit down in the middle of it? As i'm doing this, i'm actually drawing it with the blow dryer at the same time, and this will help to keep the hair in place. Where i put it so so here, i am making the closure that i'm gon na be putting in that little space that i leave on the top. All i'm doing is rolling the hair, and this part you have to do it right. You have to roll it as tight as you possibly can, or it's not gon na work. It'S not gon na look good. I'M gon na keep rolling it until it gets small enough to where i want it, and it's about right here. So i'm gon na go ahead and cut it here now, i'm gon na add some more glue down in there and then spray some of the pump it up in there dry, just a little bit to where it gets tacky and then i'm gon na push my Closure down in there, as you can see, i'm still holding the closure in my left hand, because i cannot let it go. I don't want it to get loose now. I'M just gon na push that baby down in there and i'm gon na hold it in place. As i dry it, some more with the blow dryer, what you see me doing here is i'm just making sure that every single part of that weft that i rolled is getting down in the glue, because after it's dry, i don't want anything to be popping out. Just because it didn't get no glue on it, and that will happen and then you don't want to be putting glue on it at that point, because it's gon na be showing the glue is gon na be showing unless you're gon na do this step over now. I'M opening up the roll that i made from the top to spread it out just so, i could push it down in there some more also. This is how i want to leave it. I want to leave it open and i'm doing this with the scissors. This was a bad idea, because i ended up cutting my finger with the scissors because of how i was holding it. The scissors is very sharp and i wasn't holding it right and it cut my finger as you're gon na see probably you're gon na see me. Do that right here there we go cut my finger, but my fingers all better. Now the cut didn't last too long, because it wasn't very deep now, i'm finally gon na dry, this little area um completely, and then that will finish the making of this wig after i was done making the wig. This is how much hair i had left over from the two packs. Now, i'm gon na show you guys the wig on me and i'm gon na fix it to my liking and you know cut what needs to be cut. You know tease it with my comb and all of that good stuff. So i'm just opening up the curls a little bit with my comb and as i do that you could see, the hair is getting bigger and bigger, more puffy, more fluffy, and that's exactly how i want it now. I'M gon na go ahead and trim some of the hair from around my face, so i could look more natural and this way i could actually see where i'm going. When i'm going wait, wait, wait y'all, see the smile on my face. That'S because i actually really love it. I feel like i did a phenomenal job, and this is it guys? Definitely let me know what you think about it in the comment below. I did a video similar to this one about a year a year and a half ago, and i see that you guys really enjoyed that video, so i thought i'll make a more updated one, and so i hope you guys enjoy this one as well and here's The back, i thought i could do a little bit more picking with the comb, but that's something i will have to do after i take the wig off, so i could see what i'm doing yeah i really like it and i will be making more wigs. So definitely look out for them. Just you know like different styles. Also, i want to say to you guys that i will be posting on wednesdays and saturdays, so look out for those videos. If you found this video helpful, please go ahead and give it a thumbs up. I would really appreciate that. Also, if this is your first time on my channel, i would love it if you would subscribe and hit the notification bell, so you will be notified whenever i post a new video. Thank you so much for watching i'll, see you in the next one bye,
Comments
Sarah Jones-Hunt: Just saw your video and you did an excellent job! You were very thorough. Thanks for sharing. This was very helpful! ❤️
Rose G: Hello Gorgeous great job on this beautiful wig, you make it look so easy, looks great on you.
mstasha80: I want to try this! You make it look so easy.
Keesha Williams: You look Beautiful!!! And you did a great job on that wig.
Lise Thomas: Beautifully done ✅
Ur Highness: Absolutely gorgeous!!!
Brigite Green: Friend you do such amazing hair styles you need your own salon and makeup. Because you are always slaying your hair and makeup. Beautiful as always. Just stunning.
MzVan21: Beautiful! Will be doing this style
Marlene Lyles: I love to do quick weaves. You did a spectacular job
KyKy Faison: I have been stuck watching your videos this morning lol! You do great work Doll!! ❤️❤️
Mika Mathis: Your closure gave great leverage to your bang❤Looked gorgeous on you
Rebecca Diggs: You explained that real good .
Shawna Douglas: It's so beautiful
Tonia Kennedy: Love it!!!
Jennifer Cruz: Beautiful!!!❤️
Calvin Russell: Still Beautiful all day and every day Beautiful work ✨️
ANN STAR: GORGEOUS SIS GREAT JOB❤️❤️❤️❤️❤️
Linda Scott: Beautiful
Eva Agbley: Beautiful as always
Nicole John: Really love this
Aubrianna Langlais: Gorgeous
Angel Mcphaul: You are so beautiful. Great job
Chenedra Caldwell: This is cute
Marnay Sylvester: Love this
Janecia Goodin: Nice!!
Mrs. Onyango: excellent!
Simona Venable: Very very nice