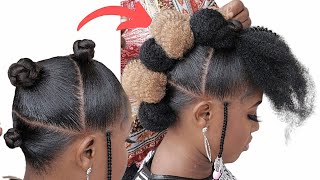
How To Part Hair For Updo Cornrows
- Posted on 15 January, 2022
- Updos
- By Anonymous
A lot of us struggle to cornrow hair into an updo without running out of hair to pick up. I know this is something I had trouble with when I was first learning how to do hair. In this video I walk you through how to part your hair in order to make sure that all your cornrows fit into the updo.
Baby Registry: https://www.amazon.co.uk/baby-reg/aida...
Learn how to Part Your Hair
https://www.youtube.com/watch?v=Tb-Z4Z...
How To Cornrow Your Own Hair Tutorial
https://www.youtube.com/watch?v=9yi9d8...
How To Cornrow Other Peoples Hair Tutorial
https://www.youtube.com/watch?v=x68V6S...
How To Add Patterns Tutorial
https://www.youtube.com/watch?v=tNabtY...
How To Cornrow The Back Of Your Own Hair Tutorial
https://www.youtube.com/watch?v=q4TjZn...
How To Do Feed In Braids On Your Own Hair
https://www.youtube.com/watch?v=EPjR_c...
Watch And Learn How To Cornrow Your Own Hair For Beginners
https://www.youtube.com/watch?v=pRieHi...
————Follow me here————
Instagram: http://instagram.com/AidaKiraya
Twitter https://twitter.com/AidaKiraya
TikTok: @AidaKiraya
Email me at [email protected]
————Stuff Used To Shoot My Videos————
Main Camera: Canon 5D Mark iii
Vlog Camera: Sony A6400
Waterproof Camera: GoPro Hero 4
Second Camera: Canon G7x Mark ii
Main Lens: Canon EF 20mm f2.8
Close Up Lens: Canon EF 50mm f1.8
Wide Lens: Canon 16mm - 35mm f4
Drone: DJI Mavic Pro
What is good guys it's ida and welcome back to my channel if you're new here please subscribe and make sure you turn on notification bell, so you can be notified every time i post so things on my channel are a little bit different, seeing as your girl Is pregnant so that means that every tuesday i'll be uploading a pregnancy, video and every saturday i will be uploading, a hair video that is until about may junish when things start to get a bit crazy. Today i am joined by this lovely lady who you guys haven't seen on my channel in a hot minute um. I literally just took out some of the cornrows that kay had did in her hair from months ago. As you guys know, i was trying to teach my husband how to cornrow, hair and um we're gon na get back to that honestly, because i wan na do a video of him doing my hair and see how that turns out, but yeah today we're going to Be doing something on her hair, so a few months back, i was asked in the comment section to teach you guys how i part hair whenever i'm doing my updo. So that's what i'm going to do today, i'm going to show you pretty simple technique: how to part hair so stop holding her like that, how to part hair if you want to do an updo and how to like keep parting, the cornrows to make sure that You don't run out of hair because that's a big problem that a lot of us face so i'll be using the typical stuff i like to use, and that is a wide tooth comb, a rat tail comb and a couple of hair bands. My hair is a bit of a mess, so i'm just going to quickly detangle it. I didn't carry my spray bottle, it's in the other room, but usually i would use a spray bottle, spritz the hair and then a detangle. I like to use the big comb to part the big sections just so i can get a nice clean part in straight away. Remember guys! I have got a tutorial on how to part a hair, because i know a lot of you struggle. So there is a tutorial out there, so what i'm gon na do is go to around the point of the ear and just like part across from ear to ear and try to get something along those lines. Now there is a lot of different ways. You could do this, this updo in technique, but i like to stick with this one, because i find it the easiest and it's the one that i could just taught myself when i was learning how to do hair, luckily she's a mannequin, so she can turn. So. I can show you exactly what's going on, so i'm just going from ear to ear, and i will check afterwards to make sure that it's all good how i want it to be so yeah. I think that's pretty. Even for the purpose of this video, i am going to start at the bottom of the hair. Do it up and then go to the top just because it's easier to see the cornrows that i'm doing when i start that way. So the aim of this is to get the hair right in the center, so i want all my cornrows to end up right here. In order to do this. Whenever i'm doing a parting, i need to make sure that it starts off whatever size. It is, but it gets thinner towards the middle just so that there's enough space, because if we're all trying to, if we're trying to aim all our cornrows here, we're going to quickly run out of hair room. So we want to do our parts kind of like a triangle in the sense that you start off kind of wide and you get thinner and in and in and in especially on the sides, because that's where you have the most area to cover when you get To the bottom, it's a bit different. You can do kind of straight up. You want to make sure that whatever cornrows here kind of blends right into this one, you could do it where it's obvious that you did a middle parting and just do it like, like. Had the cornrows coming like that, like literally from the bottom up, but what i think it's better is, if you do it kind of from the sides and then work your way to the middle. Just do a part in across, like that, make sure your parts are nice and neat which mine are currently not that's a bit better. The aim of this tutorial is not to teach you how to cornrow. It is to show you how i part my hair for the cornrows. You can see here that the ends, the hair that i'm using is super super thin by the time i get to that middle piece, i'm using really really thin strands of hair because i really got ta ration it out just braid, then we're just going to continue To kind of go like this here, then here then here then here kind of like imagine it as if you're doing the hair and quarters you want to make sure that this by the time you get down here, that is going to go straight up, whereas all The others are going at an angle by the time you get to the bottom. It'S going to go straight up and then continue on the other side. Keep it thin like really be stingy with the amount of hair that you use. Usually, i would do it from the other angle, but for the purpose of this video i'm going to do it from right at her face, so you guys can see i'm sacrificing my own vision for yours, then, once again as you get to that center point, the Hair becomes super thin yeah once you get here, you want to start thinking about adding a bit extra to the nape of the hair. Just so you can start getting that curve and that bend that you need at this point you should be thinking. Have i got enough hair to then do a couple more and be in that straight line, if so, you're on the right tracks, my hips are starting to hurt. Oh pregnancy is no joke. Yo, it's no joke. I remember, but my mom used to bend my head. Like this, when she was doing it - oh my god, i think this is why i don't let people sit in between my legs when i do hair, because it's just traumatic for me. Man, then days when i had to bend up my neck, have my head in her lap uncomfortable while people are watching tv around me and i'm just there suffering. I think that's why i just give people the privilege of sitting on a chair and me working around them, because that ptsd from when i was younger - oh my god, this one should be almost like straight down now now, i'm in an awkward angle. So i can't tell that is more or less the center of her head, more or less she's got an awkward head shape, but i would say, is okay from here. I can tell it's slightly off literally just feeling her hair not looking at it. Then you would basically just mirror exactly what you did here on the other side, so you'll start there and then it's kind of like a clock right. You start at 12 o'clock and then you want to end up at 3 o'clock. So i'm going to do that off camera, so i can sit down and relax these bones and then i'll be back. So this is how the back turned out. I did end up redoing majority of these cornrows. I can't like only because it wasn't that neat, but i didn't touch the partings. One thing i will add is make sure that you're doing it at an angle where you can properly see, because if i was here, i would be able to notice that the the cameras are slanting to the side just a little bit, and i would have fixed That ages ago, but because i was from behind, i couldn't really tell what was going on so yeah we're doing a updo that is slightly leaning to the left of the lady. But that's okay. This back took me about half an hour to do in total and then we'll just basically do the same thing at the front. The way the mannequin's hair set up is very thick on the corners of her head, so it might be a bit clumpy and awkward, but i'm just gon na grab a piece looking at the hair that i did before and trying to aim it at the same Area with the front, you usually have a bit more legroom to play around with, because you just have some more hair the front half of your head. Naturally, whereas the back is a lot narrower, you see how this cornrow just blends right in with the one from the bottom half that's what happens when you kind of just. Do it slanted like that, when i usually do my own hair, i usually do because i'm lazy, where i'll just come from there and around, where it's really obvious that you split it in half. But if you don't want that to be shown, then just do this. This kind of i don't know what to call it slanted slanted chorus. I think you guys can get the idea where i'm going you're basically doing the same thing you did here at the front, depending on the person's head shape. It might change slightly um, i'm gon na do the rest of it off camera and then come and show you the final product and her hair is all done. I think in total it took me about uh an hour so about half an hour on the top and half now on the bottom, and this is how it looks as you can see. All of the hair now goes up in one bun at the back. You can leave it like that, obviously do it into the ends. You can leave it like that um, but i like to use a hairband. Some people like to use thread and like thread it together, but i'm just going to quickly tie up her hair and then we're just going to give you a quick overview of what we have learnt today. Look at this cute cute. I saw my hair like this. All the time as a kid, what have we learnt today? Well, as i was finishing off her hair, i thought to myself that doing hair is exactly like matte. This is the one thing that i think maths is useful for in the outside world, so you want to divide the hair in half. Then you want to also think about the center point of where that half is so. You divided it in half. First then, you found like a middle point. Now you want to focus on that middle point and the way that i do it is, i think, about the hair in four quarters. So you have your half, but then you also have your four. So you want to make sure that this quarter, the first chord that you're doing goes towards that center point and in order to do that, you're doing loads of triangles loads of isosceles triangles. To make sure that you meet that point, think of it as having a pie and now splitting that pie into more or less equal parts in order to meet that center of the pie. So do that all the way around and then just keep going um with her hair. It changes in terms of thickness throughout. So it looks a bit jaggedy, but with human hair. I don't think that necessarily happens. Once you get the general idea down, you can start playing around with different styles. You don't have to have it all straight going back as long as you think about that center point. At all times, you could have all different styles happening, but as long as you make sure that you ration out the amount of hair that you use in the middle of the head to make sure that all the cornrows fit. Thank you guys so so much for watching. Hopefully this has helped loads and loads um. Let me know what you think in the comment section down below and i will see you guys next time: peace, love and life.


Comments
Celisa Morris: Thank you Aida!!! I just love your how-to videos because of the small details you share that make the big difference in the end. Priceless indeed! Blessings to you and your growing family as well!
It’s ya girl chi: Thank you so much for this detailed video!! I just saw a video of someone wearing this style and I wanted to learn how to do it. I clicked on your video and this was perfect! I hope I can pull it off!
Nickell Francis: Thanks Aida for the up do video now I’m going to learn this technique
Victoria Namulindwa: Thank you soooooo much this is what I needed
Jamaican Beauty: Love those earrings!! Oohhh chile, an up-do . When you can do that type of style of yourself, you have skillz . Thank you for taking time to teach us ❤
Nisespoo: First time coming across your channel, really helpful... New subbie ❤️
Erica santos Santos de carvalho: Não entendo inglês , mais da pra aprender amei ♥️♥️♥️
Chibuike Francisco: You always come through. Thank you so much!! You've got a pretty smile too.
MuslimaUponSalafyyah10: Hi, congratulation on the coming new edition to your family..... I love your videos thanks for shearing all your methods and beautiful braiding styles...... I have 4 daughters and I am looking to by a mannequin doll head for them to learn how to braid..... where did you buy your mannequin doll head? Thanks
Tori Greenaway: Very helpful ❤️
Maria Mitchell: Hello Aida,it's Maria again! I have been praying for you and your husband as well as the new bundle of joy! I am so so happy and excited about the baby! I love babies to death! Take care now! I love you! May God Bless You and Your Family Always!❤
Miriam Kedey: Doing hair is like maths indeed Thanks for this tutorial.
sunshine peterson: And thank you so much for sharing God bless
darcey derosa: This is one style I can't get! I am transitioning and I hope to have the style down by the time I BC!
Angela Wilson: Thank you
Gertrude Tipayson: Please how can I get this?
Cashlin Kock: buy for me the mannequin plz, they are exorbitantly priced in my country.
Marie Stan: New subie here,
Yanique Wilson: Can you share mannequin link thanks
Acapella Angie: Is the baby here yet???
Mom Mom: Your name is so pretty
Kayla Woollery: Jesus Christ is the way the truth and the life Jesus Christ loves you John 3 16 For God so loved the world, that he gave his only begotten son, that whosoever believeth in him should perish but have everlasting life
Shannakay Phipps: George