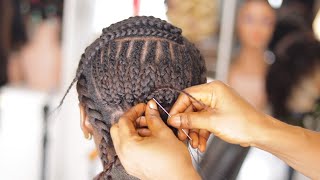
2 Lace French Braided Updos Video
- Posted on 20 December, 2011
- Updos
- By Anonymous
Here are two different updos using lace french braids, sorry that the format is not exactly the same as the previous videos but the clips were just too long and I couldn't slot the introductory section in :(
Hope you guys like it though and don't forget to subscribe :)
Hello, welcome to lushfield laura i'm laura and today i'm going to be showing you two different hairstyles using lace, french braids. Now i think that you've noticed too. If you regularly watch my channel one is that i've been absent for quite a long time, and that's because i've been having exams i've before been having exams. I'Ve been having very intense revision, because this term was so difficult and before that i've been having a bunch of projects to hand in anyway. Second thing: i've changed locations, and i don't know if i'm gon na still use this new location of my number. Next to video, because even if the setting is nicer - and i moved on here - because i was quite bored with a setting upstairs but upstairs has better lighting and you can actually see the details of my braids better because i have really dark hair. So you can't really see that much details unless the lighting is perfect, which today, it's not so i'm gon na, have to use my explanatory skills in order to make you understand how to do these. Two hairstyles, and another thing that you will have to bear is the fact that sometimes they'll be passing cars or passing motorcycles like yeah. I don't know if you heard that that was actually a distant motorbike so anyway, if you want to know how to do these, two hairstyles then stick around and i will show you. I see that i have a middle parting. You can change your parting if you like, but for this style i want to have a middle parting. I think it looks better, however, because it's going to be a side braid and a side ponytail later on, i'm just going to at the back separate the hair unevenly like this, you see so you see, i have more hair this side and the other side. So i'm just going to secure this out of the way temporarily, it's not necessary. It actually doesn't really get in the way and i'm going to work on this side. Now i'm going to do a lace, french braid. So what you do is you grab a section at the front of your hair and you split it into three equal sections now, because i want the hairstyle to show the braid at the side, i'm going to put the strand furthest away from my face over the Middle strand and the strand nearest my face over the middle strand, then i add hair only to the strand that is furthest away from my face and i go over the middle and i don't add any more hair on the one nearest to my face and go Over the middle strand - and i continue doing that - not sure if you can see it because my hair is dark and the lighting is not like - you know fantastic, let me just yup, that's a bit better. You can see that a braid is actually fairing out here. So i'm just going to continue i'm going to volumize the braid so that it doesn't start off, like you know, a really small braid that gets like really huge or something so once i have grabbed all the hair, i want to make sure that all the strands Are of the same length, because i'm going to braid this and when you braid it, you want to braid it all the way down to the end, i'm braiding it quite tightly so that it doesn't create any loose flaps over here. So you want to put it as far down as you can. Usually i can braid it um further down, but i didn't really see how long it was in each strand, because i don't have a mirror anyway. So we're going to do exactly the same thing on the other side, but starting here and going all the way to the back. So i'm just going to do the same thing. I grab a section of hair at the front, split it into two equal sections. Take the strand furthest from my face and go over the middle strand and the strand nearest to my face: go over the middle strand, only adding hair on the strand, that's furthest away from my face and going in over the middle and the strand that is nearest. My face, i don't add any more and i go over the middle, it's very simple: it's the art of lace, french braiding! So now, because i'm going to be braiding at the back, i'm just going to make sure that i have all of these three strands separately. I grab the hair, that's the bottom and i add it to the side strand and i go over the middle strand, but i don't add any more hair on the strand. That'S close to the top of my head and i go over the middle strand and i try to keep my braid as close to my neck as possible. Here i want to braid quite tightly so that it doesn't become all flappy and loose, and you know weird. Looking so once, i feel that i've grabbed enough hair to braid all the way around my head, i'm just going to english braid it down, so that it'll be easier to handle and you'll see. Why? So the reason why i break this all the way down is because i'm gon na have to let go of this eventually, and it will take longer time for the braid to unravel and because of that, the braid over here will not unravel i'd, be and be Really secure in this big braid and but to form. So i just grab three sections and one of the sections is the braid that we made at the very beginning and start braiding. So untie the elastic band right where your braid ends and you should end the braid around where the little braid ends, otherwise the little braid would just unravel and all of the hard work at the beginning will be just i don't know a waste now, usually i Did not have a tail this long. As i said, i didn't have a mirror, so i couldn't check whether all the all the strands were of equal length, so i didn't get to braid it all the way down like i normally could. So. This is the finished. Look for one of the looks um lace, french braids, going at the back and meeting them to one big braid. There is a small braid within a bigger braid. However, if you don't want this big braid, you can just simply untie the elastic band. Try to be gentle, i'm quite impatient and that's not very good for the hair, so unravel all the braids here and tie it off into a ponytail tugging it so that it's more secure and tight. And if you want to hide the elastic band, then just take a thin piece of hair and wrap it around the elastic band. So securing this in place is going to be difficult, especially when i don't have a mirror under bright lights to see so how? I do this is basically i'm not actually, like. You know, an expert at bobby pinning it's actually one of my weak points, but i i take the section that is sticking out. You know um the one that's sticking out with the bumpy bumpy. I take that and i sort of scoop scoop a bit of hair from the surface and then i twist the pin up and there it's secured. So, basically, what what i did was i used this bit of the bobby pin to scoop the hair up and then after the hair has been scooped. I do this and push it up and i actually might want to do that in some other sections, because my hair is uneven, so i might have tied off, like you know, a section of hair, but something else will unravel. So i'm just going to do that again and this way you don't see the bobby pin on the hairstyle. So that's good, so those are the two finished looks hope you liked. It hope it helped. You don't forget to subscribe and see you later and as a ps. If you want to accessorize this updo, you can use a decorative flower or decorative bow or anything and yeah


Comments
Alisa Jett: oh yes I was excited to see your new tutorial when I logged on tonight. I only really look for a few of the hair goddesses that I just love and am grateful for and one of them is you now. Good tutorials you'll be in high demand. THANK YOU
lushbylaura: @ALadyJett I'll try think of something soon :) but meanwhile, I do have an older tutorial that uses 4 braids (though of the same type) called 'Double Dutch Lace Braids'
Alisa Jett: PS. Just thought I would now make a request. IF there is any, could you maybe do a video on some kind of half do or whatnot that uses a lot of different braids like maybe three or four. I don' t know they seem pretty when different ones are near each other and would be fun to try.