Working With Natural Curls - Create A Bridal/Wedding/Party Up-Do Curly Girl Hairstyle
Master the perfect the curly girl technique for working with naturally curly hair. Create smooth, glossy curls in the hair by prepping properly and then create a beautiful updo on the curly hair. Don't be afraid of working with natural curls - with the right curl cream and a little patience you can achieve perfect curls with naturally curly hair! This no heat curly girl technique will create a beautiful curly updo and protect the hair from damage and frizz! Learn how to work with natural curls, find out which products work best and get top tips and advice on how to create beautiful curls on naturally curly hair - with no heat.
Join award winning bridal hairstylist Pam Wrigley for this fabulous tutorial on how to work with natural curls, creating a fabulous curly up-do.
An essential tutorial teaching the curly girl techniques. Learn how to create perfect smooth sleek curls and create a fabulous bridal/wedding/party hairstyle on natural curls.
Hair prep is key when it comes to creating beautiful bridal hairstyles, especially if your client is looking for a smooth sleek finish to the hair.
Achieve a natural looking curl, and get lots of lovely root lift, great when it comes to making fine hair look thick and full, and dull hair look shiny and glossy.
Learn how to Create Beautiful Bridal Hair-styles step by step with Pam Wrigley, UK Wedding Hair Stylist of the Year.
Subscribe and learn the latest wedding, bridal, prom & party hairstyles alongside timeless, classic hairstyles and vintage looks that never go out of fashion.
Learn all about hair prep, which hair styling tools & hairstyling products work best, and find how to work with different hair types.
Join Pam and Learn all about hair prep, what products to use, how to work with padding and hair extensions.
We'll also teach you how to blow-dry with videos on curly blow dry, Victoria secrets blow-dry, short hair and smooth & sleek blow drys.
We've got it covered . . . we even have tutorials covering the curly girl technique!
Great for fans of natural unintentional ASMR!
Hairstyle tutorials include hair prep, hairstyling and hair up, blow-drying, curly girl techniques, working with different hair types, hair textures and hair lengths.
Create hair up & bridal hairstyles and become a bridal hairstylist with Pam Wrigley, UK Wedding Hairstylist of the Year
Just SUBSCRIBE & LIKE!
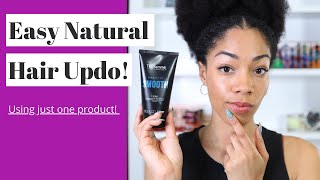
I'M going to show you how to work with natural curls, and my model today is Becky. Now Becky has beautifully curly hair but, as you can see without any product, the hair can look a little bit dry and brittle and definitely a little bit kind of frizzy and fly away. So we're going to work with Becky's curls, I'm going to show you what to do we're not going to use any heat on Becky's hair, we're going to enhance her natural curl and have a beautiful looking style for her wedding day. So, let's begin the first thing we need to do is brush through the hair if you're worried at all, it's quite easy just start at the ends and work your way slowly up to the root for next I'm going to wet Becky's hair. Thank you. I'Ve got some warm water, the other alternative, if you're worried about brushing through your clients hair. Whilst the hair is dry. If you get your clients to brush through her hair, while she's got our conditioner on and then she'll rinse out the conditioner, and then she could just put a few chunky braids in her hair, so that it doesn't tangle again as it dries and then as soon As you take the braids out, you're ready to wet the hair again and start the styling process, so you want to get the hair nice and wet, especially at the roots. Now you can see Becky's curl a little bit better. So let's start sectioning the hair and then we can start applying our product so separate your five sections. So we've got our top section side section, so I've separated our sections out. We'Ve got our front section, the two side sections our crown and now the back section here, I'm just going to take just going to section the hair again, leaving about maybe about an inch and a half down at the bottom here and we're going to start with. On the hair down at the bottom, so the product we're going to use today is a Mixed, Chicks leave in conditioner, and this is a lovely product for different. It comes to defining the curls. This is actually one of Becky's products that she likes to use. So if your client has a product that they find works, particularly well on their hair - and it's always a good idea to try that on the trial, I've done Beck his hair once before, and I tried a couple of different products but found that this one works. The best on her hair, so what you're going to do is just get a little smear of the cream, the curl cream on your hands and kind of just look at the curls. So we're not going to do a definite partings. But you can see how this is kind of, naturally separating into these two curls and that's what we're going to work with, so we're not going to try and force the sections we're just going to naturally work. It'S almost like that. One we're just going to! I think this might even be three we're just going to work with the sections as they fall smooth it all the way on that hair and wrap that hair around my finger and then nudge that off and let that curl go. So we kind of just looking and guessing and kind of working out which bits of hair want to sit together and then smooth into one cow right, the way down to ends. I'M wondering if that wants to go up here, and I might add this to this one. If you feel that some of the curls are a little bit too long like, I think they are the thing with curly hair. Is that when you get it cut, it can be all one length and then it kind of, depending on on the next day, depending on how the hair feels it can kind of all look like different lengths. So what you can do, if you want to, if you've, got any particularly long curl, it's just pin them up just for short, while just with the little pin curl clip, so it can take away a little bit of that length off the curl. Just whilst it's drying, you won't need to do this. I shouldn't with most of the curls just the odd one and just keep it going. If it's a trial run, you can try some with the curls pinned up and some leaving some of the curls down and just see what works best for your clients, what works best for her hair for her curls. If somebody wants more length, it's probably not a good idea to pin the curls up for too long. So even once this is dry a little bit even once this is dry a little bit I'll. Take those pin curls out or else they will definitely be too short - I'm just going to take these out because I want the curls to dry and not be too short, but you can see where that's separating a little bit, so I'm going to bring that back Together, if the curls are separated and fluffy at this stage, they're going to be separated and fluffy when they dry so make sure everything's all the hair is all nicely kind of smooth and then you'll get a really good results at the end. So we'll take the next section down get another section of hair and then you're going to start working on these curls and then work your way around to the sides and then we're going to finish off at the top. But we always work from the nape of the neck up we find a little bit of hair that looks like it doesn't belong with any of these curls lower down. Just pin it up take out of the way and we'll use it in the next section smooth at those ends. That'S really important twist your hand as you wrap around what you don't pick up some hair from somewhere else. That'S better! Now I want what we want was Becky's hair when it dries we're going to have quite big chunky, curls, so don't kind of be tempted to do lots of little curls, because we want this, these curls to be quite chunky. That'S better! And this one's going to go to here, so, let's you wrap the hair. You got a nice amount of product on the hair. You don't to overload the hair, so I should wrap it around your finger. We'Re not going to keep the hair flat like this! We'Re actually going to put a twist in the hair a little twist it. So it's a little kind of movement of your wrist as you twist the hair around your finger bit my product just for the ends from curly hair. The ends always tend to be a little bit drier, so each of the curls once you've got them into shape, should be nice and kind of glossy and held together. So you don't kind of fly away and kind of separate with bits going in different directions. So try to work with the hair and reasonably big chunks and create your curls. Now the hair is drying quite quickly, underneath these studio lights. So I might, I think, I need to add a little bit more water to the hair. So you can see how the ends here are getting a little bit dry, but it really will depend on the climate where you're working. So if you're working someone where it's really hot, you might find you have to real wet the hair a little bit as you go along. If you're working here in London, where I'm based and you weren't under studio lights and it's kind of wintery, then you'll find the hair really won't dry out very quickly at all. And you probably just need to allow a little bit of extra time for the hair. To dry, because once this is once all these curls are done and also each curl is shaped individually, then we've got to let the hair dry so keep the hair together. So you don't get any flyaway bits from the reason. I'M not using my comb to separate the different sections is: I want to see where the hair is falling and how it because it will naturally form curls itself. So you don't actually need to create any straight partings or section lines in the hair, because the curls are already there and we just need to find them smooth them and then let them dry. If you find it's easy, you could do kind of more vertical sections. If you find that works a little bit better, so here we've got to see where these curls are. That wants to go here. That'S one curl and this might be one or two: that's a bit of water. Try not to wet the hair underneath that you've already worked with. That might be a bit big for one curl. You just try it. You know you could always try it if you're not sure, try it and if you don't like, if it looks like it's not sitting together, come back and change that is sitting together quite nicely. Actually, so I'm going to just put a little bit. It'S quite a big chunk, so I think I put a little bit more curl cream on there. It will hold together nicely. You can usually tell when you let it go if it holds into one big curl, then you've got the sectioning just right. So here I can see now on Becky's hair, that doing the longer vertical sections is much better, because that's how the curl wants to fall, but a bit of extra product on the very end where the hair is usually a little bit dry. If you want a little bit of root, lift what you can do, instead of just letting the curls drop, if you pin them up into position, then you'll find that when they dry, you get a little bit of lift with the curl at the root, because quite Often I know certainly with my hair, it can have a tendency to dry and be quite flat on top because the weight of the curl, as it dries kind of way down the hair and pull it down. So it can get a little bit flat on top. Here still thinking about the sectioning, I'm working with the way the hair naturally tends to naturally wants to separate and then we'll pin this curl up and then we'll pin this curl up flip sitting on the bed of the curl. So we get a night. We start to get some root, lift with the hair, if you're not sure where the sections want to fall, just kind of look at the direction of the root, and you just don't want to be taking the hair. So you can see how this hair wants to come this way, so I'm not going to take it over there and it doesn't matter if some of the curls are bigger than others. And if your lady wants a looser curl, you could be wrapping the hair around two fingers. It just depends on the size of your lady's natural curl yeah. That'S going to be perfect! Next, I'm going to come around to the side sections and we're going to finish off with the crown see whether I wanted to separate not about that yep little bit more product to make sure it's all together, don't forget to put products at the root. So take your time on the front of sections because of course, these curls are going to be visible here at the front, so it's a little twist with your hand and then back to flat. So if you're not sure what I'm doing here is I'm wrapping the hair around my fingers, I'm using the reverse wind with a twist technique, we could even a bit like doing a beachy wave, so you can always check out our is our heated roller. Video will create different curls with the heated rollers or you could have a look at our the different curls with the tongs in each of those tutorials. You can see how I twist my hand as I wrap the hair around the world and here which I'm twisting my hands as I wrap the hair around my finger. So let's do our final section of hair here, but it's our top section now remember at this stage, you're going to be working with whichever direction your clients parting is going in so you're kind of see your top section. You might have you know if you having a center parting you'll, be you might be, bringing the curls back this way, but here we're going to bring the hair back just pre-wet it just a little tiny bit and, let's start creating our sections here on the crown Decide where the hair wants to separate where those curls want to lie smooth on your product, and here is where we want to get some root: lift for Becky's hair. So I'm smooth on the product twist and then pin up. So we get that little bit of root, lift remember to put products at the roots, well, the curl to be smooth everywhere. So here see that curl, just quite a big one. I think it's all holding together nicely see. This is one smear of product and create the car. So if your client doesn't want any extra root, lift or high, you know sometimes depends on nights hair, but I know Becky's hair similar to mine as a tendency to go flat on top. If your client feels she doesn't want any extra height, then you would just leave the curls and let them fall down and dry in this position. So you don't have to pin the curls up it's just. If you want extra movement, an extra root lift here, then I find allowing the curls to dry when they don't have the weight pulling the hair down just means she gets a better. You get a little bit of heights, so it's really depends on your clients. So we'll do our final few sections now wrap those curls around your finger. We'Re aiming to get a little bit of root lift here, and I think this is our last one. So you're gon na see see where the car wants to fall a bit of curl cream on right to the ends, particularly careful with your front these front curls because of course, they're not going to be hidden by any other color and want to make sure that They look, fabulous, pin them in position. For now. All we need to do is just do a little final check. Make sure that all the curls are perfect and just let the hair dry. If you have any curls that look like they've kind of gone a little bit straight, then you can always come in use all of your little pin curl clips and pin that up so just double check the curls before we for your, let it just dry so Depending on the temperature and the hotter, the temperature, where you are the quicker it will dry so the bottom sections now are more or less dry and I'm just going to take these top sections out so that we can just get a little bit of air into Those curls and if you have a look and just think actually they need a little bit more time to dry. That'S okay, just remember just try not to disturb the curls too much. We'Ve got some nice root, lift here on the crown you can see these little curls here, just lifting up nicely, which is exactly what we want careful it. Does it that's better delicately. Take the pinko clips out. You might find that you need to just give the hair another few minutes if there's any dampness left in the hair, once you've taken your pink color clips out, I'm just kind of going to come back, so I'm just going to give back his hair a couple Of moments to dry and then we'll be ready to style, so once the hair is dry, we need to judge the hair a little bit more to get some root lift in there. So I was going to show you my hair use. What I would do. I would kind of show my client what I want them to do in base that's what you're going to do is get them to tip their hair up, but the house just in the root - and you judge it a little bit and then fling it all back. So that's something what Betty is gon na do. Next, you ready yeah gently, get some root, lift and some volume so make sure the hair is nice and dry or you're just going to end up with frizz and fly away bits in the hair, okay Becky. I think we're ready to come back great lovely, so once you put your curl looking beautiful, what we're going to do next is we're going to create our uptick, so we're going to just bring those curls back so then play with the curls and get them into Position, I'm just going to use a bobby, pin we're going to do a little cap and a soft little updo, picking up one curl at a time. So we've got our nice root, lift here. So it's not too flat. You'Re, just gripping the curls to SCAP. So, working from the top here see where the curls want to fall, you want to make sure that your bobby pins are hidden so where, as you follow the shape of the curl, where the curl is flat against the head. That'S where you're going to secure your bobby pin so the curls look like they're just kind of gently cascading, but each curl is held in place and looks beautiful. Remember we don't want any visible bobby pins here, so I'm going to pin the curls up at the back here and create a little soft low row so to help me create the roll I'm going to use a little bit of padding. So this is just a little bit of a donut that I've cut up into pieces. I don't need a lot, so it's just a small little section of padding and I'm going to pin that here to the back of the hair, but just for the purposes of the tutorial. So you can actually see what I'm doing. I'M going to use a little piece of this light brown padding fold that up I'm going to pin that here, just to the the back above the nape of the neck and I'm going to use the bobby pins just to secure that to the hair. So if we do our bobby pins first now, we do have quite a few tutorials that show you how to secure Donuts to the head and with the same method, I'm using for bobby pins around the edges of the donut. So the bobby pins are going against the scalp, I'm just picking up a little bit of the donut there. A little bit of the padding should say and do that on each of those edges, and then we get our bobby pins pick up some donut now up and over I'm back underneath. So you don't underneath the bobby pin but securing the donut to the scalp. So we've got our bobby pin that goes underneath against the scalp. Our hair pin goes in pick up, some of the donut come over touch, the scalp go, do your up and over and go underneath the bobby pin. Let me just show you, with a blonde pin you'll, see a little bit better we're using our hair pins here. So you go into the donut pick up a little bit of donut it'll stitch of donut in one direction, then you touch the scalp and you go back in the opposite direction, making sure you're going underneath that bobby pin that we're putting there as our anchor this Way we can make sure that the donut is really secure. So it's very important that you get the donut secure, because this is going to be the foundation. Fire-Up do now I'm using blonde pins. So you can still see these little tips here, but normally you would use the black pin in dark hair. So you don't see you don't see any of those little pins peeping through. So we get a really soft secure. Looking style pick up the curls a little just one at a time, I'm not pulling them up tight. I want them to be really soft and look like they're, almost kind of falling down pick up a bit of donut up and over and secure the hair to the donut and create your style just make sure you happy with the profile and any errant curls you Can come back in and secure them in place so when you're creating these styles, try to remember to take a step back and look at your style from different angles. So I've got a marriage of stuff camera here and I always find it really useful. Not only can your client kind of give you feedback, that's how she would like her hair, but also it gives you the opportunity to see the hair from a little bit of a distance. Now, if let them will almost there lovely, so you can either use the open older technique just cure the hair to the donor, or you could just use a bobby pin now. I think we definitely want some curls down the front, but maybe not this one, and this one needs to come as well, and this one needs to be brought back as well check them. Mara, you've got fine, you've got any free curls and that one just make sure that you decide whether it's going to be out or in because we don't want these curls to kind of start moving around and doing things. We don't poking out at odd angles and if you find you do have any little flyaway bits or areas where maybe it didn't put enough cream, so they're looking a little bit fluffy, then you can just spritz it with a little bit of water once you've finished. If you do find, you've got any little sections that are a little bit fly away, just get your water spray and spritz. So any flyaway bits, if you need to you, can just mist with a little bit of water. The thing about styling, curly hair is the pinning up. The part is really quick. It'S a prep that takes the time in getting those curls getting each of those curls perfect. You can loosen the hair if you want to a little bit and make it a little bit fuller if you feel it's needed and you can even pop in a little sparkle accessory and although it looks really soft, remember, we've got the padding under the earth. It'S a perfect place to secure our accessories and that's our curly hairstyle finished if you've enjoyed this tutorial. Just click like and subscribe and join me on my next video
Comments
Amy Seaman: So great to see a detailed tutorial for curly hair - so many people don't know how to style natural curls!
Judy Willis: This is like the most helpful wedding curly hair tutorial EVER. I wish she could do my hair for my wedding <3
bologna: I'm doing my own hair for my mother's wedding tomorrow and your videos have been hugely important to me doing my hair trials! Thank you for posting :)
Luce Z: I have enjoyed every one of your tutorials I have seen so far. For me it’s 20 out of 10. You basically cover every question I may have as you go :) and your voice is ever so calm and relaxing. Thank you very much, lovely lady :)
Casie Farley: have my first ever wedding upstyle to do on a client by myself tomorrow and she told me she wanted to keep her natural curls and i was so nervous till this video !! SO helpful ! feeling much better about it now :) thanks for posting !!
surf1ncybersis: Excellent! I learned so much. I have medium length curly hair and this tutorial gives me hope!
Eleanor Green: beautiful! If it were for an all-day event like a wedding, would you use any hairspray to lock things in?
Deborah Lincoln-Strange: I wish you could do my wedding hair! You're so talented!
charlotte whitaker: Lovely curls ☺️
Girly Girl: Beautiful!!! And I was impressed how much love you put into your work! You havw a lovely warm personality! And I am in London too :) Xx
creeikuko: Beautiful
SonicX 2000: I like the part about too big chunks of hair because the curl will seperate. My hair seperates because I grab too big of chunks, but the little separate curls are too thin and not chunky enough so when they dry they look frizzy. Do you have any tips for holding bigger chunks together because the vhunks only hold at the middle and bottom, but the root has those individual chunks that won't go together and separate.
Margie Graddicks: Her hair is beautiful!!!!
Ana Martins: Love this video, how long could take all the process of preparing the curly hair and let it dry?
KEVITA master-brew kombucha 505: I wish I had that much hair at my crown
Kaila Lynch: Okay now how do I do this on myself?
Marsha's Journey: Finally a wedding hairstyle where there isn't straightened first.
vaishu: I don't like curly hair but I am having it