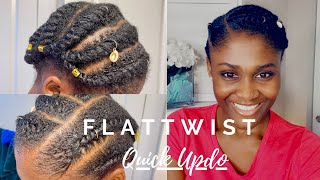
Twisted Updos On Straightened Natural Hair - Diy Tutorial
Hi luvs! Here are two creative updos on straightened natural hair that you can do for numerous occasions. You can Check out my flat twist how-to video here: https://www.youtube.com/watch?v=VJW07K...
Hey guys today, i've got two diy tutorials for two different twisted updos. The first is this look here that you guys really liked. I straightened my hair last week and i've been just having a lot of fun coming up with some creative updos, and so first i'm going to show you guys how i got this first look. So the first thing i'm going to do here is section my hair into two sections, there's a section in the front and a section in the back, i'm going to pull the back up into a ponytail just so that it's out of the way, as i work With the front section, so what i'm going to do first is take my denman brush and just make sure that that section is nice and smooth and straight and then i am going to start flat twisting and i am flat twisting from the right side to the Left side it doesn't matter which side you start from um. I just tend to like to start from the right and twist to the left. So that is what i am doing here and i am doing um my most the usual twist that i flat twist that i do, which is where i um twist backwards: um as opposed to that invisible twist that i do sometimes where you twist forward. So this one the twist is revealed and you can see it's nice and sleek there, and so what i'm going to do is i'm going to start to kind of loosen up that twist and with my straight hair. All of these updos are really about working with the twists and loop, making them loose and flexible and more messy the messier, the better um as far as i'm concerned when it comes to these updos with straight hair. So i'm just going to pin this back. For now i wanted to go ahead and get the back situation situated before. I really started to form that front section. So for the back, i'm going to do the same thing where i'm going to start from the right hand, side and flat twist to the left and nothing. Nothing special here. Just doing that same that same flat twist, but just in the back and i'm just gon na continue to flat twist over, if you guys, i think i always kind of mentioned in these videos, if you have not seen my how to on how to flat twist, I will put a link to that video in the description box. I mean it shows you the two ways that i typically flat twist so now that i'm about done here and you can see that that twist is really nice and loose and just messy i'm going to pin that twist back kind of tuck it into itself. In the back and secure it with a bobby pin - and you don't want to when you do these twists - you want to do them fairly loose because you want to be able to wiggle and jiggle them and make them um create some nice dimension um by keeping The twist just loose, so you don't want to do your twist, really secure unless that's something that you prefer or you like, but to get these looks, i really try to keep the twist as loose as i can. That really helps with the look. So you can see with that front section that i'm just kind of playing with the twist kind of i'm gon na pin some sections that may be a little too loose for my liking um. But that's nothing that bobby pins cannot correct or solve for you um and then i'm just going to continue to adjust and kind of pull at those the twist and the sections to make sure that it is the way that i like it. Obviously, i'm trying to duplicate um the style that i did for you guys. Last week i come pretty close, it's not exact, but this is. This is what i did in order to get that first look, and this is pretty much the final look you guys. I love it the second time around. I would totally wear this style again. You can see the back is just all nice and smoothed up in that flat twist there, so you're working with essentially just two flat twists that you tuck, and that you really loosen up and try to create some nice, some nice dimension with by just loosening up Those twists and keeping it really nice and messy nice and messy it sounds like oxymoron, but you guys know what i mean the messier the better when it comes to these straightened, the straight hair flat twist styles, that i do so that is it for look one. You guys, and now i am going to move on to the second look, which is this look here, and the only thing that i'm going to be changing here is that front section. I have kept the back flat twist intact. I have not touched it at all. I did undo the front flat twist because that's the section that's going to be different and the reason that it's different is because what i do, instead of flat twisting from right to left what i'm going to do is i'm going to flat twist from back to Front so i'm going to take that front section and i'm going to start my flat twist from the back of that section and flat twist forward and so same same general flat twist motion. But just the direction is different and so i'm going to twist all the way down and then i'm really going to try to loosen up that twist, really create some dimension there and i'm just going to um pull that twist around and tuck it into itself. And i'm going to secure it with a bobby pin and then after after you have it secured um, where you know it's not going to move it's really just a matter of playing with that twist and loosening it and pulling. You know pulling some sections out to really create some depth there and dimension with that front section: that's what really makes these looks. You guys is really keeping the twist nice and loose and you know playing with them so that they create different, looks, and you can do this look several times and it will come out different every time but fierce every time. So i'm just kind of pleased with myself at how how how this look came out. Okay - and this is kind of impromptu, i was really trying to duplicate a different look, but this came out so different that i felt like it needed to be its own. Look. So you'll see at the end of this video, i will put up the original style that i was gon na, try to duplicate for you guys, which is this exact same method with the flat twist in the back here. It is here and that forward flat twist, the only difference is you use a chunkier section in the front all right, so i hope you guys have enjoyed this video thanks. So much for watching i'll see you guys next time, bye,

Comments
Khalilah KJ: You have me craving straight hair! How long are you planning to keep it straight? Your styles are so cute. Thanks for sharing and I'd really appreciate it if you checked out my channel as well xx
Karrie Ann: Super cute!! Can't wait to try it out!
Laset livingstin: You are a BIG solution to my problem, which is being stuck in hairstyle rut!..How to take something simple to new heights, w/ imagination...I needed more than just Afros, twist -out's, & flatiron...These can go from simple to such elegance!..Thanks!..
Millicent Swift: I love your creativity and all your hairstyles!
HairCandy Kina: Flawless!!! Love these looks!
SheAnatural B.: Very Nice, loved all three looks!
sam brown: Love it!!!
Angela: Used this look yesterday. Not quite good as yours, but pretty good for a new be. Went for a trimming and she blow dried and flat ironed my hair.
Yoli Reals: Very nice! I just subscribed to your channel & you're my new fav
Ebizzill: oh hail.. the queen of updos-that-look-super-complicated-but-are-really-easy-to-create!!!
Angela: FYI, Several comments regarding this style. They said, it looked like a fan and it was cute!