Easy Wedding Updos - Quick Hairstyles
Easy wedding updos - quick hairstyles. Follow my step by step instructions to recreate these quick and easy wedding or occasion updo's. 3 easy hairstyles, including a low updo, an elegant chignon and an undone bun, each with simple, clear instructions. Only takes a few minutes from start to finish, so perfect to do on yourself. Ideal for every day, or perfect for bridal or bridesmaids hairstyles
Want to know what products i used? Then just click on the links below:
USA Viewers click here: https://www.amazon.com/shop/hairangels...
UK Viewers click here: https://www.amazon.co.uk/shop/hairange...
We are a participant in the Amazon Services LLC Associates Program, an affiliate program designed to provide a means for us to earn fees by linking to Amazon.co.uk and affiliated sites.
You will not pay anything extra by clicking on the link.
Business enquiries: [email protected]
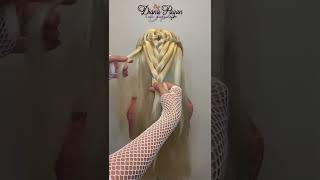
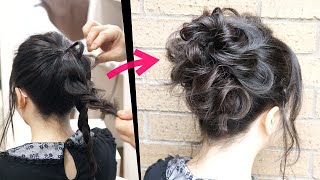
Hi guys today, i'm going to show you how to do three, quick and easy hairstyles that are perfect for weddings and other special occasions. We'Re going to start with this low updo to start i've, curled the hair and we've just popped it into a side parting. Then i'm going to divide out the hair from the top of the head to just behind the ear and clip this out of the way, and then just repeat this: on the opposite side, now we're going to take a small slice of hair from behind the ear And we're going to do this on both sides of the head now bring these two sections together at the back of the head and tie them together with a clear elastic band, now split all that hair, that's hanging down into three equal sections and starting on that Middle section we're just going to divide that into two and wrap these sections around one another to create a loose twist. Make sure you tie this off with a clear elastic band, then just repeat these twists on the left hand, side and also, on the right hand, side add some texture spray to those twists i'll pop the one i'm using in the description below for you and then Gently pinch and pull each one of those twists to give it a bit more volume now, starting with the twist, on the right hand, side i'm just going to pop my fingers behind that section that we tied off at the start and we're going to pass your Twist up to those fingers and wrap it around that section and then, if your hair is long like my model here, i'm just going to do that one more time so pop your fingers behind that section grab the ends of the twists and pull it through. Then just use a few bobby pins just to secure this to the head and we're going to repeat, on the left hand, side so pop your fingers behind that section grab your twist and pull it through once and then pop your fingers behind that section again and Grab the ends of the twist and pull it through for a second time again secure to the head with as many bobby pins as needed. Now, with this middle twist, we're going to tuck that little elastic band just behind that tied off section just like the other two pieces, so we're just going to feed it through with our fingers until it all lines up and then again secure with as many bobby Pins as needed so taking the side section on the right hand, side, i've left a little hair out to frame the face and again i'm just going to create a loose twist wrapping the sections around one another and we're going to drape this over the bun and Secure it all the way, along the length of that twist with a few bobby pins to keep it in place if you've got any tail ends. All we're going to do is wrap these around an open, bobby pin and then just tuck them up and underneath that bun, then we're going to repeat it on the opposite side of the head. So leave some hair out to frame the face, divide it in two and create a loose twist drape this over the top of the bun and secure it all the way along the length of that twist, with a few bobby pins wrap your tail ends around an Open bobby, pin and again tuck this up and underneath the bun, so you can't see them gently pinch and pull at those twists just for a little bit of extra volume, and it really is that simple here's the finished! Look if you liked it, please give it a thumbs up and don't forget to subscribe for more tutorials. Next hairstyle is this elegant chignon to start, i've left some hair out around the face, we're just going to section off the crown area and tie this into a low ponytail using a clear elastic band. Next, take some spray wax i'll pop the one i'm using in the description below for you and just apply that to that section and then pinch and pull to create a bit of texture. Clip that ponytail out of the way for now and we're just going to divide the remaining hair into a right and left section and again secure these with clips. Now i've cut up a hair donut and i've just shaped it into a small round shape which i'm going to put on that parting and i'm just going to secure it all the way around the outside. Using a few bobby pins release that ponytail and pop a clear elastic band about three inches from the bottom, making sure that you don't pull it all the way through, on the last turn of that elastic band, so you're creating a small loop and then all we're Simply going to do is push that loop up and underneath the padding at the bottom spreading the hair out as we go now just push the top of that ponytail down towards the padding and secure it with a few bobby pins and then also secure the hair On the left and right hand, side remove your clips and we're going to divide this section on the right in half and we're going to take the hair closest to the donut and we're going to drape it up and over to the top left hand. Side. Using our fingers to spread out the hair, so it covers the padding and then just secure it with a bobby pin or two we're going to apply some more of that wax spray and again we're going to pinch and pull to create a bit more texture and We'Re going to do the same on the opposite side, so take half the hair drape it over to the top right hand, side and secure with a bobby pin and we're just going to secure the hair at the left and right hand side using a few bobby Pins next apply your spray and pinch and pull again to create more texture and just wrap those ends around your fingers and push them towards the head and secure them down with a couple of bobby pins so taking the remaining hair on the right hand, side, i'm Just going to drape it over to the opposite side and give it a little twist and just anchor it down to the top right hand, side of the bun using a bobby, pin and then secure the side with as many bobby pins as needed apply a bit More spray to this section and pinch and pull so it matches the rest of the hair. Again we're just going to wrap the ends around our fingers and pin them to the head with a bobby, pin or two, and then we're just going to repeat this. On the opposite side, so take the remaining hair and we're going to drape it over to the right. But i've got a little topsy tail tool which i'm just going to tuck behind the previous section again i'll link this in the description pass. The hair, through the loop and pull it all the way through and just secure the top of that with a couple of bobby pins, apply your spray and pinch and pull at that section and then lastly wrap the ends around your fingers and just tuck them up. Underneath so you can't see them and here's the finished. Look if you liked it, please give it a thumbs up and don't forget to subscribe for more tutorials. And lastly, we've got this beautiful, undone bun to start we're going to divide the hair and we're going to go from about the end of the eyebrows so section off this top section and just smooth it down with your hand. Next split it into three equal parts and we're going to do a very chunky, french braid, so across the left over the middle and then the right strand over the middle then cross the left strand over the middle. But this time we're going to add a nice chunky bit of hair from the left hand, side and cross that over to the middle. Also and then we're going to cross the right hand strand over the middle strand and add a nice bit of chunky, hair from the right hand, side and join this into the middle strand as well. Then just do a stitch or two of regular three strand braid and we're just going to push this up slightly, to give it a bit of lift and pin this straight across using a few bobby pins just to hold it in place. For now we're going to take small sections of hair between our finger and thumb and we're just going to pinch and pull them out and secure them in place with a little bit of hairspray. And we want to do this all over that braided section of hair, to give it a nice messy. Look next gather that hair that's hanging down and bring it up to meet those bobby pins and we're going to gather it into a ponytail. So we'll just slide. Those bobby pins out of the way and then using an elastic band, create a ponytail about ear height next twist that ponytail in one direction and then wrap it around the base of the ponytail so around that elastic band in the opposite direction and then wrap it. All the way around and tuck the ends underneath then just secure this to the head all the way around that bun, using as many bobby pins as needed. So we want to mess this bun up a little bit so take very tiny sections of the hair and again pinch and pull and secure in place with hairspray and we're just going to carry on pinching and pulling around the entire bun until you're. Happy with the look and here's the finished style, if you liked it, please give it a thumbs up and don't forget to subscribe for more tutorials.

Comments
Caitlin Lavery: Pretty hairstyles
Zenlife: Great Video!
perceptions 1008: Very interesting finishes. ThQ. Blessings. Mumbai India