Lace French Braid Updo! Short, Medium, And Long Hairstyles!
Hey everyone! I always get asked to do more braided updos, so here you go! Today I'm going to show you how to do a lace french braid updo. This braided updo is so beautiful and would be a great wedding updo, bridesmaids updo, prom updo, homecoming updo, etc. Let me know what you think of this hair tutorial in the comments below! #updo #frenchbraid #longhairstyles
LASH SERUM THAT I USE FOR LONG LASHES:
USE CODE LAINEY FOR $20 OFF LASH SERUM OR BROW SERUM:
https://www.maxeylash.com
MY FAVORITE HEATLESS CURLS (3 STRAND ROBE CURLS):
https://www.youtube.com/watch?v=driTmC...
HAIR PRODUCTS I USE ON MY HAIR:
Purple shampoo: https://go.magik.ly/ml/171f6/
Regular shampoo: https://go.magik.ly/ml/192fc/
Deep Conditioner: https://go.magik.ly/ml/171f8/
Moroccan Oil: https://go.magik.ly/ml/171fa/
Hair Elastics: https://go.magik.ly/ml/171f4/
Instagram: https://www.instagram.com/laineymarie...
Tiktok: @laineymariebeauty
Email: [email protected]
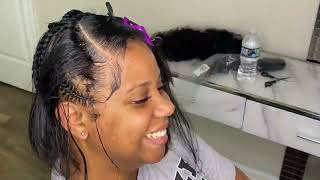
Hey guys so for today's video we are gon na. Do a braided updo, you guys always ask for braided updos. So that's what we're gon na do in this video we're gon na. Take it step by step and yeah. It'S gon na be super cute. This one is very cranky, that's why he's filming the intro with me today, but let's go ahead and get started, so i'm super excited for this updo. So what you want to do is just section off your hair, so we're going to do about three inches and just kind of take it back, i'm just using my nail and kind of doing it at an angle. So we have hair left in the front and the back and then do it on the other side, we're just going to take that section twist it around our finger to give us some volume bobby pin it into place in the back of our head. Now we just want to divide our hair into three sections and with that middle section, you're just going to put in a ponytail and then you can take those bobby pins out. This was just to kind of add volume, and then you want to take that ponytail and then just divide it into three sections. So a regular braid. Do it all the way down once you get to the bottom, then you want to pancake it. Well, i, like you, want to tie a clear elastic then pancake it so just fluff it out, like i'm doing here, do it on both sides and then once you're finished pancaking it. You want to take that and we're going to do a bun. So we're just going to wrap it around itself and we want to make sure the braid is flat against our head. So once you do that, just bobby pin it all the way around to form a bun. Once you get to your end, you can just kind of tuck that underneath the bun and bobby pin it so your bun should look like mine. Now we're going to do a lace, braid so divide your hair into three sections. You'Re going to take that front section cross it over the middle section back section cross it over the middle section, so a regular three strand braid. Now, with the lace braid, you add in hair to your front strand, so we're going to take a section of hair right next to our front strand, we're going to add it into that front strand and then we're going to take that combined strand and then cross. It over the middle strand and with the back strand we're not doing anything with it, we're just crossing it over the middle. Now repeat, so you take that front section you're going to add in a strand of hair right next to it make sure it's about the same size once you combine them, then you're just crossing them over that middle section, so slow-mo, so you guys can see it. Just cross it over that middle section take that back strain cross it over the middle strand, we're not doing anything with it. Take that front section you're going to add in a section of hair right next to it, combine them cross them over the middle section. Don'T do anything with the back strand just cross it over the middle. Take the front section you're just going to add a section of hair right next to it, combine them cross them over that middle section and then just take the back strand cross it over the middle strand, we're not adding in any hair. So again, take that front section add in a section of hair right next to it, that's the same size. Combine them cross them over. That middle section. Take the back section cross it over the middle, so one more time take that front section hold on to it. Take a section of hair right next to it and you're just going to combine them and cross them both over that middle strand. Take the back strand cross it over the middle, you don't add any hair into it and you just do this all the way down. So we do have quite a bit of hair on this side and we're doing it all the way down we're adding in every single bit of hair. So as you're going down and you're adding in hair just make sure you're kind of angling, the braid towards the back of your head, that way, you don't get any bumps or anything, but we do just keep doing this all the way down a lace. Braid is super simple, because you're just adding in hair to that front strand it's not too complicated once you get the hang of it and you don't really start to see the braid form until you get a couple stitches in, but i love this braid. I love the way it looks i do wish. I would have left some hair out in front just you can see. My arm was hurting here, but i love wispy, hair and left out in front. I didn't do that with this one. I wish i would have so just a little tip if you want some hair hanging out in front another tip. If you want your braids to be even on each side of your head part, your hair down the middle, you can see this side is going to be a little bit bigger of a braid than my other side, because i part my hair on this side. I have more hair on this side, so just a little fyi. Now we are going to pancake our braid. This is important, so start at the bottom work, your way up and you're just pinching and pulling the outside of your braid and you're going to have to go up and down, and do this a couple times because, as you can see, when you're pulling up it's Kind of shrinking the bottom um that you just pancaked, so you just kind of have to keep going up and down and just pancaking until all of it is even, and all of it looks good and fluffy and people ask me why it's called pancaking. I don't know, maybe because pancakes are fluffy and the braids fluffy. That'S my guess, but i didn't create the term, so i just go with it, but yeah tie it off with a clear elastic and then we are going to pancake the top of our head too. So again, pinching and pulling you want to do this on both sides right now, i'm just doing it at the top, but towards the end of the video you'll, see where i kind of pull out the the front part of that braid too. Now we're gon na take that and we're just gon na drape it across that bun that we already have and we're gon na start bobby, pinning it around that bun. So just go around bobby! Pin it. If you have ends hanging out like i do wrap them around your finger and tuck it up underneath and then bobby pin it, so you can't see it and it's out of the way. So this part is important. We want our lace braid to lay flat against our head. It kind of sticks up. If you don't do this, so you want to just take bobby pins, insert them directly into your french braid, your lace, french braid and now just do a lace. French braid, on the other side, if you didn't want to do this, you could do a twist. You could do a regular braid. You could do whatever you wanted to, but i'm just doing another lace, french braid, pancaking it and then just taking that and draping it across the bun as well bobby, pinning it and i'm actually going to use a topsy tail tool here. So i'm just sticking it into the opposite side of my updo and just pulling it through. You don't have to do this part. You could always just continue wrapping it around, but i was extra here so again, i'm just kind of wrapping it around bobby, pinning it into place. So now, i'm just bobby pinning this to my head, making sure it's flat and pulling out some hair that i wish. I would have pulled out in the beginning, and now when i said we would pancake the front here, we are pancaking that front those like front pieces just kind of make them not so tight against the head. We want this to kind of be a little bit. Looser of an updo and i'm just going to pinch and pull the back for some texture for some volume make sure it's not flat up against my head. When i think of updos, i think of lots of volume and texture and then the little bit of hair, that i could pull out, i'm just going to take a one inch, curling iron wrap it around and just kind of make it loose and wispy. And here's what it looks like so here's the front and here's the side, i'm going to show you the back of it. I am obsessed with this. I think it looks so darn cute. This is great for fall for prom, for homecoming weddings, bridesmaid styles, you name it. I think it is adorable and i hope you guys like it too, so that is it that's the video. I hope you guys learned something i hope you'll give it a try. Let me know what you think in the comments below i'm excited for next week's video, because a little sneak peek, i bought a dyson, and i can't wait to try it. I have not opened it yet. Let me just show you real quick what it looks like. Also, this is real life. This is what i look like filming, so it's so embarrassing, but i thought you guys might appreciate that it's this one. I can't wait to use it, i'm going to be testing it out all week, so i'm going to give you a very thorough review, i'm going to use on wet hair dry hair, we're going to get down to the bottom to see. If this thing is worth the money, but anyways that'll be next week's video, so yeah, thanks for watching, don't forget to like subscribe, leave a comment and i'll see you guys, my next one bye do. Do you

Comments
Kendra Grob: I love how you explain the steps to keep things simple.
Emma: This updo is so pretty!
Sarah Parker: Your boys are growing up so fast! Love this hairstyle Can't wait to see next week's video... Love watching your videos
Kailly sisi: I love everything you do from creativity I learned from you Thank you for your mouth
Melina Licharowicz: I've been doing lace braids for years (too lazy to do full french) and had no clue it was called that. Thanks for the confidence boost and an awesome video!
7027CATHY: I like it. I'm going to try it today. I've been getting a lot into braids lately, I chop and change with hairstyles. Thanks for the tutorial.
LettieNugent.com: THANK YOU! My hair would be a wreck, if it wasn’t for your tutorials. Feel free to give your babies more video time. They are so CUTE!!
Cina Chandler: So beautiful!!!! Thank you!
megadoomerVR: So pretty! Love it
EllesToca: Yay! Can't wait! I know it will be beautiful!
Cynthia Bowen: You are awesome! love you help with braided updos, you make it look so simple!
Katrien Roels: I adore this one! So nice!
Tracey Wassenberg: This is so beautiful!
Grace Yeh: Thank you for your creative hairstyle videos :) Your baby is very cute!
Tayla Dale: Gorgeous love it x
Susan Nelson: That’s gorgeous! I have rheumatoid arthritis so I have limited dexterity in my hands and arms ... I can relate how tired your arms must get doing this complex style. It looks extra nice with your highlights. Baby is so cute and didn’t seem cranky at all. Where do you buy clear elastics and those special Bobbie pins you like?
Re: Choice!: Your tutorials are great and look easy
Hope Smith: So very pretty!!!
Henné Addicted: I love it!!!
ari2131: Beautiful
D Jones: Wow! Gorgeous!
Jessie H: Omgosh this is beautiful but I don't know if I have the patience with how long my hair is, but I am going to try!
Hermine Nazari: I really liked it thanks
Becky Sharrah: Hi! Love your videos! One question though - you seem to use a lot of clear elastics...any advice for not getting breakage from them?
ThePlusSideOfThings: I love it!
Charu Shekhar: You are gorgeous
Esther H. E.: Does it work for longer hair as well? I'll try it! Thanks!
Alicia Marin: I had no idea that braid was called a lace braid. I used to do it all the time in HS (way back when) just because I couldn't be bothered to add in the other side. Well, now I know. Also, do you have any hints for pancaking thick hair? I have a lot of hair and also my actual strands are thick, i.e. I don't have fine hair. So when I try to pancake, or even pinch and pull, the hair just slips back into place.
Joanne Shaw: I can’t wait to see your video on the Dyson. It’s hard to know if it’s worth it as a lot of influencers are gifted them so never sure if they really like them
Ayu Dwina: I love it
Megan Scull: Love this!!! I wish i was as skilled as u r!!!
Samantha Chung: This hairstyle on you looks so fancy. Ou la la. Well done. I thought you meant the vacuum re Dyson. Ha ha. Thank you for sharing.
Jeri Forga: Awesome
Afke Deen: Oh is that called a lace braid? I've done braids like that before. It's also good to go from one side of your head to the other, like a hairband and then when you get to the other side go over the back of your head, Dutch braid and diagonal to the other side of your head and then you get a side braid. Or stop in the middle and make a bun. Anyway, that's how I've used lace braids before I knew what they're called. I did this updo and it stayed up all day with work, It was great. Thanks :D
Samrawit Berhanu: Waw beautiful
Emily Craig: I'm assuming pancaking as in flat as a pancake...it makes the hair more spread out like a pancake? Regardless, gorgeous up do!
Elena Vremes: Super
Stydiashipper11: Great video, but could you do a Lydia Martin hair tutorial video. Sorry I keep asking☺️ but I’m a big fan of the show , and I luv your videos?
Redneck Beauty with Debra: I'm here I'm here!!!! Hello gorgeous and happy Sunday
Ayesha ❤️: Hii lanei i don't know your actual name but i love your contents so much. I wish you read my comment and also comment me something back like where are you from. Love from india. ❤️
Arras10: Oo can’t wait to see the Dyson
Karmila Constantino: Imagine getting a heart from you
Anne Bellamy: Beautiful sweetness he so cute
alma acosta: