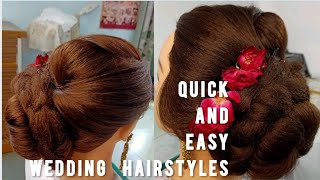
Tutorial | Indian Bridal Hair/Updo | Mona Sangha
- Posted on 19 January, 2016
- Wedding
- By Anonymous
Indian Bridal Updo Tutorial with Flower & Passa/Jhoomer Demonstration
PLEASE READ BELOW YOU MIGHT FIND ALOT OF ANSWERS TO THE QUESTIONS YOU MAY HAVE
Other Useful Vidoes:
How To Make Hair Padding: https://www.youtube.com/watch?v=HcEy1T...
Hot To Set A Dupatta: https://www.youtube.com/watch?v=Eq4Q82...
How To Set A Tikka: https://www.youtube.com/watch?v=6Rd3T-...
How To Set A Tikka/Jhoomer/Mathapathi: https://www.youtube.com/watch?v=8oqV2I...
Follow me on Instagram: https://www.instagram.com/monasangha
View my portfolio: https://www.facebook.com/hairmakeupbym...
For Business Inquiries: [email protected]
Products Used:
Teasing combs available at most drug stores and beauty supply stores (pink one is a dannyco one, the other one has no brand)
Hairspray: Tresseme #5, Joico Joimist Firm, Redeken 23
Smoothing Gel: Joico glossing polish
Curling Iron: Babyliss pro (I threw out the box so I no longer know the model)
Curling Wand: Bombay Hair
Flowers: Michaels Arts & Crafts
Jewelry: India Trend https://www.indiatrendshop.com
monasangha, keepingupwithmona, mua, indian bride, indian bridal makeup, indian bridal hair, hair, hairstyle, updo, bridal updo, bridal makeup, indian wedding, sikh wedding, bollywood, indian fashion, tutorial, dupatta, indian beauty guru, punjabi vlogger, india trend, indian jewelry
So I'm going to show you how to create a certain type of bridal, updo I'll, insert a picture, and it's also the picture. That'S in the thumbnail and I'm going to show you guys my way of how I'm doing this without extensions, because saya has got enough. Hair for it - and I have also been using limited heat for this hairstyle, so I'm not a professional like hair teacher or anything. So I don't know any technical terms or what I was like. My first updo tutorial so bear with me, but I'm going to show you guys how I do this. So I've already parted her hair. Basically, I've taken out the front sections and I just start with a middle part, but I am going to be doing a side. Part on her, so it doesn't really matter, that's not perfect, and then I take out the crown section, which is this. This is where she's going to have that bump and then the rest of the hair I put into a nice sleek ponytail and I make sure the hair spray all the little flyaways, because you don't want any flyaways, and this is the hair. That'S gon na make that bun in the background, so I'm also going to be using hair padding, which I have a video, where I show you guys how to make your own hair, padding and I'll link that video down below. I'M also going to show you guys how to insert flowers until this hairstyle I'll show you guys how I'm going to put in the basa, so this tutorial is going to be very informative, so keep on watching alright. So these are probably the hair pieces. I'M going to use I'm not sure if I'm going to use this one, but if I need extra volume that I'm going to use this one. But I've got three sizes, and I've made these myself this one, the long one which I showed you guys how to make is going to go up top right here. This is going to be for the bump, the volume on the top - and this is usually what the does pinned into the round one's going to be pinned back here and that's what's going to make the base for the bun in the back. So I'm going to show you guys how to put these in its pretty easy all right, so we're going to make our little bump it area. First, I don't know what it's called, so I'm just going to call it a bump. It area the bomb, the poof. We call it the art de pute, sometimes because idea, I love that ID proof on top of their head, so I'm just going to let down this hair. This is just a way we're not using this hair yet so what I like to do is kind of take out the sides so like that, because right now, I'm just going to be using hair from this section right here, I'm going to clip these away, so They don't get in her way. Also, I put out there that these hairstyles take practice like they're, definitely not a pic inner hairstyle or anything. This is more advanced bridal updo. So if you're not a hairstylist or have never done or have never taken a hair course, this is going to be a little hard for you to follow on. But if you do already do hair, then this might help you out gon na grab some more hair from the ponytail that I showed taken out before. If your client or it's our students are, you saw, I never do updos on myself, because I cannot see. What'S going on back there but yeah if your clients hair, isn't long enough like the hair from back here, you can always put in extensions, but Sarah's got enough hair that I don't need extensions. So from this area of hair, I'm just going to take a section from the back so I'll Turner. This way, you guys can see what I mean, like I'm just going to put my comb in here and just take out a section about that much I'm clipping the hair away that you're not using, but okay. If I let hang there okay, so I'm going to take this hair now and I'm going to tease it all the way to the top using a boar, bristle teasing brush. This is what it looks like you can find it almost anywhere on any beauty supply store. I think Walmart carries them too. So if your hair stands up like this on its own without hairspray, you know you did a great job teasing, I'm just going to do the ends a little bit more and now I'm going to go in and hairspray less. My hairspray I'm using today is the Tresemme number five and the red can 23 at the end of this hairstyle. I'M also going to be using the joy, Cove firm, hold joy, mist firm, I'm also going to be using this glossing polish by joy quo as well. I'M going to go in and take a hair spray and I'm just going to take my hands and I'm going to spread this. So this really teased section of hair is what I'm going to use to cover this little hair body. Okay, I got sorry. I turn her head back, so you guys can see what's going on, but along here, I'm just going to put in some bobby pins, I'm going to cross, pin them and that's what you're going to pin this piece into. So you guys are like seedy doing it. Once you see me doing it, you'll kind of get more of an understanding of exactly what I'm doing so we're just going to take some pins kind of along this area. Let me know friend hurting you am i hurting you, so I hope you guys can see that cross pitting means just making a little axle at the bottom pans. They should cross each other at one point and I'm just going to put them all along here. This is going to make sure that your hairpiece is really strongly secure, because if it's not secured properly chances are it might shift and then defector is gon na shift with it as well. And you don't want that happening, especially on your wedding day outside. Imagine yourself falling apart, and butter falls off to at the border. I'M totally sucked right there yeah. If it did, it biggest fear the good spirit you sure I'm not hurting you yeah always ask your client if you're hurting them or not, because you may be poking up their scalp too hard right. You don't want that hopping and you don't have to do this, but I like to go in and hairspray where I've cut those pens in. I don't know why. I just feel like keeps them in a little bit more secure all right. So we're going to take back that piece of hair, that's teased and looks like a bird's nest on top of your head. She'S gon na hate me after this have fun washing this out: conditioner yeah, okay. So what we're going to do is going to take those hair, I'm gon na take those hair cutting and I'm just going to wrap it around that hair piece and roll downwards, get it and it's okay. If these ends aren't covered because you're going to use this hair as you can spread it, you have this hair in these sections that I took out and we're going to use that to tease and bring back and cover this and make it look nice and smooth. So just keep watching you guys will slowly start to understand what I'm doing. If you could put your head up. Thank you. So I'm going to take bobby pins now and just bobby pin this into the pins that are already placed on our head. So now I can let go of it and I've only put in about four bobby pins and it's not moving anywhere, but I'm going to put in way more, even though this is just a tutorial she's not actually heading to her wedding right now, I'm still going To make sure it's pretty secured, as I want to show you guys how you guys can make this super secure, so I'm just gon na spread this hair a little bit just to cover more of that hairpiece, but really doesn't matter if it isn't and I'm going To go in and spray so I know this looks really weird on her head and just looks lopsided and weird, but I promise you it's not I'm going to turn it this way. So you just can see what it looks like so far. These sides look a little extra dramatic right now, but they're going to be covered. So if you want it even more height up here, you would take another hair piece, not so big, but a little one and you can pin it right here. So at this point, you're going to have this action going on okay, so I'm gon na show you guys how to cover that up. Make a nice smooth bump around that, so I'm going to be starting with one side. So my Mary took both sides out. That'S what they're, for so I'm just going to take a section from the back of this and I'm just going to tease it. I'M not going to tease it all the way and while just going to tease it till about here, give that a spray and then spread with your hands. Now you can use heat if you want to I'm not going to use much, but I'm just going to use a little bit. So you guys can see say your client has like super curly frizzy hair. His hair is like a couple days straightened. So that's why? I don't need much heat if you wanted to you could so from the front. There'S that piece to use to spray it and you're just going to take it towards the Bach and you're going to start to cover the hair padding. So I'm just going to pin it back here, I'm also going to tell you guys a little sleeker if your bride wants flowers in her hair like back here or on the bun. You don't have to be very neat with this area right here, because it's gon na get covered with flowers. I'M going to take another section from this side, and you just need keep taking sections teasing and covering the hair party want the top of this bump. To be a boost, if you don't want to see any teasing, so I'm going to leave this one for the last I'm going to take a section from this middle one now start covering this bump. You so don't worry about these pens from here. Like I said it and get covered up with flowers, if your bride isn't wearing flowers in your hair, then you got to be a little bit more careful about where you're, placing these and kind of hiding them in a way but anyways. So we have all this hair, these ends of hair that are from this hair up here, I'm not going to use this hair, so I just like to hide it. So what I do is I kind of just wrap it around this ponytail and I'm just going to pin it and you're not going to see this because getting it covered with a hair piece. I'M gon na hide this hair go in and pin it randomly ready. Okay, so now I'm going to be attaching the round hair piece, but before I do that, I'm also going to place cross, pin bobby pins all along here, you I'm going to take the therapies the wrong one and I'm going to place it like so and I'm Just going to turn it and then we're going to take this hair and cover that hair piece, so I'm going to pin the hair piece at first you once that hairpieces and securely you're, going to start taking pieces from your ponytail. You can use heat on this part if you want, so I'm just going to give it a little bit of curl to this piece, I'm using a babyliss curling iron, if anyone's wondering it's a one inch barrel just going to give that a spray and to help Smooth away flyaways, I'm going to be using the joyful glossing polish. Now, I'm just going to put a little bit on this piece and basically every piece that I'm going to use to cover this fun. So I'm going to be taking this piece and I'm just going to cover this side just bring it up and cover the side like so, and I'm going to pin it up here for this part of the bun. I like to use these kind of pins that you shake pins and then you're just going to take the end and just use that to cover this haircutting so you're just going to take sections from this ponytail and just pin a mop. That'S like so and you're going to cover this hold on with this hair and, like I said, if you don't have enough hair it, you can use hair extensions. So I'm just going to go and do that and then I'll show you guys head to the front and how to clip in the flowers. So this is what the hair looks like so far. We basically have her fun and I'll spin her this way. So you guys can get an idea now you guys might think like this is smooth, but if this was a real bride, it would be waste. Mother, I would have like made sure absolutely perfect, but basically all we have left now is the front, and if you have a middle part, you could do a middle thing, but I tend to do a middle part. A lot unloaded my brides because they were liquor. Ditka and I have a lot of pictures on my histogram of middle parts, but I've never shown this hairstyle side part. I think I did once I did on one of my brides, but we're going to decide for it because we're gon na put in a fossa. So what I do usually I'm right here on this way so going that way. Okay, so I'm going to go in and part your hair, so I'm just going to take this tease it out the root and pin it towards the box, like so. Okay, no another fun fact was not fun thought, but if this was a ride, I would have gotten her to shield her face, or I would have shielded her face for her breasts just Saira. So it's all good. What'S that you're using your hand anyway, we've already come to the conclusion we're going to like probably die from Harris breaking in one day, anyways. So all right, so I just went - and I tease this hair at the root and then I put in the curly one and I just let it cool down top of her head. So I'm just going to release it now before I style it. These won't bite any one pin I just they're just chill enough talk, your dad just K. Okay, so I'm gon na take some hairspray and spray these dude, it's you might want to come here for all right, so her updo is basically done. I'M just gon na give her a spin and then I'm going to show you guys again right up here. You can see some little and sticking out some bobby pins, but it doesn't matter because we're going to use flowers to cover this up now, if your bride or your client doesn't have fresh flowers, you can also use silk flowers. Now you can buy an actual bloom of flowers like this from Michaels. You just need pliers and you just fly them off. So I'll just do one on camera for you guys, so you can catch it when it falls, so just show it to them. So then it looks like this and it still has like the stem on it. Now, if you really wanted to, you could superglue like some wiring on to it, so that's easier for you to stick the wiring into the bun. But honestly, you can just use bobby pins, so I'm just going to put these around the bun. It'S going to make it look ten times better. Actually we're going to use this one, because this one it looks and feels more real deal it doesn't. It feel like it's real yeah, it's so weird right. You can just hide that and no one's in there. No those pins are there once you put the flowers in, so I had to charge my battery for a bit in between dough and add any more flowers. I saved it for you guys, but I don't how sorry I put on some earrings and red lipstick to make this more Bridal. So, let's pop in some more flowers, so that was super easy and the hairstyle just looks so much better now. Doesn'T it look amazing and I'm going to put in her boss, aw now too, so for those of you who don't know, I used to have an old t2 channel that I don't use anymore, but on that channel I actually have two videos once on. How did it put a tick on which Sarah, then it was like one of her first YouTube videos and it's actually hilarious, to watch and and then there was another one that I made on my little like hair mannequin, and that when I showed how to put On them up the body apasa and um, I pick up and apostle's also notice that your mark in case you guys, are wondering, but this one matches the earrings and the earrings and the spots are from India trend and they sent it to me. So we're going to use this, but I show you guys on the back of the basa most of them have this little like hook. I guess you in college, so they have a hook. So what I like to do is I like to take a long, bobby, pin and put it through that hook. So now this is like hanging right, there's different ways. I can attach this blossom, but for haircut style today, I'm going to do it this way, so I'm going to close the little hook right here and squeeze it shut and I'm going to place this basa and see whereabouts on her forehead. We want this. I think that's about good, so I have this bobby pin here, I'm going to take it and I'm going to shove it into this like see where we have this volume or try doubtful into this bomb, I'm going to shove the bobby pin into the box. So hopefully you guys to see what I'm doing for Tribeca and it's pretty secure but say if it was her wedding and she's wearing a gourd Lord every time she would bend over to Method ake it possibility it might slide out so to prevent that from happening Here, take another bobby, pin and you're going to cross, pin that and cross pinning always walk two bobby pins in place and they won't move. I'M just going to take either one straight head up just cross pen Bob for the sake of this tutorial. You guys are able to see put you my gun where those bobby pins are, but you don't want it to be seen when you're doing a bride. So when you're doing a bride, you would just push it all the way in so you don't see the bobby pin because not going to look nice once you get there pictures of stuff taken in the morning, so I'm going to just adjust this. You can put more pins in through these little holes the links you can also glue this a little bit to your forehead. But there's really no point today because, like I said it's not actually her wedding glue, you would use the eyelash glue because it's chalky you'd apply it on this side. Flip it over apply some glue. Let it get a little chalky for, like maybe 30 seconds and then custom write and then it's not gon na move, but you can let go here's a full Bridal, hair style with Vassa and flowers. So let me know what you guys thought of this tutorial. If it was helpful, I'm like I said it's my first one so bear with me. I hope I did a good job. I hope some of you at least learned something and yeah comment down below if you'd like to see another hairstyle or if you want to see another bridal, updo and yeah. Sorry, do you have anything to say? Do you feel like it's your wedding yeah? I never would I show them look if I tell you that I already have a video on how to pin it about death, so I'll link that down below too, but I'm just going to show you how this looks with it about Donna so ravine anywhere passing You the different job, okay, so the whole point of this volume up here so just put your head down. This is just like a little tiny little kid to put down and even know where Oh someone left in my studio and put your head back I'll. Take my bobby pin box - and you know so say we penned this here but put her down. You need this volume here for this tabata to set on top of so you would just put in pins through here. Like I said, I already have a video explaining all this, so please go take a look at that video I'll link it down below put your head back up, and most apart does if their net, it's really nice, because you can still see the flowers through the Diverter so yeah. That concludes my video. This is my bride. Now we know what Sarah's gon na look like on her wedding day: mmm you're, acting all shy like you're, a shy bride, all of a sudden anyway. Alright guys, we will see you in our next video comment down below what other videos you'd like to see, and I hope you guys enjoy this one and yeah. I hope you weren't that bad at explaining this, so I'm trying I'm trying my best. Alright guys take care and I'll see you guys in the next video bye.
Comments
yvonne Clair: so you know what I love about you mona? it's the fact you actually share these fabulous secrets alot of hair and makeup artist would not share usually... and you thoroughly explain the whole process... you are fabuloussss!!
H. Hochman: Thank you so much for your videos especially this one! I have a bridal trial this morning and she has similar hair to your model here. Love all the work you do so beautiful and perfect! Definitely subscribing to you Mona as I do a lot of weddings and updos
Sherry K: So amazing! Love this look! Definitely learnt something! Love you Mona & Syra
Newitaa: OMG i like that bridal updo! I might even use it on my own wedding day in a year . Thank you for showing us how to create it! Love your videos❤️
Meera Meme P: This tutorial was SOOO informative! I can't wait to try it out. Thank you xxx
Neetu Josh: yes mona love this! more bridal hairstyles please :)
Shaikh Town: You did a fabulous job Mona. Thank you for taking the time to teach us. Yes, I would love to see more hair tutorials. Keep up the great work.
anna choudhury: Hey Mona!! Thank you so much for sharing this tutorial. I love the way you do make up, it's sssssooooo beautiful!! Keep it up.
sim khan: It was wonderful watching this video, thank you, also I would like to add that you are very blessed to have cousins and friends like Syria and Ravenna who support you also take the time to out being patient and letting explore and show your talent through them, sharing your passion, it's really wonderful to see such relationships between you guys, may God bless all of you.
Gabe and Arya: So detailed., thank you so much! Felt like I was in a class!
Ann M.U.A: lovely tutorial mona.. you are really talented please keep making detailed bridal hair tutorials like this one .. really appreciate it.. lovely work, keep up the good work .. hoping to see more videos like one.. will be waiting for your next one.. :)
parminder johal: I loved this tutorial.. Very informative and easy to follow. Great job. You should to do more bridal updo videos Thanks!!
Kausar Kazi: This is awesome! Thanks for sharing and being public about your methods. I recently just started trying out bridal updos on friends and realized I have a passion in this and they come out pretty nice on the first try! Your tricks are going to help me out even further! Thanks!
Krish S: Hey Mona thanks for this lovely tutorial !!!! You made it very easy to understand ..!:) just wondering what kind of Bobby pins do you recommend and where do you usually get it from ? Thanks so much .. Love all your videos
Miss E: I absolutely love your work Mona! Keep up the good work.
🌞sunny siblings🌞: Thank you so much mona for sharing your hair styling and makeup skills..its so beautiful .. And the way u and syra pretending to be serious and raveena in the background i was smiling throughout the video :)) May all your wishes come true :) thanks alot
j. Ahmad: Thank you so much for such detailed tutorial! Definitely more bridal hair tutorials please.may be the rosette bun? Love your videos!
Kiranpreet Hayer: Loved it! More bridal hair tutorials please :)
ishamaini1: this hair reminds of old 60s bollywood glam! it's so gorgeous
shootstars91: love this! your details and helpful hints are awesome. please keep it up!
Filza Najmuddin: Thanks for sharing n teaching this! Most of the big desi makeup artist never share their tricks and tips for free. Shows how amazing u are as a person
Amarpreet Tiwana: You're amazing, loved this video; very helpful! <3
Drish Amarnani: Very informative:) Would love to see more tutorials on bridal updos!
bhallabonnie: love this video! very detailed! please do more videos like this!! love from Montreal!
Anupreet Badwal: hey mona! i love your videos and theyre really informative! i was wondering if you could make a tutorial on how to pin dupattas with suits for like non-brides? like where to place the dupatta and all that good stuff! I'd really appreciate it!
Azmeree: pls pls pls do more bridal hair updos!! u r amazing!
Yasmina Karraz: I love your work so much! you can do everything xx
P. Sandhu: Amazing!!!!! You are really talented girl u could keep secrets but you explained it so well.....really appreciate it!!! Please share more bridal hair tutorials. I have watched so many videos but no one explained step by step the way u did. Thank you so much for sharing. Waiting for next one..........
shailly varun Sharma: Hey Mona!!! hope you are doing well ..I just love your videos ...you are amazing ..I'm getting engaged soon and I want to do my makeup on my own since its far from the city and in a resort .. could you please please do an engagement makeup tutorial for a pink and silver outfit. ..I'll be highly grateful . Thanks .
Zahida Roshanali: Amazing!! Your a really great teacher thank you
Gurjeet Kaur Kohli: Hi Mona I did this hairstyle today . thanks for lovely tutorial
TheHausOfPink: Thank you sooooooooo much for this video!!!! I always have so much trouble with the "Auntie Bump" lol After I watched I was able to create a smooth hairstyle!!! Thank you thank you thank you!!!!!
Drish Amarnani: Amazing tutorial! Would love if you could do more videos on Indian Bridal Updos. Thank you!
Sandhya 604: Great video! Love the hair tutorial. Please do more hair videos! :)
XOJHA: Great video. More hair videos please. You did amazing with this. xx
shazia rafat: what a bomb ass hair tutorial !! Of all the hair tuts on youtube yours just aces every single one of them ! PLS plssss do more of these bridal hair styles/ mehndi hair styles . i'm always checking back to see ur channel for updates ! absolutely love you and your work mona :)
Mandeep kaur: I love this mona, this is so helpful, i really loved how to went in detail so deeply thanks for that. Please make more videos like these maybe your signature hair styles that u love doing on brides thanks xoxoxoxoxo
Kavreet Gill: Love it!!! Great job Mona
Kaur Beauty: This was really informative! Syra looks so pretty!
Azmeree: thank you soooo much!! I was dying to see how to do this hair updo! Thank you Love <3
Manny Shina MUA: Never fail to impress mona
Summer Paris: Wooow you made it look so easy thank you xxx
jessi d: absolutely love it. very detailed
〈tRuE lOvE〉: grt job mona...loved it totally...cant wait to see more of such videos from u:)
Jasi Sidhu: This is so pretty, thanks for sharing! :)
Roxy makeovers: It was a lovely hair tutorial.. Could u plz show us more bridal and bridal reception hair tutorials.. Thank you✌️
Gina Trujillo: You are so very talented and patient. This was very interesting and love your beautiful customs
Payal's Way: thanks... I was waiting for this ever since you mentioned it in your blog! it's beautiful!
Harnam Chana: This video tutorial was super helpful. Please try and post more bridal hairdo vids. You do such a fantastic job. I have a couple of questions for you. Do you charge your brides extra for each individual hair pieces and flowers? and secondly do you purchase hair extensions for brides yourself or do you get the client to bring their own in?
Sahiba Johar: This was amazing! Please make more videos of Indian bridal updo with long hair.
AndjaniTriloki: I Loveeeeeeeed this tutorial, this was so helpfull. I really want to see more hairstyle tutorials. Gonna watch the hairpadding video right nowww
nida mashood: Can you please do more bridal hairstyles I’m learning more from your hairstyles
Jas Kaur: you should do more hair tutorials! you're good!!!! ♡♡
supermaryxx: lovely video explaining step by step instructions, will definitely look at more of your videos
Jaspreet Gill: Thank you for making this video. Very informative!!! Want to learn more bridal hair styles.
Ruchika Kandari: oh wow!! we want more such videos.. you're incredible
indusbeauty mua: thank you so much for sharing this hairstyle. I always wanted to Learn this style. :)
simran arora: Amazing love the video! Yes I learnt so much! You are truly great
Rifath Hoque: omg!!! thank you!!! I love in Michigan I have so many parties this summer. this will be my go to. thank you again!!! please do more hair tutorial videos.
N_lrn: your videos are so diff and youre so real and so kind for sharing these kind of videos here on youtube for everyone to be able to access for free thank you so much for this
Being Priti: Thank you for a great video! Please do more hair videos!
SM: love ....love...love the tutorial....can't wait for the next one.
Sonika Karir: Omg thank you so much!! I'm so happy you've upoaded a tutorial on bridal hair absolutely love it!! oh and I'd defo come see you but I'm in bradford haa amazing work
sananasir1: Love the updo....really pretty...can you please give tips on getting the teased hair out easily
rahmahh94: Please do more!! Loved it
Maarya Nasar: amazing tutorial. please show us more bridal hair tutorials. also if possible how to put a parandha in. thank you sooo much. best bridal hair tutorial ever!!!
Jami Jia: @keepingupwithmona love it!! plz do some more updos..really informative..
Syeda Juhi: It was really pretty n helpful..plzz make more videos on bridal updo for long n thick hairs..
Simone Marcondes: Damaste adoro seus penteados
Scruffy horan: So nice! Do more videos like this! Xx
myimmortal231: You are awesome! Now i wish i could get married again and have you get me ready! Haha just kidding, you know you are so good with what you do
rxbeauty: Thank you for sharing your ideas. Very helpful.
Gina Lekasdottir: I prefer hair like this. My sister's wedding is in a few months and I'd much rather have an updo like this than just having it curled and pinned back a little. I am going to look up some photos of indian bridal hair and use them as references for my own. :)
sweetheartjy 🌸: awesome!! yes more hair tutorials pls. ;)
harleen virk: hi mona! you are the best makeup artist and hairstylist in the world... u are totally an inspiration for me! I literally think ur a celebrity for me!!! I was hoping you could do a high updo totorial like a high bridal bun! if you reply on this comment I am literally going to freak out! and I wish I can meet you some day!
Just Jeevz: Love this up do x
Meme O: Thank you so much much for this video :)
Jayde Rimson: Yes!!!! I love your channel you explain everything in such detail. No other channel does this. They speed everything up and are like here you go... smh.
ni b: amazing! ! please do more of these videos
JKFLOWER: Good Job Mona....love it!!!
Nicole OCOG: great job. Yes, do another bridal up do please
marcela de santana: Amanzing tutorial I loved ! Hugs from your Brazilian friend.
Naina Saili: wow, so detailed. love it
ThatGirlEma: Wow, you're the best Mona!
artistrybyjyoti Narang: Thanks alot ... Amazing and very very helpful
Gurpinder Kaur: wow beautiful hair do, so helpful. you should do more hair tutorials
realvanillahair: Thank u thank u ur very kind to share ur skills with us ....more bridal hair plzzz xx
BBPRODU: please keep these up I love the hair tutorials
Aleeza: amazing tutorial!!
Sarala Devi Krishnan: Thanks for the video dear. Please do more hair tutorials. Thank you so much once again.
Laiba Sreevas: Such a good video! Thank you
Hema Mistry: that was brilliant please do some more xx
Bella G: you did a fantastic job mona.
P.G: Thank you so much for sharing .. love your videos
Zsófia Pink: Very nice, I would like to attend a transformation like this once
Ria Mirza: fantastic tutorial the bit when you teased her hair up actually reminded me of Basil brush show I used to watch when I was younger lol x
nabila ahmad: You are awesommmmmmeeee n this was soooo helpful!
Simar Anand: Hey Mona! Just curious, what editing software do u currently use? Really trying to find an easy to use software that isn't slow! Thanks!
Jas Kaur: Great tutorial are you able to do a similar updo which has curled swirls on the actual bun and possibly a tutorial for a updo for someone that has a extremely heavy dupatta. Also can you recommend a hairstyle and makeup training doll head? Thanks
Rifath Hoque: I almost forgot to mention. can we get an updated version of dupatta setting, and tikka setting?