Easy Wedding Hairstyles | Bridesmaid, Wedding Guest & Special Occasional Hairstyles Tutorial
#AD Wedding guest & special occasion hairstyles that are so easy to create with the help of @TRESemmé! I love all of these styles, they’re so beautiful & require minimal effort too. Which is your favourite style? I'd love to know which one you think I should do for my friend's wedding as well!! Xx
TRESemmé Keratin Serum: https://bit.ly/3qUJ7Zl
TRESemmé TRES Two Hairspray: https://bit.ly/2JUJS41
[#GreatStyleReset #TRESPartner]
[created in partnership with @TRESemmé ]
——————————
You Might Like:
WEDDING DRESS SHOPPING: https://youtu.be/n92GyJOGfls
LONG HAIR EVERYDAY HAIRSTYLES: https://youtu.be/7XZsCp-W9X4
——————————
Find Me:
♡ IG http://www.instagram.com/alicia_haque
♡ BLOG: http://www.golivexplore.com
♡ TW: http://www.twitter.com/alicia_haque
♡ FB: http://www.facebook.com/golivexplore
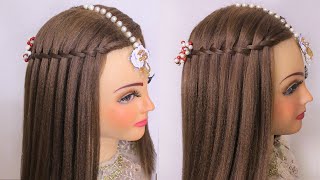
Hi friends and welcome back to my channel, so this video is going to be all about special occasion. Hairstyles. You know those kind of styles that are perfect for like weddings, if you're a guest or you're a bridesmaid or for prom or just for occasions where you want your hair to be a little bit more special. I also want to note this is in partnership with tresemme. I'Ve worked on quite a few styling videos with them this year, i love their styling products. The inspiration for this video came from the fact that i am going to be a bridesmaid at my best friend's wedding, very very soon the wedding's going to be in ibiza - and i am so excited i've been thinking a lot about how i'm going to do. My hair and how i'm going to do my makeup and i've been doing lots of different trials, and so i thought i'd make a video on different kind of very simple, yet elegant and beautiful special occasion. Hairstyles that you can do these, don't take a lot of effort. They don't take too much skill or too much time, and i feel like these styles, just look, really beautiful and really classy and perfect for a special occasion. So there are a few essentials that i'm gon na need to create the styles. The first one is a set of velcro rollers. I will also be using two tresemme products, so this is the tresemme tres two extra hold hairspray. This is so good. I'Ve used this for a very long time. It offers a really good hold. So this is number four which is extra hold. However, it brushes out really well so, if you're changing up styles, you know if you decide to do your hair again, if you don't wash your hair for a few days after you've used this, it doesn't matter because it doesn't leave any residue. It doesn't leave your hair like sticky or greasy or anything, and it offers a really really great hold, and i'm also going to be using the tresemme keratin smooth serum. I love this as well, it's really lightweight, it smells divine, it smells amazing and it just gives your hair a really nice bit of gloss and shine. I'M also going to be using my hair dryer, which is on the floor as well as some bobby pins to set the style and also some little clear elastics, and what else have we got? I think that's it. So, let's jump straight into the styling. So for the first style we're going to be using the velcro rollers now this kind of doubles up as like a preparation step and also as a hairstyle. If um, you want like a blowout look, velcro rollers are really good for creating that i'm just going to use a little bit of the keratin smooth serum. So i'm just gon na pop a couple of pumps into my hands and then just run my hands through the ends of my hair for the first one, i'm basically gon na grab this very, very top section, and what i'm actually going to do is i'm actually Going to heat up the hair at first before i pop the rollers in now heating up, the hair will basically just allow the hair to set a little better. I'M only going to leave this in for probably like 15 20 minutes or so. Ideally, i'd leave them in for like two hours. But it would just make film in this video very very long, but you should be able to see kind of the difference that it makes. And obviously, if you leave the velcro rollers in for longer, then it will make more of an impact on your hair and it will create much more volume and body. So i'm going to start off by just heating up this very, very front section with my hair dryer and just with a round brush. Now that my hair has got a little bit of heat, i'm going to take my roller, basically just kind of run. My hair around the roller making sure that the ends sit nicely and you want to pull it quite tight tension. Is your friend with these and i'm just going to secure it with a clip just to make sure that it doesn't go anywhere. This top section is really important, because this is where you'll see like a lot of the body and a lot of the lift. Oh, my arms aren't long enough. So now that is nice and tight if um you're finding like here, for example, the hair is just kind of falling off the side of the roller. You can just take a little bobby pin and you can just very gently pop the pin just on the roller and that will just keep the hair in place. So i'm basically going to go throughout my hair, adding in all of the rollers and then what i think i'm going to do is i'm just going to apply a little bit of heat, so that is another trick. Obviously, he helps to set the buns and set the style. So i'm going to apply a little bit of heat on kind of a low intensity and about high heat, and that should hopefully help the rollers to set a little better. And then you can take the rollers out and i'll show you what it looks like so i've had these in for about 20 minutes, or so i have applied some heat. I'M just gon na apply a little bit of hairspray and let's take them out and see how they look. You want to be quite gentle when you take them out. You also want to just kind of treat the rollers like a hairbrush, so basically just like use a roller to kind of smooth out the hair. Oh, you can see. You'Ve got a little bit of a flick already, that's really nice, so it will go through the rest of the hair. I'Ve got to remember now where i put the bobby pins and i'm excited to see what it's going to look like when we take them all out. Look at that little flick. I'M really really happy with that, and my hair is so super smooth. So you just kind of twist the hair a little bit just to kind of keep it in the style. Okay. So let me just give my hair a little bit of a shake out. Look at that volume. That is actually amazing. Isn'T it you've got so much volume around the face? It kind of frames the face really nicely yeah. I'M super happy with that. So i'm just gon na grab a little bit of serum and just kind of smooth and tame this mane - and i mean you know this - is definitely a really lovely style in itself. If you want like a straight style, but you don't want it to be like too super straight - and you just get a nice bit of shape a nice bit of volume and um yeah, i think that looks really cool. You can also do it's kind of flick over to the side which is sort of like my signature style. I often have my hair like this and um. You'Ve got a nice bit of volume as well just giving her a little bit of a spritz with hairspray. Just to kind of set the style a little bit, but um yeah, that is style number one. The next style that i'm gon na do is more of a curly style. So i'm actually going to count my hair very quickly, i'm just using my waving wand. I'M not gon na! Do a full tutorial on this, because i've done lots of waving wand and wavy hair tutorials before i'll leave those in the description box down below. If you want to go and check them out, but i'm just going to pop these on - oh no, i'm not need to plug them in so i'm going to plug them in and curl all my hair and try and keep some of this volume as well. So this is a super like glam big, and this can be an amazing like style on its own. If you want a look, that is just kind of a little bit more glam and just a little bit more full um. This is a very, very kind of simple. You don't need any accessories, just a bit of hairspray and you're good to go. So i guess that is style number, two very, very simple, and i love these kind of curls they're kind of nice and pronounced and um yeah, just really really nice so on to kind of accessorizing a little bit more so for this first style, i'm gon na Do kind of like a half updo, this one is super simple. I do this one all the time, and especially if you've got your hair like this, and you know the top goes a little bit flat or if you just want your hair off your face. A little bit this one is a really nice style. So what i'm going to do is basically separate the very very top section of my hair. It'S kind of up to you how much hair you take here and then i'm going to just twist my hair at the back and then add two or three bobby pins and it works well to cross them over, and i find that the pins just hold so Much better when you do that and you interlink them and then you can just add a nice clip over the top. If you want something, that's a little bit more glam, you want to hide the bobby pins or you could add, like flowers on top. I guess it depends what your outfit looks like and then i'm just going to add a little bit of hairspray just to seal the style, and then you can either choose to leave your hair kind of pulled back or if you've got little bangs. Like me, you can just kind of just tease them out a little bit. I like to have a little bit of hair kind of framing my face, then with some hairspray and just basically set the style spray. The bottom and i find this style - it just is so easy to do. It really just adds just a little bit of something to your hair and without it taking lots of effort and yeah. I think it looks super super cute, so, let's dive into the next style, this style is um a little bit similar, also a little bit different um. It involves a few more bobby pins and a little bit more styling. So i'm going to do my best to do this style without being able to see the back. So excuse me if it was a tiny little bit messy, but hopefully i'll just show you the technique and how you do it so for this style. What i'm going to do is take kind of the very top section of my hair around the crown i am going to twist it and kind of like push upwards a little bit just to create a little bit of volume and secure with a couple of bobby Pins and then what i'm gon na do is, i am going to piece by piece: take a hair from the top part of my head and around the sides and basically pull the hair around over the twist and over to the other side. So we're kind of like overlapping over that middle section and then i'm going to secure with a bobby pin and then on the other side of my head. I'M going to do the exact same thing, take a piece of hair from the side and basically pull it around to the opposite side of my head. So it's kind of hard to explain this one. Hopefully, you can tell a little bit better by me just showing you um and then basically, i'm just going to kind of keep going around my head just following this movement and what you should see is kind of like a crisscross look, and i think this is Just really nice, it looks really elegant again. It'S super simple. It'S kind of a variation of the previous one, but i just think it looks so elegant, elegant and intricate from the back, but it's actually really really easy to do and hair spraying. It literally will just solidify it and keep it in place, so you don't have to mess with it and then again you can just kind of tease out little bits around your face, and then you can just pop a little bit of hairspray in the sides from The front, if you want your curls to be a little bit more pronounced and um yeah. That is another one of the styles, so this song and the previous style are a little bit more, a little bit more sleek and a little bit more pre. Now the next style i'm going to show you involves these little cutie little elastics, okay. So for this next style we are going to follow the topsy tail technique, which is basically where you kind of tie your hair in a ponytail. And then you sort of like wrap the pony under i'll. Show you in a second and it creates a really cool. Like boho kind of like mermaidy look, so this is super easy to do again, but it looks very, very complicated if you're on pinterest, you've probably seen this hairstyle floating around. I am going to just separate out the very top section of my hair and i'm going to take an elastic, wrap my hair quite tightly and pull the bubble tight and then what i'm gon na do is just with my fingers. I am gon na just create a little bit of a hole in the middle and then i'm going to pull the ponytail through the hole and you'll get this really nice twisted look and then i am going to take another section underneath from both sides of my Hair and i'm going to make another ponytail and do the exact same topsy tail technique pulling my ponytail through the hole. And then you want to make sure that you pull the pony tight. Just so you don't see that little bubble creeping out and basically you can just keep replicating the topsy. Tail technique keep making little ponytails and you end up with what looks like a super intricate, very kind of uh boho looking style, so i've just gone and added a little bit of kel just around my face because i feel like it's dropped quite a bit. So for this textile, it's actually going to be a variation of this style. I love this one so much. I think it looks really cool and this style is going to be for those who want all of their hair off their neck and off their shoulders. So all i am going to do is just pull my hair up into a ponytail. It'S gon na be a fairly low pony and i'm gon na secure with a elastic band. If you've got thicker hat, you might want to secure with two instead just to make sure it's nice and tight and then what i'm going to do is i'm going to take a small section of hair from my ponytail and i'm just going to wrap it around The bobble just to conceal the bubble and just to make it look a little bit more put together, so i'm going to wrap it round and then secure it to my head with a couple of bobby pins. It'S better! If you do this under the ponytail. Just so that you can hide the ends and the pins a little bit. What you can then do, because i feel like ponytails, look better when they are a little bit messy. Is you can just gently just pull out the hair? Just tease out little bits around the front, you can just tease out the little front sections just to make it a little bit softer and then what you can also do, which i think looks really cool - is just backcomb the ponytail a little bit. This helps to give your ponytail just a little bit of body, and i think it looks really really cool and then what you can do is just grab a little bit of the serum and just run that through the ends, backcombing does mattify your hair a little Bit and it can make your hair look a little bit dull, so i feel like a little bit of serum just bring some of that shine back, makes it nice and smooth and then again just secure with some hairspray hairspray. It'S definitely your friend when i'm doing these kinds of styles so yeah, that is the final style. It looks quite nice and you kind of pull it around over your shoulder. I really really hope you have enjoyed this video and you found this useful and it's given. You a few ideas if you're looking for just very easy hairstyles for those special occasions, i'm still on the fence about which style i'm gon na do for my friend's wedding. Let me know in the comments which is your favorite style and which you think that i should do. I would love your feedback, i'd love to know which one was your favorite. I will link the products that i mentioned in the description box down below the hairspray and the serum. Thank you so much for watching, and hopefully i will see you in my next video next week. Bye

Comments
liedyMc: You have lovely hair and lots of it , i love volume , when I was young I had beautiful thick hair unfortunately that’s no longer the case . Down the first one definitely my first choice , it’s hard for me to keep any volume in my hair with our Vancouver weather.
Mr. "X": How'd the wedding go?
Summer Kroetsch: Alicia can you post again