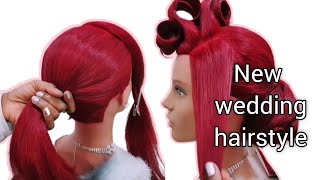
Learn Gorgeous Vintage Waves Updo - Half-Up Hairstyle On Long Hair
Learn how to create vintage waves on long hair and create this half up bridal hair style, great for wedding, special occasion and prom hairstyles. Join award winning bridal hairstylist Pam Wrigley for this fabulous tutorial. Learn hair prep and styling styling and create classic, vintage, modern, up-do, half up half down, or hair down style. Learn how to correctly secure the hair, working with bobby pins and master hair curling techniques needed for perfect hair prep!
Hair prep is key when it comes to creating beautiful bridal hairstyles, especially if your client is looking for a vintage finish to the hair.
Achieve a natural looking curl, and get lots of lovely root lift, great when it comes to making fine hair look thick and full, and dull hair look shiny and glossy.
Learn how to Create Beautiful Bridal Hair-styles step by step with Pam Wrigley, UK Wedding Hair Stylist of the Year.
Subscribe and learn the latest wedding, bridal, prom & party hairstyles alongside timeless, classic hairstyles and vintage looks that never go out of fashion.
Learn all about hair prep, which hair styling tools & hairstyling products work best, and find how to work with different hair types.
Join Pam and Learn all about hair prep, what products to use, how to work with padding and hair extensions.
We'll also teach you how to blow-dry with videos on curly blow dry, Victoria secrets blow-dry, short hair and smooth & sleek blow drys.
We've got it covered . . . we even have tutorials covering the curly girl technique!
Great for fans of natural unintentional ASMR!
Hairstyle tutorials include hair prep, hairstyling and hair up, blow-drying, curly girl techniques, working with different hair types, hair textures and hair lengths.
Create hair up & bridal hairstyles and become a bridal hairstylist with Pam Wrigley, UK Wedding Hairstylist of the Year
Just SUBSCRIBE & LIKE!
Is so perfect for tonight's live tutorial, tonight's webinar, so the style we're going to do so. Welcome to those of you that have just joined, we are going to do this style tonight on Sophie. This was Sophie's hair that I did for her wedding, so we're going to I'm going to show you how to recreate this style tonight. If you have any questions as we go through the tutorial, please just type your questions in and my fabulous assistants just off camera Robby will pass your questions on to me and hopefully I'll be able to answer them all. If there's anything, I'm not sure about I'll. Be able to look into it and be able to get back to you tomorrow, so please, just if you have any questions feel free if you've got any questions about wedding, hair or advertising for your wedding business or just hairstyling in general. Please just type your questions in and I will answer them for you. So Sophie's hair. Did you wash your hair today Sophie yeah, so it has very fine hair so when to wash the hair? It'S a big question that I'm always asked when I'm working with students and my brides and my clients often ask me when they should wash their hair. So if somebody has particularly fine hair and or even if it's just the hair gets greasy very quickly, then it's better to wash the hair on the day. And but if they've got very sick, coarse hair or very soft super silky hair, then it might be better to wash it the day before. But if your clients used to washing their hair everyday, then I was to definitely suggest they wash it on the day of their event, what you can always do to take a little bit out of the softness out of the hair, and quite often what I do Is I will just spray our texturize, the hair first before I start styling, so I'll just spray a little bit of mousse at the roots? This is a L'Oreal technique. Art mousse! I like this one. It'S a volume, lift mousse, but really any mousse will do the job. I like this one: it's because it's got a little directional spray on it, so we just want the Moose to be at the kind of route, so maybe a little bit on the Midlands. But it's mainly at the roots of the hair, and then I might just to give it a little bit of extra grip and you can take a little bit of a product through to the ends. If, especially, if you're doing a wave look. Because we want to make sure that the style stays. I think when we did this for your wedding Sophie it stayed in all night. Didn'T it the style yeah. So don't be. You don't need to overload the hair with product, but make sure you get enough in I've already started and the hair preps. They don't want to spend too long on hair prep for you and while you are watching live well and what I've done is I've used the reverse wind with a twist here and if you're not sure, I'm going to do a couple of sections here as well. Using the same technique, if you're not sure about how much mousse use you can watch our and the tutorials on texturizing on doing hair prep with to texturize the hair and also our vintage finger wave tutorial where I use mousse in the hair prior to styling. So when we do have a finger waves on wet hair, as well as the finger waves on dry hair and I use the mousse on the finger waves with dry hair, so that's the one that you want to be looking at. So I'm going to solder has very fine hair, so say if I was working with somebody who's much thicker hair. I might use smaller narrower sections and might even what I'm doing here. I'Ve sectioned the hair at the sides, sort of your section here and the same on the other side. So it's literally just kind of the the section above the ear. I always find it much easier if you section the hair do a little bit of sectioning of the hair first, when you start to prep the hair, because it just makes the whole process a lot easier. Just by taking away some of the weight of the hem. The volume of the hair before you start styling, especially if your client has thick heavy hair. So if you are working with somebody with thick hair, you might do the way. Do the sections a bit smaller a bit narrower. But here because I want these waves to all sit perfectly in line so for those of you that may have just joined us. We want these waves to all sit together, so it's in what I'm going to do rather than doing sections of hair, I'm just going to do one wave all the way across. So that might just mean. I think that might be okay might be slightly on the thin side. I maybe could have put a little bit more hair in there. So, let's, let's just correct that now, just a little bit more. Let me use my home I'll use my tail comb. Actually, you know what I'm going to use my back combing counter section. Now everybody some people, you may prefer to use the your tail comb, sometimes especially if I'm working with long hair, I prefer to use my the tip of my back, only come to section the hair just because sometimes it can be quite difficult. Sometimes, if use your tail comb, you end up with lots of hair kind of floating around everywhere and when you section the hair, try and keep your hand and the coal close to the hair. So don't kind of have your hand up here and start to section, because you'll find you'll just get lots of the hair and Zipporah kind of fly away and messy. So if you stay a little bit closer to the scalp, you'll find your sectioning will be easier and just a little bit more precise. So we just have a little bit of mousse here at the root. So I'm just going to click this pulp in this section. In place so as I say, if you have any questions, please just type them in and Robbie will ask me your questions, but we are going tonight to do our lovely soft, vintage wave style now what some hair on my face. So we don't have any. We don't need any Heights with this style, so I'm just going to spray a little bit of our silhouette style and care lotion. Just a little mist of that - and I know I don't need to straighten Sophie's hair she's got very it's fine hair, it's naturally straight, so I'm not putting the straightness to it, but you do need to have smooth hair. Ideally before you start this style. Sometimes I find it if you do straighten the hair, it can take a bit of the life out of the hair. If you do feel like you need to smooth any flyaway bits, you could just use your tongs. Sorry. So if you're then pulling back, you could just go over the hair with your tongs just to help to smooth a little bit. If you need to. I don't need to do that wheeling with faux for his hair, because it's already quite smooth and sweet, so we've got quite a wide section. It goes from kind of one ear to the other ear. So now on this section, I'm going to use because we want these say: Sophie's got very fine hair. So we want these waves to stay in place, so I'm actually going to spray the top and the bottom of the hair again with a silhouette products - and this is a styling lotion. They'Re also saw some great, not stylish as a setting lotion. There are some great products out there. I think there's another one I think indle. I think they do a lovely, a really good setting motion that doesn't make the hair sticky or wet and not too crispy, either just a little mist. So you're not really too close to the hair because we don't want to get it wet. So I've got a hair on my face. That'S better, but we do want to get plenty of products on the hair. So I'm going to use my tongs with a 25 millimeter Tong and this is a diva Tong and basically what I'm going to do is if I just turn around a little bit here, we're going to do the reverse winding with a twist. So we do have this tutorial available online. So if you're not sure we can't kind of zoom in when we're doing our live tutorials. But if you're not sure what I'm doing, you can watch our tutorial that we have already available on creating waves, vintage waves in long hair, so we're going to do our first wine with a twist. So you want to keep your hand. You don't have your hand. Far away from the Tong, you need to have your hand close to the towel you're going to sweep the hair around the key flat, push it down to the ends, I'm keeping my clamp down on the tongue here, because it just makes it a little bit less Awkward, so you hand goes round with these thumb flat. Then you come up to the top a nice tight, sharp twist and back to flat again. So hopefully you can see what I'm doing, I'm just going to nudge that hair down to the bottom of the tongue. You don't want to start running out of space on your tongue here and I'll twist, I'm gon na unwind just a little bit so that when I wind back up again, the end of the hair here gets caught underneath this top a bit of hair. Maybe I could come down, that's better, because this particular style - it's not like when we're doing a beachy wave where we leave the ends of the hair straight and we leave them out of the tongs, because then you get a little much more relaxed. Looking beachy way here we're doing a vintage wave and we want the curl to go all the way down to the bottom of the hair, so make sure that you get the ends in it's a little bit loose here. That'S because I'm standing to one side so ideally it would all be. If I stand in the middle, you won't be able to see anything, so I'm just going to hold it a little bit tighter there. So hopefully it holds sometimes when I do these webinars I'm going to do the live tutorials. That'S it I'm just touching the hair and I can feel the heat coming through I'm going to lift the clam. So I need to lift the clamp and try not to disturb the curl. The hair is quite hot, so if you're not used to the heat of her hair, then you could always put a heat glove on. Sometimes it can be tricky. You'Ve got a heat blood on to feel the heat. You know to kind of feel the texture of the hair through, but you don't get any burns. So that's works better for you, so we're coming slightly. I do want them all going up in a row like these ones here, but this is slightly off-center but, as I say, I'm working from the side here so that you can see what I'm doing so, hopefully it'll be a nice style. At the end of the day, but the most important thing is that you'll get the gist of it. But main thing is: is that you see exactly what I'm doing as I save you're, not sure I can miss of our style and hair lotion? First, just comb that through yep you can thank you hi Michelle. You can do this with heated rollers. We'Ve got a tutorial where i'm showing you how to do different, curls with and heated rollers, so you can get waves and you can get the corkscrew curls or just a soft natural color, and this would be the reverse wind with a twist technique. But you could definitely you wouldn't you'd need to do different sections, keep them all very precise and in line, but you can definitely do it with heated rollers. Sometimes I find with heated rollers, especially if I was working on Sophie's hair, because I, how is naturally straight, but I would need to use a small rollers all over, because otherwise you don't get a deep enough wave. So fabulous you used to do heated, rollers away. You could get, but they come with all different sizes, but you can fill up the kind of heating unit with all small rollers, because you could buy individual rows. You could kind of a bag of well extra rollers, so you could get, and I used to have lots of roller sets with my teaching course as well. So I could have it fill up the whole unit with small rollers. Then I could do the whole head with the rollers and then we get a beautiful wave on the whole head, but I wouldn't use heated rollers if you're going to use the medium ones or the large, because you won't get a deep enough way just one second, I sort this out just minutes. Let me move these tongues off here, so I'm like any other heat nuts out. Okay, so got our it's just smooth down the top of the hair here, just a minute I just saw got bit of product on the tongs there. Take that off, okay, guys, one second so got our products on there. The hair isn't wet with the product. We'Re going to do our first wine with your twist just a touch long. I want it to be a little bit damp with the product, not wet, because we don't want the hair to go crisply, but I do want it to be just a little bit damp with the product when the tongs go on. There make sure there are no tangles in the hair smooth and then we're going to do our reverse find with a twist I'm not starting too high up here, because it's going to be quite flat at the top. We don't need a lot of height with this star, so there's our hair flat and twist nice tight, sharp twists in the hair. So you should, when you're, creating the star got a nice sharp twist at the top and then the hairs, nice and flat at the bottom of the tongue. That'S it and then you're going to come out a little bit with you tall so that when you roll the tongue back up, you can just catch the ends of the hair, just underneath the heat there. I just turn you around, underneath the hair at the top. So it gets a little bit the heat and it catches the end. So we get a nice curve at the bottom of the hair. So when I did this style for Sophie for her wedding, we think it probably took us about about 45 minutes 50 minutes. Think, from start to finish, so it's quite a quick style if you're working with somebody, Sophie's hair, likes restraint if you're working with some in his head and they've got natural curls, maybe or a very strong, thick kind of coarseness to the hair and their hair holds Really, well, then, you might not need to you, might just be able to create each wave and just let it settle and stylish wave as you go along, but because Sophie's hair has a tendency likes to be straight, I'm pinning it in so it helps to cool Down in the shape of the wave there and then when we take it out, it'll hold a lot better. So all these things are kind of flexible depending on your clients, hair, so don't hold it on too long. You want to keep an eye on there and that heat starts to come through loosen the tongue. So you're going to lift up the clamp to loosen the tongue and gently. Take that off, holding it together as well as much as you can, because it's hard to get that twist back in there. So you don't want to let that unravel and then try and retwist it. You need to get that twist and the straight kind of flicks of the hair in exactly the same position. So that's not easy! So try your best! That'S it! I'M going to leave that there. I think we've kind of moved slightly over to one side I'm standing over here. Let me just put my straightness in I like not so put them in turn them on so go add a little bits here at the side, but I think what we might start doing is normally. I believe that maybe ten minutes or so because I'd like to get this, I would like to let this cool down a little bit more. So just in case you've just joined us. This is the style that we're doing this evening. So it's this beautiful kind of soft vintage wave style that we're doing tonight on my beautiful model Sophie. This was solely on her wedding day. This is a style that she had for her evening party. So what we've done so far in practiced in case you've just joined us? We'Ve done a reverse wind with a twist on each of these sections, taking the whole section from one side to the other, all the way up to the top and I've just kept these side sections out now, let's take these colors out and see what we've got. I'Ve got a little bit of going to turn these off. Now you don't need those, so I have a little bit of cold cream here. This is just secret agent, frizzy secret agents. I might use a little bit of that, but I'm probably more likely to use my at the L'Oreal infinium strong hold hairspray. So let's have a look. What we've got I'm fingers crossed we're going to get love laughs first way. No, don't worry if, when you take the first one out, it kind of looks a little bit more. Like a curl, I find that with this technique, the more hair you have, the better the waves look. So if your lady's got particularly fine hair - and you think - oh my goodness, it's more of a curl than a wave then just persevere and keep taking more hair out. Sir, let's just put a little bit of spray on here. Just now, we've got this wave and wants it to stay in. You can even push it up a little bit with your hand, just to help get that lovely a bit of depth there to the style, and you can see what I did when I took this out. Come up hold my finger through it. We don't want beachy waves, so I'm not kind of combing. My fingers through I haven't combed it through or brushed it I'm just when I take this curl out what you want to do. It'S got a twist in it. So what we need to do is take that twist out easy peasy and if your lady has to say, if your lady's got naturally curly hair you'll find it work even better, it will hold even better if your lady's got, though fine hair, then you need a Good strong haircut get my words out properly need a good, strong, hold hairspray to help it stay in place, so the one I've got here is the L'Oreal Infineon, and I think this is there yet extra strong hairspray. This is a really good, finishing spray. I wouldn't necessarily recommend you start styling with this, so this is going on your back a little bit surf it because it can make the hair a little bit sticky and if you're not sure what you know. If this was a trial - and you won't, she wasn't sure she definitely wanted this sub, and I probably use that hairspray because it makes it hard then to create to change the hair into a different look. So there's the twist and need to pull that out. That'S better here we go that way. It'S a little bit flyaway, pull that hair push it back in to itself this one, I think could be might have to nudge it into position into those waves. Just a little bit. It'S a bit flyaway with your comb. That'S better now you can see here. I can tell you what's gone wrong here, you can see here how the hair wasn't, even when I put it on the tongue, there's a little bit of a mark here on the hair. So I've been really careful. I think there maybe I was trying to cut corners a little bit and I trusted I didn't either didn't put any look at enough products on, or perhaps I did it just. It was a bit it wasn't quite combed through when I twisted it. So it's not quite sitting evenly, but that's okay! You can cheat it another question. Yes, hi Deborah now Deborah sent us some amazing style, she's doing our online course and and she's doing her exam work at the moment and she sent us some fabulous braids. I believe, I'm pretty sure yeah gorgeous work. So yes, hi, Deborah yeah take the curls out. First, you could either go through. You could either blow drying to smooth it out, go over with the straightness all with the tongs just to take the curl out and then we go, but yeah you'll find it will curl, because it's got a natural curl. It will want to go back to that shape, so, yes, I would take the natural curl out first, ah, that's better, sometimes you're, just gon na find where the hair wants to lie. I think this is getting better. That'S it! Yes, so straight take the kinks. If you had some of the hair like mine or maybe less color than this, but certainly definitely with mine, you'd need to take the curl out and the blow-dry would be good and then you could go over it just with the tongs. If you want to you know - and I did that first a little bit when I kind of went over the hair to smooth you can do that you've got any flyaway bits with a little bit of your style and care lotion. So now, let's do next one! This is a nice glossy one. Let'S have a look. Ah, look at that. One lovely fabulous go through with your fingers a little bit smooth it get everything in position you might want to use your tongs to just finish it off make sure on lies in place. That'S it. That'S spread out a little bit, so I don't know now, if you find you've got quite a lot of flyaway bits of hair and that's where you said the ends, especially you might find this. If you are working with something, that's got natural curls is, then, might you might find when you get to the ends of the hair when you get to the exo, when you get to the ends of the hair, you might find when you get to the ends Of the hair that that there are a little bit mm, you might get more split ends or broken bits of hair at the ends, because, usually when people have got natural curls, you can kind of cheat it a little bit and you cannot have your hair cut. That often so it quite often happens that the ends of the hair can look, beat once you've straightened. It you'll see that they're a bit uneven or they might be a little bit broken and that's why you need to come in with your curl cream on the ends, but we certainly don't need to do that with sofa tonight, because her ends are perfect. If you do find, you've got a little problem with split ends or they look a bit dry or brittle. Then a little bit of curl cream is always the will do the trick. If you, if it's quite - and you know you might be something quite strong l-3, if it's very recently everything quite bad conditions or you could even use a pomade, especially if it got roasted, I would never use a pomade on on Sophie's hair because it will just Make the hair look greasy, but if they've got a thick hair or curls like mine, a little bit on the ends can just helped us new the way those flyaway bit. So, let's pull out that 1/2 lovely pull out the twist in the hair, and you can see now those colours look lovely yeah, because we want this for this particular style. We want it. I didn't whole started with the hat when I was working on the crown section here for this particular style. Let me see if I've got the picture so simply didn't want too much height here, want it quite smooth and sweet on the crown, and we don't want a lot of height if I'd wanted height here, then probably what I would have done it would have held The tongs close to the scalps instead of starting here, I would have been up here with the tongs making sure you know. I was close to the scalp here and I probably would have pushed the hair forced we've got a little bit of root, lift as well before I curled for her. So really it's just because I don't want a lot of root, lift on the hair. I want it to be quite smooth and sleek and then down into the wave further down so yeah, it's just so it was sofas, personal preference, but she wanted her hair. She didn't want to off the tie and a lot of volume, smooth and sleek glossing gorgeous and kind of vintage with a nod to well. It was 2019 when she got my, but I would say, with a nod to 2020 mm-hmm: that's it lovely! So if you find your lady's hair is dropping a little bit or you just not happening, you feel like you'd like it, the wave is a little bit deeper. You can always get some of your section clips and you can go along each one of these little sections nudge, the hair up a little bit push that in and just to hold the hair in place. Let me see if I've got enough of these long. Section. Click the long section clips are better. I don't really need to do this with Sophie, but I mean I could I don't got any more long ones in my little box here, but you could do it if you've only got the shorter ones. You could still do that and just lift up clip that thing doesn't work so well at this bottom. One you'd almost need to push it up. I think and clip it high. Maybe the long ones would be better here have a look. If I was going to do this here, you take this out. You need to have enough longer clips and you need to push that up and kind of hump in it in a little bit, maybe catching it at the back of the other one. If you can't, let's see catch so almost pinning it up a little bit. So you can let it set there and then take the pins out carefully, though, because you don't separate the hair. So if you feel you're not getting quite enough, you know the depth of the wave. Isn'T quite enough, then, just go through with your section pins and just pin those waves in place, especially if the hair is quite heavy. So if it has quite fine, so we don't have a problem with thee. So we haven't got a problem with the waves holding. So now at the front and when we when I did Sophie's hair for the wedding, we actually wave these included some of these front sections and wave these front sections. And we were thinking about doing a bit of a finger wave here. But actually, I think finger waves when it, if you're doing a finger over at the front, you need to really have kind of it didn't suit your face shape. Did it Sophie when we did it so we decided it kind of just looks authentic, but it looked old. I think. Do you know what I mean it didn't look right, did it so we needed yeah. It definitely wasn't for Sophie. So we decided we'd have a completely different change of. We changed the plan and I used the curl. So I'm just going to put a bit of this style and care lotion on the hair before I use the straightness because it acts as a smoother and it helps colder her curls to hold, but it also works as a heat protector on the hair. Sorry, let me just move these, so I'm just going to curl these sections here, just a little bit, I'm gon na curl, the hair back just a little gentle kernels here - might just go a little bit more at the top, because we're going to use these curls As our they want mass, better warm up the hair a little bit at the top, that's better! So you want to get we're going to use these curls to create a little side. Sections here, lovely, so we're not doing a wave at the front. If you do want to do waves at the front, you'll need to do your the same curl technique that we did at the back, with the reverse one little twist and whoops. So just a little bit of heat protector, oh yeah! That'S it so use your technique that we did at the back. If you want to get the waves at the fun and we do have, we've got our video tutorial on creating finger wave, so you could have a look at that for the. If you want to wave the front sections of the hair, but we're not going to do that today, you're going to give it kind of a bit of a modern twist, that's better! So it's just curl the hair here. Maybe we could have had a little bit more of the hair, I'm standing in a kind of odd position here to straighten my hair, but hopefully you can see what I'm doing and hope it'll be going in the right direction. I'M curling this the hair away from the face: that's better okay, so what we're going to do is sew so from their toe. I always try and work with that mirror. So I've got a mirror here, just off camera little bit of spray here, just to hold that in place, and I'm just going to check in the mirror just to make sure see how we want the hair at the front. I don't think I want it too. Tight back just softly back and I've used her review Sophie's natural parts here, so I'm just going to smooth out the hair. I actually want to use just my regular L net so this bit because I don't like to be too on side get a bit of movement in the hair and I'm going to curl that bit back and then we're going to curl back. So what I'm going to turn you that way, a little bit salty and let's just twist the hair yeah, I think I go bobby pin at the back here, so you can be kind of. You might try different ideas at the front here, depending on what suits your client, let's just check again whether we want this bit back. Is that too wide there? I think that's a little bit wide the thing about this. If you don't work with a mirror, it can look great aside or at the back, but when you see it from the front it can, it might just be sticking out just a little bit. So I always find working with a mirror, makes your life so much easier that better. So I'm working with the curls here with the shape of the curl, so you can create lots of styles using straight hair, but I just find especially if you have just started you just learning how to style hair. I always just find it so much better if you've got a curl in the hair fast, because the hair kind of tells you where it wants to go and it makes your job much easier. So I'm going to get another bobby pin here, take the hair over just following the line of the curl here. Take my bowl over and pop back. We know somebody might want some braids here. You never know it's not. You know, I know it's a vintage style, but we're doing a vintage style with a nod to the 2020, so it doesn't have to be. You know if somebody wants to bring a braid or twist into the hair or they want the hairs. I say with a finger wave at the front: you can be creative and have a little play around link-up at that one. Let'S just check the front before we make a decision on this one. I think, maybe I think maybe what I might do with this one is just spray a little bit smoother and let's just not just push it through here, a feeling. I think it might go nicely if I pull it through that little space there, let's just check and I'm gon na grip, that up in place looked at that that's better, so a little sweeping wave here. Another question doing this kind of wave. So if you're doing this kind of wave - and you find the curls are dropping when you're creating the cult, definitely use some setting lotion and you'll find that will really help and if the hair is too soft when you're, when you're starting the styling process. So i texturize the hair first with a little bit of mousse and maybe even some texturising spray or salt spray, and then it does tend to make the hair quite matte, but you'll find that your style and care lotion will then help to bring the shine back. In the hair and when they wash the hair is critical. So if they got very soft silky hair, that's heavy, then I would recommend that they wash the hair either the day before or that they don't if they need to wash their hair on the day, which is absolutely fine, but they don't use any conditioner. So the hair is going to be a bit dry and a bit probably a bit brittle. If they've got color in the hair they could maybe use, they could use a little bit of light condition at the Midlands and the ends, preferably just at the ends. If they feel they really need to, but you'll find if you're working with dry hair, the hair might be quite dry at this stage. It actually holds a lot better. So if they've got very soft, silky hair, that's great if you're doing a regular blow-dry or if they want to have the hair down, but if they want the hair up and they want like the code will stay, you want to start off with hair. That'S a bit out of condition, so you don't usually advise my brides that have hair like that, not to use any deep heat treatments the week before the wedding and then then that day before the wedding - or you know, rich conditioners and the day before the wedding. Not to use any conditioner, we can always make their hair shine, but if it's super soft and silky, it's really hard to get the curls to hold. So they don't need to worry about the hair shining. We all get the hair to shine, but if they want the curl to hold, then they're better to not use any conditioner. So I'm just using a bobby pin across the back of that middle section. There then I'm going to just get rid of that in a minute, because I don't really want that to do anything. These end bits of the hair they're a bit small to make a twist with. I think it ends up looking a bit wisping and horrible. So we're going to get rid of it in a minute. Those little fine bits little bit of texturizing dust so when they wash the herd, the cows not whole think about when they're gon na when they wash the hair, definitely ask them not to use straightness before you and before you were ready to curl the hair cuz. Sometimes that can just take all the life out of the hair, so we don't want any straightness on the hair. It should be a little bit dry and not too soft and silky. Before you begin, then you use a little bit of your and use a little bit of the styling coalition to smooth if they've got flyaways or any little bits that aren't sorry bending down here, just get my straightness. If they've got any little flyaway bits, you can use your straightness sorry you're, styling care lotion, just smooth out the hair, I'm just combing the hair. Oh just turn around a little bit. That'S it! You can see what I'm doing warming up the hair first and then so we don't get that kink in the hair when we create our first curl. If you warm it up, first you'll find that it kind of the straightness work a lot better. So that's it! Um see what, if I saying so, yeah how they wash the hair, what products they've gotten first of all, then you're gon na, if they do have flyways, because it's a little bit dry or out of condition, use your styling care lotion and then use a little Bit of setting lotion before you curl the hair, normally, what I would do is as well when I was doing the trial, try different curls and see what works best for that person. You know you could use your tongs. You could try the straightness and see which curl works best which holds whoa. She could use the vintage Tong technique. That seems, they're really good one to help that curls to hold and once you've curled the hair, remember to pin the curls in place and let them cool down. Let'S just check the front again, so I've curled our other side we're almost there. Now. I think you know do we want this? I don't want it to be, even I think, a little bit of if that still might be sticking out a bit too much there. So it'd look great from the side, but not too good from the back something that would be better like that thing to you. It'S all these little bits when it comes to styling the hair. It'S not about getting the kind of it's not about recreating the exact style that people show you in a you know. On Instagram, we need to create a style that that suits our clients, face shapes so and this needs coming in and if you have the mirror, then you can adapt the style as you go along. That'S gon na be a bit better. I think better and it's the little things it's not kind of it's, not necessarily overall style. It'S these little tiny bits that make for the perfect wedding or party hairstyle, so don't be in a rush when it comes to these finishing touches, want to make sure that everything is right, I'm if this is just a little bit, I think maybe what I would Normally do is I'd actually pulled that out and do it again because I'm not happy with the way that looks there, but I'm not going to do that because we'll be here all night, but definitely if you weren't happy with exactly with the way it's sitting yeah. If you're doesn't correct, you couldn't make a proper try popping a grip in it, but sometimes I find, rather than putting loads of grips in sometimes you're better to just take that section out and re secure it. But you know what Sophie's not getting married today and it's gon na look gorgeous from the back. That'S it so I just repositioned these curls in here. What we did on the wedding day we didn't do we didn't do a I don't. We'Ve got pictures on think online. I think we've got a little video, I think as well, if the style that that I took we didn't have the curls on both sides. We'Ve almost brought this bit back almost like it was a little headband straight. So it's kind of gave it a little kind of flapper touch with a little headband, but I think today it might look nice with there's another little curl in there yeah I'm going to do a little car. Do you rock you know i would. I would say when you're curling, your own hair and you're trying to do this, it might sound kind of counterintuitive. It'S the same, if you're trying to blow-dry your own hair at the front. Sometimes, if you don't look in the mirror and you kind of do it by field, you can come and look in the mode where you are styling, but if you just try doing it, not in them. To finish your finish and such as you can look in the mode, but try doing it not looking in the mirror. Sometimes it's because everything is kind of back to front and it's sometimes it's just easy. It'S a bit like braiding, your own hair. If you're going to braid your own hair, I would definitely recommend doing it. I feel not by looking in the mirror. You can practice, maybe on your practice, head first of all or maybe on your little sister or a friend, but try doing the braids. I tried curling your hair away from the mirror and you'll find it's actually so much easier. I know it sounds counterintuitive, but I think sometimes, when you're looking in the mirror, you're kind of trying you're doing everything backwards anyway, and it's kind of for your head can get a little bit kind of it can be a bit confusing. So try doing that and I think you might find it easier and also the other thing when you're doing your own hair is don't aim for symmetry. So I'd go for a side parting, so you don't have to get it exactly the same on each side and that will make things so much easier for you. So hopefully that helped so don't aim for symmetry and don't look in the mirror when you're just doing those many creating those curls. You need to look in the mode where you're checking that you know that you like it, but I think you'll find it's easy to do if you're not looking in the mirror. Okay, that we're almost there just want to get the rid of these n bits because you'd see they look a bit kind of stringy. We don't want that, so I'm going to get rid of these bits. So why don't you notice? What I'm doing is I'm not worrying about these n bits here. I want to get this cowl in position. First, using my bobby my thumb so flat against the hair sliding the bobby pin underneath my thumb. It'S my thumb is flats holding the hair in place and once I'm happy with that, curl then I'll come back to this one and get this in place rather than kind of trying to work with a hole. All these are Flyway bits, but a little bit shorter at the ends here, as well as holding the curl in place. You might find it easy to just do a little one curve at a time we're almost there guys. Yes, it's really strange that actually it's like, but definitely braiding and when we teach our blow-drying courses if people learning how to blow dry their own hair. Then, when it comes the front section, just if you're trying to learn how to hold the blow dryer and how to you know, which type makes you should sure you're going in the right direction, it's so hard if you're doing it in the Marisa. Take yourself away from the mirror and try just gon na get rid of this end. Here, it's a little bit of a gap there that I don't like on the back and nudge that over yeah that's a bit better. I think what almost uh it's one little bit that I don't like, but let's come back in a minute so now to secure this, I'm using some little oh well. I was using that so I've got some more here. A little tiny, little mini bobby, pin so I'll show you next to the figure at full size bonds. So I'm just using don't know if you can see and we see that there Robbie can't see it. Can we we've got a tiny one and the big one? Can you kind of see so these little fine ends of the hair? These little tiny bobby pins are great. It'S just nudge that up into position hold that that's the one I was looking for. So I'm going to get the bobby pin on the end of that hair twist it in and grip that into the scalp great I'm not going to happy with that. I think I need to spend a whole lot longer on that section. I think, but I think for tonight's webinar, that will be good, but I don't like this little bit of hair. You see that there. That seems to be doing its own thing. So I'm like to see if I can move it and get it to sit it's it's kind of a little bit. That'S lighter than everything else you might want to go back. That'S a bit better! Well, reposition, any odd strands. Sometimes what I do here is. I will take a picture, have a look on the phone because you'll be surprised how much any of the odd bits that are sticking out like this bit. I don't like here I can would come back and maybe just recall that little bit just care a bit round. But if you look, if you take a picture on your phone, you'll find that actually it kind of gives you a the ability to set that. But having the lower is great, because I've got the ability that can step back and see it from different angles and taking a picture again gives you another angle. So, finally, we have our little and hair piece here, Sophie's little piece from her wedding day. So you could either use the end of your tail comb or you could use just one of your strong hair pins and you want to slide this behind. If something has something on a comb, we do have videos available online way. It shows you how to put things like veils in and hair combs, so you don't want to push it in because we don't want to spoil the style. If you've got high equal, we don't want to call the height down. So what you need to do is you can either use your tail comb or you could use a strong pin like this one and I'm just going to pop it in position and using my tip of the pin, I'm going to push that so make sure it Goes behind, that's better make sure it goes behind the little pins that are already there, but you know it because I'm not at the back. This was not that wasn't central. I need to move it, make sure you standing in the right position. I think that's about right, yeah, that's better and actually smooth in a bit better there, it's difficult, because I'm not actually that's better. You need to stand at the back, don't stand where I'm standing when you're doing your Styles on your clients make sure at the back. So you can see everything then just get a nice strong, bobby, pin and go over the side of the comb. That'S it to make sure it's nice and secure and that's our fabulous quite a quick style, soft waves. That'S it got lots of spray and we got our pretty little hair accessory in there and I can show it from the side there. So it's sweeping down this could be a little bit smoother. I think I could have worked harder on that bit there. Let'S move it, I'm always self, I'm always very critical. Don'T you know you look at it sometimes you've taken. You might find this when you're learning that you'll do a style and you think, oh, it's not very good. I don't like it. Then a book take a picture step back, look at it from a different angle, and actually it is a lovely style, so don't be too hard on yourself we're all very critical. I think - and we all think maybe we could do that bit better, but usually I think this is where the child comes in. So if you've got if you've got a bride, definitely recommend that they have a hair trial. So you can try different ideas, see what curling techniques work for that person's hair see what products work best work out when they need to wash their hair. So you know that the curls are going to hold and just make a note if you find she's got a little bit flyaway or kind of fluffiness at the top right anywhere. You'D make a note on your little wedding planner, but our hair have a tendency to be a bit flyaway, so you can be extra careful, so any little bits that you weren't happy with. You know that on a wedding day, it's going to be perfect. So that's our beautiful style today for Sophie. Thank you for being a fabulous model Sophie today and guys. I hope you've enjoyed the tutorial. If you have any questions, just let me know, and I look forward to joining you next time - we'll have another live tutorial next month. If you have any style requests, please send them in and I'll be able to pick a style and we'll recreate it live online. So if you joining us on YouTube, don't forget to Like and subscribe and don't forget to hit that notification bell. So you know when our next live tutorial is going to be thanks, guys take care, bye,


Comments
Tarryn Gee: Hi there, can you provide a link to where you purchase the tiny Bobby pins? Thank you x
Dina kreh: Thank you so much great videos really help and enjoy
Maria Dolores Lopez: Good morning, all right, I wish I wanted a happy 2020 year for all of you in the salon, I wonder if you could make a complete video with kids girl hair washing and finishing with a dryer, showing you the products, I hope you like the idea , great year for you.
Dina kreh: What spray is the black with gold lid? Strong?