Diy Christmas Hair Bow | Last Minute Christmas Diys | Diy Santa Bow | Diy Elf Bow
Hello! Welcome to another DIY video. Sorry I have been mia, I’ve had some personal things going on. Here is one last minute DIY. If you have girls and you like making hair bows, I’m sure this would look great on your little ones. Have a safe and amazing Christmas!
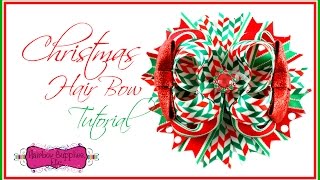
Hello and welcome to my creative space. Thank you so much for being here today welcome to another diy video in today's video i have two diy christmas hair bows. I hope you're excited to see how i created these. So let's get started here are some of the items i'm going to be using and i am going to start with this red ribbon and i'm going to take it and figure out how big i want this ribbon. I'M sorry this bow to be, and then once i figure that out, i am going to trim it and then once i have that i am going to take that piece fold it in half and where i created the crease. I am going to fold my ribbon or i guess crisscross it and then once i have it crisscross, i am going to um, adjust it to make sure that it's going to be looking good and the both sides are going to be even once i have that Figure out, i am going to take some needle and thread and i am going to be doing a running stitch and then i am just going to be doing that until i make it to the other end. Once i make it to the other end, i am going to pull the thread and cinch the middle very well, and i am going to wrap around the thread a few times and then i'm going to create a knot in the middle once i have that figure Out, i am going to trim the edges a little bit more because i felt like they were a little bit too long. Now that i have that going, i'm going to take this black glittery ribbon and i'm going to be creating some shoes and i am going to be cutting two pieces off and then basically just turning around my bow measuring how big, where exactly i need to be Cutting and then creating the shoe - and i'm just going to be using a pencil for that now that it's traced, i'm taking my scissors and i'm going to start trimming and shaping this shoe and, as you will see, i also created the bottom part. I guess the sole of it, and that is one shoe and i'm just going to be taking my scissors and my other piece of ribbon and just basically cutting using that as a stencil and cutting that off as well. Once i have those ready, i am going to glue those in place with some hot glue and that part will be done, and this is what the little shoes turned out and i think they turn out so cute right now, i'm gon na take an extra piece Of the black ribbon, and that is going to go in the middle to cover up where i cinch the bow and i'm gon na, take one of these alligator clips and glue that in place first and then, once i have that glued down, i'm gon na take The bottom piece - and i am going to glue that in between the clip or um - i guess yeah, i guess in between the clip and then i'm going to take the other end and glue that down, so that is complete and secure. Now i'm gon na take this piece of card towel that i've used on one of my past projects, and i am going to be using that to create the furry part on the boot and i'm gon na trim a um strip off of it. And then i am going to measure that into place got that into size and then i'm going to be taking some hot glue and gluing those down as well, and i think they look adorable and now i'm gon na take this gold ribbon and i'm going to Cut a little rectangle and then cut the middle of that rectangle to create the little belt and i'm going to be using hot glue to glue that in place. And it's as simple as that and here is the end result. And i love how this cute santa ball turned out for the elf bow. I'M going to take this green ribbon that i had, and i don't think you can tell, but it has a little bit of silver hints to it, and i really like it. So i am going to start by taking my ribbon and folding it um three times. I believe like giving like three loops on that and once i have those loops figured out and how big i want this belt to be. I am going to trim my ribbon and i am going to take that and fold that in half and then where i created the uh crease on it. I am going to be doing running stitch on this as well until i make it to the other end. Once i make it to the other end, i'm going to pull my needle and thread and i'm going to cinch it very well in the middle, and i am going to be wrapping around the thread a few times and then securing it with a knot. Now that that is completed, i'm trimming the ends of this little bow and burning the edges just to make sure they don't come on rubble or whatever, and then i'm gon na take this other green ribbon. That has polka dots as well, and those are going to be the legs of my little elf and i am also burning the edges of those as well. Once i have those ready, i am going to move on to use this black greenish ribbon that i had. It'S glittery super pretty it's kind of thick. So that's. Why um it's kind of hard to work with this, but i really like it. So i'm going to be creating a super, simple bowl. I made these type of types of bows before so i'm just gon na. Let you watch now, i'm going to be taking this red glittery ribbon that i use for my past bow and i'm going to create some elf shoes and i'm going to use the same technique where i just use my pencil to trace these shoes and then once They are traced on this ribbon. I am going to cut them, and these are really simple shoes. I think they turn out super cute and, as you can see, i just traced it with the pencil and now i'm going in with my scissors and once i have that cut down, i'm going to be using the same shoe to trace it and create the second Shoe now that i have both of my shoes it's time to glue them in place and i'm going to be using some hot glue for that. It'S time to put all my pieces together for this elf bow and i am going to take a piece of this red ribbon and cut a strip off, and i'm going to glue down my black bow into place. First, as you will see now, i am taking some hot glue gluing, that onto the green bow. Once i have that down. I took my red strip and also my alligator clip and i'm going to glue that first before i glue anything else and then once i glue that down, i glue one side down off the red strip. I hope you're able to see i'm sorry if you're not but um once i had that down don't glue the second piece yet because i made the mistake here so i had to um take that apart again, my little elf legs were a little too long. So i had to trim them again and before i glue anything down um, i am going to be gluing those legs together. First, as you will see, i'm adding some hot glue gluing those down and then taking that piece off again, because i messed up adding some hot glue in between the clip gluing my little legs down once those were down. I am going to glue down the top red piece of ribbon, as you will see, and then clip that and then clip that in place, and that completes this. I love how both of these bows turned out. Please let me know in the comments down below which one was your favorite bow. I want to wish you a happy and merry christmas. I hope you have a great time with your family, don't forget to hug them and tell them how much you love them. Thank you so so much for subscribing to my creative squad. I am so close to getting to a thousand subscribers. So thank you. Thank you so much. I hope you have an amazing and safe christmas and i will see you on my next diy. Bye,
Comments
Cathy Wood: Those bows are so cute! Merry Christmas.
Kathy Snawder: I loved the bows!
Joan Friant: They are stinking cute!