Installing A Synthetic Wig | Azalyn Style Wig By Outre
Outre did it again! Meet Azalyn. What do you think?
Amazon: https://www.amazon.com/gp/product/B095...
Sam's Beauty: https://www.samsbeauty.com/service/Out...
C O N N E C T W I T H M E:
Instagram: https://www.instagram.com/crownmetaci/...
Snapchat: phatphace513
Facebook: https://www.facebook.com/crownmetaci
Twitter: https://twitter.com/CrownMeTaci
Tumblr: https://crownmetaci.tumblr.com/
B U S I N E S S:
For business inquiries please contact [email protected]
#outrehair #syntheticwig #affordablewigs
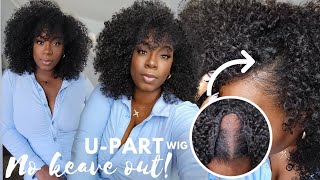
I don't know: what's ruining my life more right now, my eczema are these damn cicadas and they are so loud they're so loud like what could you possibly be talk? Well, they haven't seen each other in 17 years. I'Ma cut them some slack, but they ain't got to be that loud hi, i'm tossy in my natural habitat and welcome back to my channel if you're a returning subscriber welcome home and if you're a new subscriber make yourself at home by clicking that subscribe button. It'S been a while, since i've done a wig review huh, it's been a long little minute, but i am back with another wig review and this time i'm going to show you guys how i prep my wigs. On top of that, yes, honey, we are going to lay and slay a synthetic wig. We'Re not just gon na put it on. I'M gon na show you everything. I meant to do that when i had my red bob but, like i said in that video deleted all the footage on accident and i had to redo the whole entire video all over again. I was so mad about that, but now we have a chance. So not only is this gon na be a wig review, but it's mainly gon na, be me showing you guys how i prep and take care of these wigs so that they look the way that they be looking okay. So if you're interested stay tuned for this video and yes, i will be putting the link down below for the wig. If you like it, i am not gon na lie to you. I do not know how to pronounce this name, but i'm going to try because i hate it when people do it to me, i want to say it's called asylum asylum azalean. I don't know, i don't know what it's called, but this is the style asylum and, of course the company is outer. You guys should be familiar with outer. If you're subscribed to my channel. You know i love them. You know i do but plot twist, if you've been subscribed to my channel. You also know the majority of the wigs that i wear and purchase are from sam's beauty. This actually is not from sam's beauty. I know right. This is a first. It is not from sam's beauty, because, even though it is available on sam's beauty, they only have a certain limited amount of colors, because let me tell you, people were buying this up. Okay, they only had like blonde and stuff like that, and you guys know like i'm, not a big color person, i'm going to get into color sometime soon, but right now i just want to keep it simple. I just like you know natural, solid colors, and today i got this in a 1b. I forget what all colors it comes in. Actually, there should be a paper in here somewhere, so it comes in this color called chocolate frost, this honey golden melt, dr sienna, copper, which is like i want to say, that's probably similar to the red wig that i had that's probably like the similar color. I believe they have one called black cherry, and this looks kind of cute, but it looks like it only has a streak of like a very light red honey brown, cinnamon spice and wheat. Blonde wheat blonde was the one that was on sam's beauty. That was the only one left and they also have one 1b, 2 and 613, so they have a lot of options. They have a lot of colors, but for me personally, i'm just going to stick with my little ones and one b's now. Let'S just take this out the package officially and see what it's working with so i have to say as far as the crimps go, it is really really cute really really nice. You can't really see it on camera, but it does have a few flyaways we're gon na fix that don't worry i will say, though, off rip. I can tell going to have to do something to this closure, because this definitely is very very closed, and on top of that, it is not given scalp honey. It is not given scalp at all like. This is the back of my hand. It still looks very, very pale, very, very white, but that's why you clicked on this video, i'm going to teach you guys how to fix this. So let me give you guys a list of everything that you're going to need in order to fix it. The way that i fix my wigs because everybody's style is different, but this is just how i've learned how to do it. This is something that has just been working for me for a while. So you know take heed, take heed. It might work for some. It might not so the things you're going to need number one is tweezers scissors setting powder concealer that somewhat matches your skin tone, but probably is like one or two shades lighter. If you have it hot comb, if you don't have it a blow dryer and a flat iron works perfectly fine, a brush, obviously edge control and mousse. And of course, you'll need, like you know, a wig cap and some wig glue. But those are all the products that you should need so now that we got all of our products. Let'S fix this closure honey now notice how i never said that a mannequin head was mandatory because, honestly, you do not need a mannequin head to do it. You should be able to thug it out and use your own head, but for me it is easier for me to have a mannequin head, because then i really really really get to see what i'm doing so before i start plucking. I make sure that i pull the hair back like majority of the hair back into a ponytail, because what we're focusing on is the closure piece and the closure piece only when it comes to dealing with synthetic hair, synthetic hair can be easily tangled. So it's very very important to not manipulate it as much as possible when it comes to plucking on a synthetic wig. It'S going to be vastly different from how you would do human hair. If you just pluck like how you would do a normal human hair wig. The way that the hairs are going to go because they are synthetic fibers and not human hair. What it's going to do is the friction between the tweezers and the follicle of hair. It'S going to make that follicle of hair just curl up really really tight. So you don't want to do that. What you want to do is not necessarily section it off, but you want to take pieces of, like the closure, very, very close to where the parting is supposed to be you're gon na hold it with one hand and you're gon na pull it like you're gon Na kind of wrap it around your hair and pull it really really hard and then you're gon na go in with the tweezers, and the tweezers are basically going to cut the hair away. So that's what you want to do, instead of just plucking like you, would do a normal wig grab it as tight as possible and just use the tweezers to pull and kind of nick the hair out of place. The other reason why it's really important to do this type of technique when plucking two is because, due to the fact that it is very cheap lace, it's very easy for this lace to tear get holes in it. I mean any lace will really do that, but given this is very, very cheap, it's not meant to be plugged. So that is another reason why my technique is very very important because it focuses on one area if you just start plucking and plucking and plucking, and you pluck too hard you'll start to create a few holes. Also, keep in mind that, even as you do this technique, it might be a few times where you make a few holes in the lace, but that should be okay, because they should be small if they're, not small, that's a problem, but the holes should be very. Very small, and once we put our wig cap on and do more adjustments to this wig in general, those holes will be non-existent, like you literally will not be able to see them so stay tuned for that. But if you want to decrease the likelihood of having huge gaping holes in your lace, this is the best method that i found me so now that we're done plucking or should i say, pulling the hair out, you can see the difference in the parting now the Parting still kind of looks a little weird just because, obviously this is cheap lace. This is not hd lace. This is not transparently, it is very, very cheap voice, so because of the cheap lace and because obviously the knots are not bleached, it still kind of looks crazy but, like i said, stay tuned, this will be together in a second. So the next thing you're going to want to do this once again, you don't need a mannequin head, but what i'm going to do is i'm going to turn this wig inside out place it on my mannequin head and on the lightest parts of the lace? Not the black part, not this part, only the lightest parts of the lace i'm going to take a very thick brush and some concealer, and i'm going to apply some of the concealer onto now, don't completely over saturate it with the product. Give it just a few dots: do some like really close to the hairline? You don't have to do the whole entire lace right here, because we're going to measure before we officially put it on so after you measure it on your head and cut it into place. All of that stuff will like fall in line eventually, like i said you don't need to put it all the way down, because you're, probably not going to use all of that lace like nobody's forehead. Is that big nobody's forehead? Is that big? But we are definitely going to put a little bit more on, like the perimeter and like closer to the hairline because, like i said we're trying to make it look, slayed we're trying to make it look natural because there might come a day where you don't feel. Like putting a wig cap on and like officially officially laying it, this is so when you throw it on as just the curl on wig it'll still look stashed. Now, if you are using a mannequin head um, this is going to dirty up your mannequin you're gon na have to clean it afterwards, but it's worth it now. I don't have a specific blending technique, but what i will say is make sure that it spreads. You want to spread that all over you want pigment to be all over. You want to make it as brown as possible and then, when you spread it you're going to want to do circular motions, because if you can see closely, you see how there's still like dots showing where i apply the concealer that will stay there. So you want to blend that out. If you feel like you need more concealer, it's okay to go back into it, but this should be enough for me personally now the next thing we're going to do we're going to take some setting powder and we're also going to apply it to all the lighter Parts and you're going to just tap it you're going to just tap it tap it tap it. This will help keep the concealer in place and because it is powder it makes it look a little bit more like skin tone. If that makes any sense, once again, you are going to need to wash your mannequin after this, because she is going to be very, very, very, very, very, very dirty and notice how, on the top part, there is some that is getting on the black part. That is perfectly fine, but try to keep it on the light part as much as possible and, as i said before, pay special attention to that hairline. Now we're not done yet the last step we're going to do is we are going to spray some gots to be glue on all of the parts that we just covered. This is going to prevent a lot of the concealer from transferring onto your skin. Like i said, there's going to be some days where you're probably just going to use it as a slap-on wig, you still want it to be together, don't you - and i know you don't want to take it off and then you see, you've got a whole bunch Of concealer just clumped on your hair right, that's why we use got7. Now you shouldn't need a whole lot. This should be good enough now, what we're going to do we're going to let this dry for a quick little second, and then we are going to start applying the wig. Now my stupid ass, just now, realizing that i didn't connect my microphone in the last clip. Wow, moving on with the video see i'm trying to get better with my equipment and, like things just keep happening like it, just keeps it keeps disrupting me, but moving on with the video now that our stuff is completely dry now we are going to start putting On our wig caps and i'm going to show you guys how i do it before we do that, though, see what i'm talking about see how we did that see the difference hold on. Let me flip my palm over. You see that you see that i know what i'm talking about. So the most important thing is to slick your edges or any other flyaway hairs on the perimeter of your hairline back, because you do not want to snatch your edges out. I already did that like off camera and listen. These are not perfect cornrows. I do not know how to braid to the scalp at all to save my life, but this was the best that i could do so just to make it easier. On myself, i usually get the wig caps that are already tinted. Did i just grab two of them? I did wow anyways. I usually get the wig caps that are already kind of tinted. Obviously this is way darker than my skin, but it helps with the pigment anyways. Now you can use a lighter cap or like a standardized cap. It really does not matter because i'm gon na add like powder to this anyways, but just a little tip. That'S what i do that's what i prefer. What i do is i apply the wig cap from the back and i just pull it around my whole entire face honestly, truly because i like for my wig caps to be like you know stuck to my head. I like for it to be very, very tight now once again what we are going to do. We are going to use some guts to be and we are going to spray the perimeter now like i said i pull it all the way down, because i want this to be like completely completely solid. Now this is going to drip some. This is going to drip a little bit, just be careful with it, so you could let it air dry, but if you want it to go quicker, definitely use a blow dryer. This is one of the reasons why i said get a blow dryer, i'm going to look really really stupid for a second, but this is the part where we cut the ear holes out. I like to cut the ear holes out first before i cut everything else, pull it all the way down. Just to make sure that i have everything, then you only want to take the smallest smallest section of the cap and just that's it. This is all you need and then you're going to pop your ear through pull it down a little bit more and repeat it on the other side. Now that we have our ear holes now we are going to cut around and directly straight. I can finally see properly all right now. The glue should be keeping the rest of the wig cap in place and on your head. If it is really truly completely dry, now i'm going to clip the bottom of the ears. This is also the reason why i like to do the ears first, because, if you can just like smoothly cut off the ear part that lets, you know that it's completely stuck because any holes in a wig cap will just take the wig completely off. If the spray is completely dry, your scissors will literally like stop working. So if you ever wanted to know if you were cutting too far back or too far forward, that is your answer see how this just gladly goes up under, and you see how it stops. I'M not even putting pressure on it. You see how it just completely stops where the spray is. That'S what that spray is supposed to do when it's completely dry, if it does not do that, you need to dry it a little bit more now. For me, i am going to move this a little further back because i just feel like this is too too far down on my forehead. I have kind of a kinda sorta abnormal hairline so, like i don't want it to be exactly on my hair. I don't want it to be that close, but at the same time i don't want it to be that far down. Do it like piece by piece? I'M going to add a little bit more spray right here up because you want to protect your hair as much as possible. I spray my ear hole. Okay, so you see these little white pieces, these little scrawny pieces that are still kind of like very, very visible. What we're going to do is we're going to take some more spray or you could use some lace glue and we're going to lay this down, make sure you have a rat tail comb or some type of something so that you can just press it down into Place, i'm going to show you guys exactly what i'm talking about i'm going to start off right here, since it's easier for you guys to see so you're going to do some more spray and you're going to spray right right there. So what you're going to do is you're going to take some type of tool, you're going to lay that right here and then you're going to put your blow dryer right there. So you can kind of see exactly what i'm talking about. You see how like now. It'S laying a little bit more flat as compared to this side. You see how you don't see that light part anymore. That'S what we want, so we're going to do this to every single aspect of our perimeter. We are going to lay this down completely okay, so the next thing that we're going to want to do, because i just realized that i just did this without recording it. You are going to want to put a whole bunch of setting powder on your wig cap. Literally just the beginning of it, but in this case, since it's going to be a side part wig, you also want to do some on the side, but you do not have to put it on your whole entire weight cap. Unless that's your prerogative, what i want you to do for this part pay special attention to your hairline, where the cap meets the rest of your skin, basically, the same technique that we used when we colored the lace on the wig. You want to be doing that now. You can officially see why i double glued down the wig. It makes it look a little bit more like your skin or, like your scalp. That'S what we want. The setting powder also helps with that. A lot too now, like i said before i know, there's people that usually use like setting powder or like concealer. That looks exactly exactly like their skin tone. I try not to do that because the reality of it is nobody's. Scalp is the same color as their skin. Your scalp will always be lighter or more pale because of your hair, especially how like thick your hair is that part of your body does not get that much sunlight, so you do not need it to be exactly your skin color. So now that we've done all of that, the next thing we're going to do. We are going to clean up because we always clean up our messes lightly lightly, clean up the very, very edge anything that you see is like completely out of place just clean that up a little bit, because you don't want you see how well i kind of Wiped it away, but you see how there's this crusty part right here. You don't want that to be visible. We want to clean that up, because that looks a mess now i recommend just using like either some some witch hazel or like some alcohol, noxzema pads or something like that, and just using that don't use water, because that will mess up all this progress that we Just did, and you do not want that at all, okay, so now that we've done all of that now we're going to get to the fun part and we are finally going to put on the wig okay, so fun thing to note: this wig does come with Adjustable bands - and it also comes with comb attachments, so keep that in mind. What i'm gon na do is i'm definitely gon na attach the comb attachment in the back. I might not apply the comb attachments in the front. I think i should be good with just lace glue, but we're gon na see right right now. Okay, i think i want mine to be like. I don't want it to be too far off to the side. I'M gon na do like right here, that's a good enough spot. I think i think i'm gon na do it right here. Yeah, that's cute! So now that we put it on you're gon na see exactly where your wig cap is another thing i should have added on the list. You might need some of these clips now. I know some people, they just slap it on their head and then they start cutting. But i like to do it section by section, because i want to make absolutely sure that everything is together and everything is covered up. So i'm gon na start over here, especially because that's like the money shot, that's the money maker, i'm gon na pull some of this hair back and clip it now, i'm gon na start cutting it, and i cut it very, very, very subtly i like to be Very very close when i lay my wigs by the way this week comes with baby hair, so be on the lookout. For that make sure you don't cut like any of the any of the baby hair. That'S going to play a part in the whole style of this wig as well. Okay! So that's good enough for me and now we're gon na move on to another section here, pulled back one more time, double checking to see if it covers good all right, we are doing great on to the other section. So since this part is gon na be down, i really don't need to make it as precise, but at the same time me just being me, yeah, i'm gon na want it to be like a little bit more together. I think we should be okay boom. I think i'm gon na trim this little piece of lace just a little bit. I completely glued that down. So that's gon na be hard, but i think i can do it. I put so much glue. It looks like i'm cutting my skin, but i'm not okay. Yeah see i'm more satisfied with that. That looks way better. Okay, so now that we cut the excess lace off, we are going to tie this whole entire thing back into a ponytail. Then we are going to flip this up or like pull it back a little bit, and this is where the lace glue comes into play. We are officially about to lay lay this wig okay, so i have like this little popsicle stick looking thing and i'm gon na use that to lay the glue down some people use a whole lot of glue. I don't use that that much i mean i use a lot to where it's like it's not gon na budge. But honestly, i feel like if you have good glue, you do not need to waste that much product popsicle stick and we are just going to lay that glue down. I like to do it sideways and forward because, like i said, the goal is to make it look like your skin. So if there is a point in time where your lace starts to lift or your wig cap starts to lift just do this process, and that should be able to fix it because, after we put this glue into place, like officially lay it down we're gon na. Go back into it with the blow dryer, so you see why i told you to gel your edges back because this would have definitely took out somebody's edges by now. This is terrible for your hair, but your skin should be fine blow dryer. So you see how it went from white to clear. That'S what you want and if you want to you, can touch it and see how sticky it is because that's what we want. We want it to be completely sticky. Now we are going to unflip our wig pull it forward and we are going to place it on all the sticky parts we just made and you might have to hold some of them for a few little seconds. That'S why people like you usually see people use elastic bands and stuff tied around their head and then just like wait for it to dry and stuff like that. For me, those elastic bands really don't work because, like i said, i have a weird hairline, so it doesn't fully like grab all of the pieces that i need for it to grab. I'M gon na need a little bit more glue on this side me so now that we have completely laid it down. Now we are going to do some styling, because, even though it looks decent, it could be better so, like i said, either flat irons or you could use a blow dryer, i'm gon na like smooth this out a little bit more. This is also where your mousse comes into play because now we're going to take away some of this little, it's not too bad of a shine, but it's a little bit of a shine. So we're going to take some of that away and it's also going to help lay the wig as well and we're going to start from the very very top part we're going to gloss it over. So you can see the difference, all ready not going to brush it out, but i am going to brush it just a little bit. The crunch really should not come out, but oh yeah, that's beautiful. This is beautiful. Oh this is so pretty so unpopular opinion. I really don't like that that many baby hairs, i just feel like andy, really need that many do you need that much like, i don't feel like you do, so i could make more baby hairs if i wanted to, but i don't want to honestly. This is enough baby hair. For me, this is this is literally like all that i would really do i'm gon na swoop that just a little tiny bit push that in oh yeah. This is great for me yep. This is this is good, okay guys. So this is the finishing product i'm actually really impressed by it. I really really like it outer did not disappoint me. Just like i expected it to look at our closure. Look at how different that was. You see the difference that makes you see how everything just comes together. You see that don't ever doubt me, i know exactly what i'm talking about. So, if you guys really like this wig, i will be putting the link down below. I will give you the amazon link and the sam's beauty link, if you guys know where else to buy this hair from because i listen, i know y'all are gon na cop this. I know you guys are gon na buy this. If you know any other place that sells, this wig don't be afraid to comment it down below if you have any other tips on how to make synthetic, wigs or even wigs in general, look way more natural. Let me know in the comments below what are some things you liked about this technique. What are some things you didn't like about this technique? I can take criticism. It is perfectly fine, so obviously i will be having a photo shoot in my room most definitely as soon as i turn this camera off, i'm having a photo shoot so guys make sure you, like this video, don't be afraid to ask me questions in the comments Down below and of course, share if you can so with that being said, thank you for watching and i will see you next time all the things

Comments
tessa fields: love this review!!
Esha Lovely: How long did it last and did you sleep in it