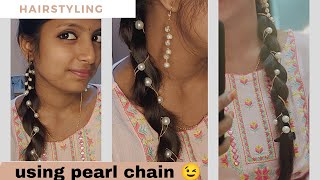
7 Tips To Achieving Cute and Easy Jumbo Box Braids At Home

Jumbo box braids are always a great go-to style because they protect, tame, and allow hair growth–plus they’re super cute! However, we all don’t have the time or money to sit in a salon and get our hair done all the time so sometimes we have to take the matter into our own hands and do them ourselves!
Below are a few steps that’ll help you achieve cute and easy jumbo box braids at home!
Settle On A Style
The fun part of getting box braids is determining what style you want. Obviously, they will be bigger than average since they are jumbo, but you can choose the desired length, color, general thickness, and part pattern you want!
I’d say the only factor that plays into how you do your braids is how much weight your hair can take and your level of skill. Jumbo box braids tend to be on the heavier side which is bad news for those of you who consider their edges and nape of your neck to be fragile areas.
If you are worried about potential damage, shorten the length or lessen how much braid hair you use until you are comfortable with the size of everything.
As far as skill level is concerned, always do what you know you can do and try to find easier styling methods that match your skill level. For example, not everyone can grip the base of their hair and start a braid–especially beginners; so they’ll tie a rubber band around the hair so the braid will have something sturdy to grip.
Whatever it is that works for you–do it.
Pick The Desired Texture
Braiding hair comes in everything from super silky to kinky*. You can have whatever you want, but you should make sure that the texture of your hair blends seamlessly with the braid hair.
Let’s say you have relaxed hair and you buy a kinky* texture, you wouldn’t want straight strands to be poking out through the braid. Or maybe your hair is super thick and coarse, a silky texture may not blend with your hair how you’d like it to.
Figure out what texture you want, manipulate your hair to match it if you need to, and make sure you braid your real hair and extensions* together evenly so that it’ll look neat and blended when finished.
Detangle and/or Blow Out Your Hair
With all the parting and sectioning going on, you must detangle your hair! Getting out all of the tangles beforehand will make the process much smoother, faster, and a lot less frustrating if this is your first time doing your own braids.
If you are using a straighter or silkier texture of hair, blow drying your hair would be in your best interest. Now, you don’t have to get it super straight, you just need to smooth out any kinks or curls that might clash with the braid extensions* by making it bumpy or frizzy.
Make sure to use a silkening serum and/or heat protectant* on your hair before styling to help blow out and for protection.
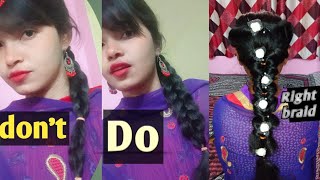
Part Into Even Sections
There is nothing worse than uneven box braid parts and sections! Not only do they take away from the neatness of the style, but they make it nearly impossible to get all of the braids the same size.
You need to pick how big you want your sections to be; the bigger the braid, the bigger the section you need to do. In the featured picture at the top, there are exactly 16 braids so there are 16 even sections to match.
For the parts, you need to keep it clean and figure out how you’ll part it beforehand. If it makes it easier for you, think about parting your hair in terms of rows and columns, or a grid. For example, if you need 16 sections, part down your head evenly 4 times and across 4 times–that’ll leave you with even sections.
Or you can simply work on one section at a time and not worry about how many braids you’ll have or sections you need to create beforehand.
 Control Fly Aways and Frizz
This part is completely optional, but if you really want a sleek look, try taming your hair with a light gel or edge control around the parts. This will take away or tame all frizz, fly aways, and unruly hairs.
A lot of people prefer to avoid this step because products have a way of working themselves into rubber bands and braids, and caking up to the point of hard buildup that is difficult to remove.
However, if you don’t plan on wearing this style for long, oil your scalp and braids, and keep the amount of product used to a minimum, it should all work out fine.
Grip, Braid, Groom
No matter how you grip and braid the hair, make sure it is sturdy and an even braid down. When you braid, braid with three even pieces and away from your face so that you don’t get that weird bulky, squiggly-looking braid we all hate.
Lightly separating the extension hair before and finger detangling the hair as you braid down will also help you achieve a straighter braid from root to tip.
If you see any little hairs poking out after you are done, don’t worry! Take some scissors or shears and trim down your braids to get rid of them. To avoid getting those annoying fly aways in the future, I rub a light pomade between my hands before rubbing them over all of my braids. This will keep them looking nice and neat!
Dip, Burn, or Rubber Band
Congratulations if you made it to this part because that means you are either completely done or you’ve successfully finished your first braid! All you have left is securing the ends of the braids so they don’t unravel. There are a few methods you can use to seal them, but the most common are dipping the ends in boiling hot water, burning them, or simply tying a rubber band around them.
This, of course, is going to depend on what look you’re going for. When I braid all the way down, I dip them in hot water. If I want to leave a little hair at the ends, I’ll use a rubber band. For a quicker, more secure option, I’ll just use a lighter and burn the ends.
Whatever it is that you choose to do, make sure it is secure and can be altered if need be. At the end of the day, make sure it looks good!