Long Shaggy Haircut | Long Layered Haircut Tutorial | New Layered Cutting Techniques
Long Shaggy haircut | Long layered haircut tutorial step by step
New Layered cutting techniques | How To Cut Long Layers
Artist: Dawn Atkinson
Instagram: @hairartistrybydawn
Link: https://instagram.com/hairartistrybyda...
*Giving is hold forever*
# ShaggyHaircut #LongLayeredHaircut #LayeredCuttingTechniques
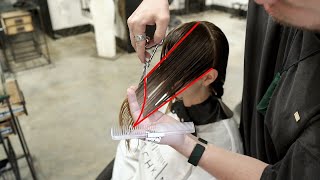
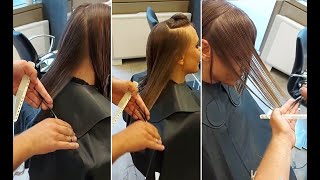
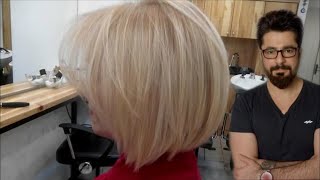
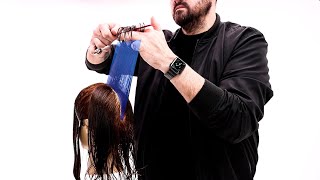
Hello, hello, good morning, everybody, i guess it's morning on the west coast and uh starting afternoon on the east coast, but good morning, hello, everybody. How is everybody today, please let you join just chime in see, say where you're chiming in from and uh yeah. I'M really really excited hello, hello. Good morning, happy monday did everybody survive thanksgiving. We had a great long weekend, so awesome, hello, new jersey, hello, so thankful for you guys joining this morning. Let'S get started. My name is dawn atkinson. I am a visionary team. Member with sexy hair, i've been a licensed hairdresser, for i believe i'm going on my 23rd year this year and i'm super excited to be joining harebrained today and i'm really excited about this series when harebrained reached out and said we want you to come on and And be a part of professionals who practice series - and i love that because, as long as i've been doing hair, we all need to practice right. We need to practice to be the best we can be when we're working in the salon and i'm really really excited. So i want to thank hair brain for having me today as well as pivot point, because pivot point is sponsoring this series and i'll be working on some of my favorite pivot point mannequins, as i work through this adorable shag, hello good morning, everybody so yeah. So this is actually josephine. This is one of my favorite uh pivot point mannequins, really great density to work with, and i just it's a really great cutting mannequin. So this is my modern take on the classic shag. How many of you guys have been doing shags like crazy this year? It'S been probably the hottest haircut when i'm working in the salon and how many of you guys feel the same way: everybody's wanting the shag everybody's wanting the curtain fringe um. It'S probably the most requested that i've had this year and i've seen a lot of different takes on the modern shag, but i find that this approach that i'll be sharing with you today is super super predictable in this line really fast and efficient. So that's what we want right to work really quickly really efficiently, with our hair, cutting and, more importantly, really customizing, our hair cutting to that individual client's needs that are sitting in our chair. So this is um. I actually prepped her a little bit last night. I gave her kind of a fun money piece because who doesn't want that right. Now, these fun money, piece uh, highlighting techniques and um. You can see that she's got a lot of really fun texture in her shag and, what's great about the shad. Guys is like it's perfect for all face shapes, so we love that right. We love those haircuts that no matter the face shape. It'S super appealing and really really beautiful and lays so nice and soft on our clients, so this is josephine. This is our modern shag, and this is what i'll be teaching you guys today. So as i'm going through with really just technique and how to and how i really attack this design, i want you guys to encourage you guys to chime in and ask any questions that you guys may have, as i continue to work as well as just any Comments questions anything at all because that's how we learn right to be engaging, so you guys, i encourage you to engage with me and i will continue to answer any of your questions if i miss them. No worries hello from mexico. If i miss him, no worries i'll go back after the live and make sure that i get every single one of your questions and comments. Um answered so all right. Let'S go ahead and get started so here's my maddie and uh. I want to share with you guys my sectioning, so how many of you guys section when you alaska, that's awesome, how many of you guys are pre-sectioning before you do your haircuts in the salon just by a show of hands, i would love to put your hand Up or say yes, if you guys are pre-sectioning the salon, i think for myself, 20 plus years ago. I thought oh, i'm an artist, i don't need to section hair. I just go in and start creating and see what i get, because i'm an artist - and i found that when i don't when i wasn't pre-sectioning, i never really got super predictable results and i found that once i started really taking the time to section off based On the head shape and the individual client that i was working on, i found that my results were much more predictable and i was able to customize the haircut to the individual client's head shape. So with this modern shag, i'll just share with you guys her partings i've sectioned from approximately up to the apex to the corner of each eye for her curtain fringe i've subdivided front from back. So the high point of the head to just behind the ears on the sides, and then i sectioned out the crown of on this doll head and i went down to a point at the occipital bone. So as i go through, i'm going to share with you. Why i'm parting the way that i am and how you can customize and change that up, but keep in mind that when you are doing your sectioning, the sectioning should always mimic what you want. The end result to be so i'm doing this beautiful, like short to long shag. So if you think about that short to long short being the front, because everything will be based off of this fringe um in the haircut i'll start with the fringe and then moving back towards the nape. So if i want that shorter to longer in the nape feel i'll actually do my sectioning that way and that's going to make sure that my section mimics my end result. So just thinking about that, like really thinking about the big picture. So, let's just go ahead and get started as i shared. The fringe is going to be the first thing that we do and don't you guys like how many of you guys are just constantly everybody wants the curtain fringe. I think it's so funny how like our younger clientele they're like oh. I want that the bangs that you see on tick-tock. They think that tick-tock created the curtain fringe, but they didn't. We know that as the professionals right um, so i'm going to show you how i like to create my curtain fringe. Now, with your parting. Now i went to about to the apex to the corner of each eye, keeping in mind, depending on how thick or thin you want your end result of your curtain. Fringe to be is going to be is going to determine how far back on the top of the head i go but base because she has like medium density to her hair. I just went back to the apex and i don't want like a super super thick fringe, but i want that like soft draping over her forehead and then i'll start blending that into the sides and the back profiles, i am going to be using a razor. So uh, actually, when i first started doing here, i was always using the razor and then we started using the texturizing shears. That was a huge thing and the chunking shears and and then i was just doing a lot of scissor cutting and i'm really excited to bring back the razor. Because, when we're seeing these really textured end result haircuts, we can put all kinds of product in the hair to create texture. But if you start from the get-go, with your cut, creating that textured finish to your ends, you're going to get much more texture of an end result. So it's like starting right off the bat i'm making sure that i'm putting that texture in from the haircut all the way through and then i can, like top it off with my stylers later close the deal right so with my razor. I'M going to show you how you can create different uh finishes with your razor, so, depending on how much texture you want for an end result will determine how you use the razor. So i'm going to subdivide this fringe in half okay. So i am doing this with the center part as well. One common question is: if she had a side part, what would i do different? The only thing i would do different is she had a side part each one of the sides of my fringe is going to be directed opposite of where it lives, so i'm just going to wrap this around to the opposite side. So this is her left side of her fringe and i'm wrapping it over to the right with your curtain fringe, your finger angle is going to mimic your parting okay, so your parting here is the diagonal forward parting. My finger angle is going to mimic that parting, depending on how much softness or more strength that i want in my fringe is going to determine how much i elevate the hair, keep in mind that as i'm moving through this haircut, the more you elevate, the hair. When you're working through the design, the more layers and graduation you're creating, so if i keep my elevation really really low, i'm going to have a super strong end result, but because i want this really textured, really free flicks and kicks lots of movement. In my shag, i'm going to elevate that a little bit higher, so i get much more softer end result: okay, so finger angles mimicking my part line, i'm laterally directing this over to the opposite side, because distance equals length so because i'm laterally directing this over when It falls it's going to be longer towards my corner, okay and then i'm going to come through with my razor and just do an up and down movement again, keeping in mind, depending on the amount of texture that i want, is going to determine how much up And down, or in and out movement i create. If i want a much stronger end result, then i'm going to take little tiny notches, and if i want a softer much more airy end result, then i'm going to be a little bit more aggressive with my razor and keeping in mind too. If i come in with the razor flat to the section, it's going to be a much stronger end result of a perimeter when it falls, but because i want a lot of airiness a lot of flicks and kicks a lot of texture. I'M coming through with my razor and doing vertical strokes through that fringe, so coming from short, lowering my elevation, because this hair here at the corner of her recession and at the corner of her fringe, typically is going to be a little bit thinner than it will. In the center, so i don't want to remove as much once i get through that corner. So you can see that the end result that i have in the fringe is very, very airy. But i do have that really beautiful short to long feel and that's going to give me this really fun curtain fringe. That'S going to open up around her face, so i'll do the same thing. On the opposite side, one thing that i always recommend in the salon is cutting this longer, first and really kind of seeing like how does that bounce up, and if i like, where it's at we're good, but i can always go shorter. If i take it too short from the get-go, then you know you can't put it back right. You can put it back, so we want to make sure that you know we start long see how it kind of lays how it ends up. If we like it we're good, if we want to go a little shorter, we can do that, but i actually really really like that. I think that's going to open up really softly and another thing that i'll do is i'll go back through and kind of customize. In the very center of her fringe after i do the blow dry, if i need to just to really customize that i feel like that's kind of the icing on the cake right, your fringe is everything i feel like you know, for an overall haircut. You can like everything, but if you don't like the fringe, you're kind of doomed right, so i really like to take that extra bit of time with my fringe and get it right. So i'm using a little bit of my center as my reference again, i'm laterally directing this over to the opposite side. My finger angle is parallel to the part line. Okay, depending on how much softness or strength that i want in the end result, will determine how much i elevate the hair, but i'm coming up about 90 degree. Elevation on this and again depending on the texture that i'm looking for, will decide how much in and out movement i have with my razor and then you'll see. I did drop down that elevation towards the corners, because our corners are always a little bit thinner. So we need to be a little less aggressive on our corners, so i'm just going to come in take a little bit more off, so i'm matching on both sides. So you can see here on the surface of the fringe, it's very, very soft and airy, and that's what i really love about the razor. The end result that i get it's very difficult to get that super super soft finish with a sheer, but i really can have fun with that razor and now i have that really beautiful curtain fringe and again, i can go back and customize that a little bit In the center, at the end, once i see how that balances up when she's naturally dry, how are we doing guys again say where you guys are chiming in from i'm actually from central illinois? So winter has begun? There are some flurries this morning here and uh. It'S pretty chilly here, so oh hello, indiana, you guys feel the same, i'm quite sure. So i'm going to drop down now. My side profiles, london, hello, hello. That is awesome. So i'm going to drop down my sides now with the rest of the haircut as i shared the rest of the haircut will be based off of our fringe. So it's just going to follow through that really beautiful short all the way back through to the long. At the nape i do the customizing on the perimeter when i'm very like at the very very end before i blow dry, sweden. How amazing liverpool awesome guys, love it. So now i'm just going to take vertical sections working through the back into the nape and then the last is the crown okay. So with my sections, i'm going to take vertical sections directing this forward, laterally forward so away from where it lives. Keep in mind that if she has very, very thin fine hair, then i'm definitely going to laterally direct or some of you may say, over direct the hair as far forward as i can so that i don't remove so much of the density through the side and The back profile, if she has very very thick hair - and i need to remove a lot of that internal weight in the design, then i'll, take each section straight out from where it lives, no lateral movement, no over direction um, so that i make sure that i Remove a lot more of that interior, but because she's like thin to medium in density, i'm just going to take this straight forward, i'm going to use the top of my fringe as my guide for entry. So this is the very very top center of my fringe, and i also have a little bit of that fringe on the interior that i'm holding i'm not going to re-cut any hair that i've already cut. But i do have that as a visual reference to make sure that i'm staying on track. So i'm taking everything straight forward. I am elevating the hair about 90 degrees. Again, the more you elevate, the hair, the more layering and the more hair you're going to remove from the internal part of that design, the lower you have the elevation if she had very, very thin fine hair - and you don't want to take out too much of This weight through the sides, that's when i would keep the elevation very, very low. So as i'm doing this haircut, i'm just basing my movements and my sectioning on medium density hair. This can absolutely be on naturally wavy as well as curly hair. If it's much more thick coarse, curly hair, then i have to kind of accommodate that right. So that's where it's really important for you guys to start thinking about all of us really like when we're practicing, and i love mannequins, because they're the perfect way to practice. I can see what the end result gives me, and then i can change my movements accordingly to get a different end result. So this is a great way to you, know, really start to hone in on your haircutting skills and making sure that when we are doing what we're doing behind the chair every day that we have really really predictable, results right and practice equals confidence. And i think that confidence is key when we're working in the salon, there's nothing worse than trying something new and not turning out on a client. So how awesome is it? You know we can pull out our pivot point mannequins and we can practice see what we? What we end up with and what we need to change and that way when we're going back into the salons and we're creating these looks, we know what we're doing. We feel confident. So you see how now i'm already getting that beautiful short in the front with my curtain fringe and then i'm moving back towards the nape area. So i'm going to go ahead and lift this up. Now, i'm just going to continue to take vertical sections and, with my vertical sections take what you can control, i think oftentimes. You know when we're trying to work through a haircut quickly, especially if we're behind in the salon we try to take more hair just to get it done fast, but actually this haircut is really really quick. So i like to take the amount of hair that i can control, making sure that my combing is really precise and i'll get much more predictable results so again, depending on what kind of texture i'm looking for in my design is going to determine how much in And out movement, i go with my razor, also keeping in mind if we keep the razor much more vertical or perpendicular to the section that you're working on then you're going to get a much more soft feathery feel if you have the the rays are very flat To the section that you're working on you're going to get a much stronger end result, it's still going to be feathery and it's still going to be textured um. But you will get a little bit more airiness with a perpendicular rather than if you lay it flat to the section it's going to be much stronger, so just keeping that in mind. So now i'm moving to my back area here and one thing too. When we talk about like the hair that we're actually working on if the hair is very, very fine and thin, i will come up much higher with my upside down teardrop section here i'll come up much higher. I won't go all the way down to the occipital bone and the reason that i do that is that if i go all the way down to the occipital bone, you can see that the interior of her haircut - this is all i have in the back profile Right, so, if i go all the way down really low - and this is all i have left in the inside or the interior of her shag - you'll - find that it's going to get so airy on the ends that it's going to be a very like old school. Classic shag, where it just looks too thin and i feel like the modern, take on the classic shag, there's still density, it's not so airy that it looks like she needs two inches cut off right. We don't want it to look so thin that she needs structure. Put back in so if the hair is very, very fine, i will go much higher because this section is going to be the surface layer of her shag. If the hair is very very thick, then i'll definitely um go in much much lower with my point here, because then this section that i'm putting those surface layers on is going to be like i can remove a lot more hair. I hope that makes sense. Also, you can customize with this section through here, rather than bringing that laterally all the way forward to the front, because remember distance equals length. So if i'm taking this all the way around to the front, you can see how i'm maintaining a lot more length and density in that nape area. So, as i'm moving through my sections, depending on how much hair i want to remove, is going to determine how much lateral movement or over direction i create so just kind of thinking about the bigger picture, the sectioning stays exactly the same other than that crown, depending On if it's thick or thin, but the shape of all of my sectionings is exactly the same for my modern shad, marie wedding, with a little bit of cutting edge, cutting edge is actually our brand new from artistry pro. This is our lightweight priming conditioner. I actually absolutely love this for um razor cutting in the salon really any cutting, because it instantly detangles the hair and it adds so much slip and movement to the hair as i'm working through the haircut, especially with my razor. I always use a new razor with every single client, but you can imagine that if the hair is much more thick and coarse, you can go through a razor really really quickly. So my cutting edge lightweight leave-in primer, it's a priming conditioner, it's so lightweight! I don't have to worry about being too heavy on the hair, but it also is going to set up my blow dryer for success, so it has 48 hours of frizz control and humidity resistance, and you know guys like we don't sell water in the salon right. We sell product so keeping that in mind as we're re-wetting our doll head here. Why not use some of our leave-in conditioner? What'S great about artistry pro? Is it's 100 exclusive, so this is only sold through professional distribution. Clients cannot get it anywhere other than from us and we can only get it through professional distribute distributors. So i encourage you guys to check out our brand new artistry pro. So now, i'm just going to repeat this. On the opposite side, doing the exact same thing, everything is taken off of the fringe, so i'm using my fringe as my guide for the rest of um for the rest of the haircut, taking everything towards the fringe laterally directing forward. How are we doing guys? I love that, like after thanksgiving everybody's, like trying to get back in the salon, but what a perfect day to get back and be educated and re-inspired, and i'm so thankful that hair brain reached out and i'm really really excited about this series. I'Ve been actually watching some of the other professional who practice series and love it like. Don'T we all just need to be like re-educated and re-inspired. I want to do here a really long time, so i want to make sure that i'm always learning new techniques and new ways to to do classic shapes. You know, i think, that the pixie, the bob and the long layer they're going to be here forever when you guys agree like they're not going anywhere. But i think it's important that we're always looking at new ways to approach those shapes so that we stay modern and we stay current and they don't look like old school right. They look like new, modern, edged shapes and this shag. I actually love it because it's like the perfect balance of the classic shag in the long layer and again like being appealing on every face shape, and it has so much versatility and styling, because it's not so over layered that you can't pull it up in a Ponytail or do lots of fun styling, you can wear very straight, but you can also wear it really textured and i think, like with the shag most people do, want to have like that: really fun, texture and movement and flicks and kicks so again taking everything straight Forward laterally, directing to the fringe, depending on the end result i'm looking for as well as the client that i'm working on and its characteristics her hair that i'm working on i'll decide how much i want to elevate the hair so keeping in mind the more i Elevate, the hair, the more hair, i'm removing the less. I elevate, the hair, the more conservative, i'm being with those internal layers. Do you guys have any questions so far? Are you enjoying what i'm sharing with you guys? So now i'm just going to comb this at natural fall, and you guys can see this really beautiful short to long draping over her shoulders if she had them right, okay, so this is the foundation of the interior as well as the perimeter of her haircut. Okay, so i have this really beautiful long, layered shaggy shape, and now i get to have fun with the crown, so the crown is going to be the surface layers of your modern shag. So this is great because this is where i can really customize. What does that client want to see her end result? What does she want it to be? Does she want a lot of layering through the crown or does she want it to be much more conservative and long layered right like where the layers we have those clients to say? Oh, i want the first layer to be here and the second layer to be here. We know that that can't be done right, but those surface layers that that client sees they lay here. Okay, so when i'm doing the crown, this is really what's going to help determine where they see that first layer right visually, where they see that so with her, i'm going to separate this crown section into four radial partings and you'll, see that i'm not picking up Any of the hair underneath these crown sections are going to lay over the top of her back profile, and i want them to come to that really nice soft taper so that it's really airy and not like a super chunky top layer right. We want to see those layers like when you look at a haircut. I love when you see that like. Where exactly does it start and end? I mean when you look at the end result with josephine here like when you look at her you're like wow. Where do they actually start and end right? You don't see like a heavy weight line where the beginning layers start they're, just very airy and start to flick and kick all throughout, and i really love that with doing this four radial subsections within my crown section and i'll show you how you can get even More airiness, as you break this section down again, i'm not picking up any of the hair that i've already cut. Now we want the layers to blend from the front to back so remember that i shared in the beginning that all of the haircut is based on that curtain fringe and then working towards the nape. So now i'm going to use the very top of my curtain fringe or i'm sorry, the top of the head shape because remember that the fringe blends short to long to the top and then the top needs to blend short to long towards the very end. So i'm using my top of the head as my guide or reference point and keeping in mind again the higher i elevate, the hair, the more surface layering, i'm going to see right. It'S going to be really a lot stronger of a layering technique through the top and i'm going to be removing a lot more hair. But if i lower my elevation okay, depending on what i want to see, my end result to be. If i lower it way way way way down, you can see that i'm removing a lot less hair than if i'm way up here, i'm really getting very strong, rounded layers. So we want to go about right in the middle okay. So i'm going to start with 90 degree elevation here, approximately just for teaching purposes. There'S my top of the head shape, okay and then i'm going to come through going in and out with my razor lowering my elevation until i get a really really fine taper. It'S important to get that super fine taper that lays over that nape area, so that you don't end up seeing those really like chunky, chunky layers on the surface. We want it to be really soft, where you can't tell where they start and end okay, each one of my radial subsections is held straight out from where it lives, because i want to have consistent, layering all the way around the crown. If i needed the layers towards the sides to be longer than i would laterally direct them back, but i want a really consistent nice soft round shape without removing a ton of hair, so i'm coming in approximately 90 degree elevation again, i have my guide right next Door or the top of the head shape, i can grab from either one deciding how much texture i want to see with my razor. So that's how much in and out movement i have and as i lower my elevation it's great, because i can see exactly where that layer is going to end right. I know if i pick up the hair here, it's very difficult to see like you know that i'm removing a ton of hair and then when it drops, what do we know it's gon na drop and then it's like, oh gosh. Now i have all these layers that i have to go in and razor out more or texturize sheer out more. I want to see like really really soft airiness short to long, that lays over the nape and the back profile. Very soft. That'S why i'm being more aggressive with my in and out movement to a very, very soft taper, so you guys see here with the end result, look how soft and airy. That is that's what i want to see with my modern shag. Last one make sure i'm not picking up any of the hair that i've already cut. We don't need to recut that using the guide from the top of the head shape here, we go see that okay and then cut from short to long, laying over that back and nape, and now all i have left is my perimeter now. What i want to share with you guys about that um i've been kind of playing around with like shaggy bobs, because i believe that that is really what the next thing is going to be everybody's, going to want the shag and then they're going to want something. New right, like everybody's kind of getting the shag right now, but they're gon na, want to change it up, but still when you get used to that really like beautiful airy shape, you want to go a little shorter um. So, what's awesome is that the shaggy bob is gon na, be the exact same haircut but shorter. So you guys can see that right like this could be the shaggy lob right there. How cute is that right or you can bring it even shorter - that is going to be the shaggy bob, so i would attack the haircut exactly the same, which is pretty awesome because you've already like created that shape on her. It'S just really determined by how short or long you go with your perimeter at the end. So i want this to be longer, like i showed you with my inspiration with josephine we're going to do the same thing with maddie, so they're going to be little shag. Sisters right and uh, it's going to be really cute so now this is when i just go in and i decide how long or short do i want my shag to be so. I'M coming in taking everything down at natural fall so right where the hair lives. Okay and now i can go in and create my perimeter, so i'm not really going to be removing much hair except for right here at the very, very bottom, because i want that to be my long, modern shag. So again, natural fall so making sure that it's laying on the round, naturally where it wants to live, okay and then go through and create my perimeter now, because i want a little bit more structure in that perimeter. I don't want her end result to look like. Oh my gosh, i already need a haircut again. Why does it look so frayed, remember what i shared earlier about when you come in with the razor more flat you're going to get a much more strong, more structured end result. If you come in more perpendicular vertical with the end of your razor, then it's going to be a lot more airy, which can be good it. Just it's important to think about what kind of hair am i working on? What is the tapestry? What is what is the canvas that i'm working on, and what do i want the end result to be. I want to put a little bit more structure in her perimeter, so i'm coming through with my razor flat to the section and just blending that right in with my short to long through the side profiles and that's the haircut guys like. What do you think like? Is it an easy approach to the shag? Do you guys feel like this is something that you guys could utilize in the salon? Right away again, i was saying how i've been kind of like practicing a lot with the shags this year and thinking about like what what kind of end result am i looking for what is the overall look that i'm look easy? Yes, thank you so much um, but you know, hair cutting doesn't have to be difficult, and i think that you know when we over complicate hair cutting it just gets over complicated. But when we take a much easier approach based on the head shape, you get a much more beautiful end result. So this is even just like starting to dry. Naturally - and you can see how beautiful this is - and this is great because she could put a little bit of blow-dry cream or mousse or gel - and let it air dry for that very, like lived in, which is kind of what we've been seeing a lot this Year right, a lot of lived in shapes, oh awesome, i'm so glad that you guys are loving it. Thank you so much um, so you could definitely just let this air dry put a little cream in that polish it up, but i want to show you guys how i would typically blow her out um. I think that that blow drying is so important. Could you do this cut with scissors point, cutting absolutely great question. I believe it's tonya great question. Absolutely you could do it um if you're more comfortable with the shear um, then you can absolutely go in and point cut just keep in mind that when you are point cutting you're going to have a much stronger end result, it's not going to be as feathery And airy, which is totally fine, it's just whatever you're comfortable with but yeah just go at it exactly in the same way with your shears and point cutting okay. So i'm going to go ahead and go in with a couple of my new favorites to blow her out. I'M sharing that, like, i feel like the blowout um, is just as important as the haircut. You can give someone the greatest haircut in the world, but if you don't give them a really beautiful blowout that they feel that they can duplicate at home, then what is it worth right like we can? We can make or break a haircut by the finish. So i want to show you guys how i like to approach the finish of the modern shag and i always encourage um stylists to like, when they're doing a style, especially if they're going to give somebody a new haircut and they're doing a finish that they set Up their phone on this station and record the process because we can say all day long like this is how i do it and then when they get home they're like oh, my gosh, i can't remember: what way did she do the brush? You know what products did she use what's great is that when they record the progress the process, they can see what products you use where you use it, why you use it because you're educating them along the way on how and why and where to use the Product and you know it's great because i've seen clients at the grocery store like a week later after doing their hair and i'm like oh gosh, it looks terrible right like we've had that i don't want that. We are they're walking, they are our walking billboards. So we want to make sure that they look absolutely stunning when we see them. When we see them, you know after they leave the slime. We want them to look great when they leave and we want them to look great when we see them when they're coming back to see us in four to six weeks. So i'm actually going to use a couple new products from sexy hair from our calm sexy hair. This is our cbd infused line. This is wet fix and chill. This is our all style cream that you can use as a blow dry styler as well as you can put it in the hair and just let the hair air dry. It really helps control frizz, i'm loving. It add to add to my regimen when i'm styling the salon and then i'm cocktailing with a little bit of our dose dose, is our silicone free oil. So this is amazing for those that are looking for more of a silicone free. But it's great because i cocktail it with my wet fix and chill we love cocktailing product, and i get this really really beautiful finish on the hair. It'S always so shiny and really really smooths down that cuticle. All of the calm sexy hair products are infused with 99 pure cbd, so the fragrance is very universal for men or women, and it's just a niche lineup that i can add into my normal lineup in the salon and clients are really loving it. It'S a great conversation piece, so i'm putting that through. Now again, i shared with my modern shag. You can put some cream in there and then just let it you know air dry, but i want to go through and do a blowout. So with your blowout, you want to make sure that you're blowing out about 90 percent dry before you hit it with a round brush, and i always go at my blowout thinking about like what do i want my end result to be. Obviously we do the same with cutting, so i'm gon na do the same with finishing i'm going to get the hair about 90 dry and then we'll go in with our round brush. So i'm going to go ahead and just get her rough dried a little bit. She'S almost there, but i need to get her a little bit more dry before i go in with the round brush. So how are you guys doing like? Have you guys loved what i've been sharing with you? Do you have any questions comments anything at all i'll? Go back through after thank you, ann, that's so sweet of you! Thank you! So much again this is maddie um. She is one of the pivot point mannequins that i really like to work on. Oh, you missed cutting the fringe. Yes, absolutely go back to the beginning. After the live - and you guys can see - and i will recap as well - i'm going to recap how i did the haircut for all of you that are just joining and what i've been sharing is the how to modern taste on the classic shag. Yes, i can't wait for you to try it too, i'm always looking for new ways to approach hair designs, hair cutting styling. Whatever i see you know, i think we're all looking for new education, new ways to be inspired new ways to do the plastic things that we've been doing. I kind of shared a little bit about like i've been doing hair, for i think this is my 23rd year and we can't always do hair the same. We did when we started right. We got to stay current, we got to stay relevant and what a great way with this series - professionals who practice series on hair brains - and i encourage you guys to like go watch all of the videos and the professionals who practice series they're. So good. And i love it because it's hairdressers from all different brands and everything from hair cutting to finishing of styling some fundamental approaches as well as creative approaches. I love it okay, so she is now about 90 dry and this is when i go in with my round brush so she's about 90 there, i'm gon na part off the top and put this out of the way and save this. For later, i'm going to keep the fringe out, because i think, when we're finishing here, i think that the client, at least for myself, they need to see that instant gratification, like i'm gon na love. This right - and i see sometimes when stylists, will like turn their client away from the mirror and they'll finish it, and then they like turn them around like this big reveal, but the anxiety they must feel, especially if you've, given them a brand new haircut right. The anxiety they must feel when they can't see while you're blow drying for that you know 20 minutes or so so i think it's important to again make sure that they can see what you're doing the whole time that you're talking about the products that you're using The whole time what it is, why you use it and how you use it or where you use it and have them videotape the process too um and then as you're having them in the mirror, while you're doing the blowout they're getting that instant gratification. Like i absolutely love what she did today right and we're giving them the confidence that they're going to be able to go home and mimic that look. So now i'm going to go in now with a medium round brush starting at the fringe, so that she can see instantly like she likes what i've given her and start smoothing that hair thinking about what do i want the end result to be so that i'm Blow drying in that direction right, so i think when years ago, when i started like round brushing hair, i would just go in and like really take horizontal sections, and i would brown brush to death right. You'D go like this right and you keep round brushing in this pattern. But if i want the hair to lay away from the face, then i want to make sure that i'm blow drying it away from the face right. I'M gon na change. My doll stands here. Just a second she's getting a little wobbly um, so yeah. If i want the hair to lay away from the face like josephine here, then i want to blow dry it away from the face. Otherwise i have to go back in with my hot tulle and if i'm trying to fight that direction that i'm giving her and it's just going to cause more work later. Okay, so just coming in blowing that away and then i'm going to take vertical sections. As i work towards the back profile, keeping in mind that i want that long and lean feel right. So if i take horizontal sections, i'm going to get a lot of massive volume through that internal part and what we see with those modern shags is more long and lean volume right, like you have that natural volume rather than volume that's been artificially created. If you will right so we're coming in from the root vertically with my round brush starting at the root area coming through closer to the ends and then all the way to the end, smoothing that out letting it cool slightly on the brush. And i get that really really beautiful, finish, yeah really soft, that is okay and then i'm going to continue moving towards the back. Now, as i get towards the back, i'm going to change the direction when i'm coming in with my round brush, and rather than going back with the round brush, i'm going to go forward. So just think about how many of you guys, we call it flash curls, how many of you guys, when you are curling or flat, ironing flat iron curls into the hair? How many of you alternate the direction of your curling iron or your flat iron? What that does is make sure that when the hair is finished, that all of the hair isn't going in the exact same direction, because if it ends up going all in the exact same direction, it becomes one big fat curl. Have you ever noticed that that like when we curl our hair, sometimes if we curl it all in the same direction, it's like it's all, really cute in the beginning and then by the end of the day, it's just one big curl. So if i go in alternating directions, the creation creates a clash, curl effect, which gives me a lot more expansion, in my end result so coming up to the root then through to the mid shaft and then through to the ends, and this gives you just that. Really really beautiful, polished, end result and again, like spinning off a professional to practice. I think this is so important, especially if you are wanting to really hone in on your finishing skills. The finish is everything right: that's the closing of the deal. So, if my finish doesn't look great, then they may not love it as much as they could, because the finish isn't great right. We want them to absolutely like absolutely just love. Love love their hair, not only the haircut but the finish. So if you start to practice your finishing just as those that have assistance in your salon - and you really really make them practice to get that really beautiful end result, your work just goes to the to another level. Okay, so again, working towards the back. Now i'm going to take a vertical section, i'll go back with the one by the face and then i'll alternate and go forward without a curling iron flat iron. Then you've done a good job. So i think that really takes our finishing to the next level as well, and i think that's a great opportunity too, for those that have assistance. If you said, okay, i'm not going to give you a flat iron and i'm not going to give you a curling iron, take this blow dryer and this round brush or paddle brush or denman brush. Whichever brush you prefer, and i want to see that hair. Look really beautiful and soft. I kind of think of the hot tools as being like taking that finish to the next level, like it's really beautiful and classic and smooth in its true form and then whatever hot tool you choose takes it to the next level, the roof through a mid shaft Through in let those ends cool down and drop it out. Okay, now i'll drop down the crown and i'll do the same thing i'll do vertical sections or radial, because it's laying on the round of the head shape using my round brush again taking my round brush at a vertical rather than horizontal. So if i do horizontal, i'm going to get a lot more manipulated volume and if that's what you're looking for then absolutely do that. But if you're looking for more of a long lean feel, then you want to take more horizontal with your round brush and always going in the direction that you want. The hair to live for the end result i'm just going to lower her down just a little bit. Isn'T she looking so beautiful? Already, though, i think pivot point right now has like some great deals as well, so you guys should go on to pivot point international right now and check out their doll heads. I love them. I colored both of them last night. I wanted them to be really soft and beautiful for today, so i would love, as i finish this up. What is your favorite thing that you guys learned today put in the comments below? What'S your favorite cake that you learned from today's live, what are you going to try right away when you get back to the salon post in the comments below, i would love to hear what your takeaway is, make sure you're smoothing the hair before you hit it With the dryer coming roots through mid shaft through to the ends roots midshots, oh thank you so much. Thank you. Favorite thing is how you cut the fringe love how to change elevation. Yes, i love that and again guys, i'm gon na go back through after, and i will comment and reply to all of your comments. Your questions make sure i answer anything at all that you guys any questions you may have. You guys can follow me on instagram, at hair artistry by dawn. I have a lot of like long hair dressing, inspiration of styles braids, but you know my bread and butter in the salon is really cutting and coloring. So i do. I have started to incorporate a little bit of that into my instagram page, so i would love for you guys to hop over and check that out as well. Social media is such an amazing opportunity to get inspired right, get educated, get inspired. I'M always when i see things i'm always like. How can i take that and put my signature on it? You know like you can only you can only create so many things, but when you put your signature on it like that's, what makes it really special we're all artists and we're all looking to be inspired from each other right. So i love that social media gives us that platform, two more sections. Thank you guys so much for being so engaging and interactive today. So again, i've taken my round brushing and i've alternated directions, one forward, one back keeping my round brush vertical. So i get more of that long lean volume is more like a natural last volume, all right. So this is i'm gon na recap valerie. So i'm glad that you asked that this is my modern take on the classic shag haircut um. This is a very long and lean haircut, and i want to show you guys too like so. This is just round brushed and blow-dried okay and then my inspo, the one i did last night for my pre-done. She i actually went in with a curling iron and did the exact same thing, so i blew her out the way that i did maddie here same exact way in more of that true form, blowout, and then i went through with my one inch curling iron and Did the exact same thing so part it off the top curled one away, one towards the face, one away, alternating directions, getting that, so you can see that it's just a little bit more curl, but very like airy and almost like feathery, you know. So that is what i did with josephine and then with maddie. I just did like that, classic in true form, blowout, i'm going to use a little bit of my artistry pro avant-garde. This is our three in one hairspray that you can use as a thermal spray because it has 450 degrees thermal protection. So i use that with my curls, but you can also use it as your working spray, as well as your finishing spray, see how beautiful that curtain fringe is. So let me just put a little bit more of that again, you guys. I encourage you guys to check out some of our artistry pro products. You can go on saloncentric.com and check them out, but again they're only available through professional distribution, so check your distributors to see if artistry pro is available. So this is my modern take on the classic shag, so you see how much movement and airiness that you see in the layers and it you almost when you look at it. You can't quite tell where do the layers starter end and she's going to have a lot of versatility with her styling, whether she wants to spruce it up with more curls? Wear it much more straight, so i want to recap how i created the haircut, and i encourage you guys, the ones that just joined in. I encourage you guys to go back and replay, because i have it from start to finish from the sectioning all the way. Through to the end result, so what you're going to do is part off the fringe which is going to be from the apex. So that's where the hair starts, the where the head shape starts to round off of the head shape from the hairline. So i'm going to go back to the apex with a center part to the corner of each eye. Okay, so that's going to be your fringe section! Then you're going to part off from the top of the head to just behind the ears and that's going to be your side sections. Then you're going to take a crown section from just right at the back of the parietal ridge down to a point at the occipital bone. So just keep in mind that your parting should always mimic the direction of your end result. So because i want the short to long in the nape, i took a diagonal back to a point, because i want my direction to mimic my parting okay and then i clipped that up out of the way. So i had a fringe sides crown area and then the nape and the rest of the back profile started with her fringe, took both sides of her fringe and laterally directed him up to the opposite side. Remember distance equals length, so i took the center part. I took the left side to the right, the right side to the left and created short to long feel, with my razor keep in mind too guys like it doesn't have to be this long. You could do like a really beautiful, shorter, more textured fringe. I just wanted to be a little bit more conservative and show you guys how to create it. So if you wanted this shorter, the only thing that you're going to do is rather than cut it here, you're going to cut it here, but you'll still get the same. End result with your curtain fringe, if you like this, but you want it shorter, you just do it shorter. If you like this, but you want it longer, you just do it longer same exact technique. Then i took everything from the side profiles laterally directed forward to the fringe, use the top of the fringe and cut from short to long brought. The nape forward use the sides cut from short to long drop down the crown subdivide into four equal radial subsections. Keeping in mind elevation is going to decide how much hair you're removing from the surface layers in your design. So then did short to long using the top of the head shape. Use that as my reference and then cut from short to long with the razor. But again you guys can go back after you guys can tune in from the very beginning of uh. This live, and i encourage you guys to to watch the other professionals who practice series, because it's just so good and it's a great way to just be re-inspired and re-educated and tries a new way. A new approach to to creating those classic shapes that we're creating every day in the salon. So again, this is josephine, she's curled same exact haircut and this is maddie same exact haircut, but just blown out in classic form. So i want to thank you guys so much for spending this hour with me. Thank you, hairbrain for asking me to come on. I was really really honored and thank you pivot point for sponsoring um this series, because i think it's you know, practices everything and practice creates confidence. So the more you practice, the more confident you're going to be behind the chair and the more successful you guys are going to be so again. Thank you guys. So much my name is dawn atkinson.
Comments
leesa tom: The Best take on the Shag! So current and on trend. These layers are so wearable. I wish I could of seen a tutorial on the curled styling
TMarie PI: What a beautiful haircut! It's perfection! This is THE best long layered haircut I have seen. You're amazing!
Angela Litterio: Love this! Not sure I can do it myself. I've been cutting the length myself and a bit of face framing over the last year and a half. Your cut/style is the best I've seen and exactly what I'm looking for! Wish you could do my hair!
Lisa Curbelo: You’re a great teacher, I love how you explained everything in detail.
Trinity Stark: I've worn this style my whole life...now it's back in style. So versatile and easy to manage. I do my own cuts at home but always looking for tutorials like this. One of the best I've seen. Great teacher!
carolinanooss: Thank you so much for the tutorial! I am no hairdresser and the few times i had cut my own hair before went with mediocre success. But you explained every step so good that i tried it myself on my own hair (quarantine style, yesss) and i. am. so. happy!!! Watched it twice before actually cutting and while cutting to prepare myself. I was in the bathroom for three hours, really taking my time with sectioning and every step, and it came out so good for a diy haircut thanks to your extremly good explaining. Again, thank you so much!
Catherine Dav: So awesome! I know this wasn't exactly the intention but with lockdown I used this to help me cut my own hair and I am so happy with the results!! Specific self cutting tutorials on YouTube are often unnecessarily aggressive and simple and I've not been super happy before. Your sectioning and explanations were so clear, logical and effective. Thank you thank you for sharing xxx
Nyah Spencer: I just want to thank you, I have been trying to stay home since COVID and I tried this hair cut by myself and you guided me through it so well, my hair turned out PERFECTLY. I am by no means a professional. I do have a natural knack for this stuff but I can’t always do this stuff on myself. You made it so easy and so beautiful. This is the best haircut I’ve ever had in my 20 years. And I just did it myslef with your help. Your a fantastic teacher and this hair cut is AMAZING
Elizabeth McDevitt: I sent this to my hairdresser, because this is the cut I have been looking for, for a long time! Thank you!
KAREN STANCATO: Love it! Great instruction! Great cut! Thank you!
robyn welsh: Beautiful precision cut looking like it grew into that cut! You're brilliant in every way. You are a fantastic instructor. Thank you so much for sharing this, this is exactly the cut I've been looking for. Excited!!!
Silv: Beautiful style and great, clear cutting instructions. Thank you
Alexandria Hendren: I wish I could message you personally and say this is the most in depth, perfectly executed hair cutting tutorial I’ve ever watched. You don’t show where to cut, you explain why! Thank you so much for your informative video.
Terri Root: Absolutely love this and Dawn is wonderful and so genuine as well as talented. Taking this to my hairdresser next week! Thanks!
Betty Kushida: Thank you so much for this video! I gave myself some light feathering following your instructions and I am loving it
theshelbster: I love this tutorial! I’ve never cut my hair before, I did it wrong and it still worked out and looks cute
kitty110494: I'm in beauty school and used this approach to cut my sister's hair into a shag. I LOVE IT!! I did substitute the razor for Pointe cutting and used texture shears to feather out the ends. It came out absolutely beautiful!!!
Lee Mager: Approximately 20 years ago I left the industry. My daughters only wanted one length hair cuts until now. Brushing up on the layer haircut and you taught me tips I didn't know then. Feeling confident to do this cut on my youngest daughter! I still have my razor and new blades from way back then. You are a very good instructor. Thank you for sharing your talents with us!
Jade sours: such a good tutorial ! love how you teach (: can’t wait to try this on a client !
Kathleen Malloy: This is a great take on a classic cut that you explained it really well. I'm excited that you used your razor rather than shears. I learned razor cutting in the 80's when texture first became part of the hair design vernacular. It is such a versatile tool but I find younger stylist often shy away from it, so it's great for them to be able to see the possibilities and potential of a great razor cut. I have a tip for you.... I attach two 20 lb soft kettlebells with a bungee cord to keep my stand stable when blow drying my mannequin.... thanks again and cheers!
Diana Barbuta: Amazing tutorial! Just gave myself the cooled haircut ever! Thank you so much!
Tammy Mcpherson: I love your techniques! Thanks for the video, and I hope to see more of your videos! One of my biggest pet peeves that makes me want to scream, is when a stylist doesn’t match the cut on the left side to the cut on the right side. You keep your sides mirror one another to match, super nice!! Have a great week!
Rachel Caullay: A brilliant and educational tutorial. I love this hair style and a beautiful result
valintina Avilla: Thank you so much for this detailed video!!! I was able to do it on myself. I love it!!
Gossamer: Thank you for the equation, showing the work, and the end result! I love the mathematical side of hair. Also- wolf cut is the new shag of 2021 love love love it.
Oniramas: just followed this to give myself some face framing layers and followed your advice for thin hair and my hair has come out looking fuller. I didn't do the full shag as i left the crown and back mostly untouched but this was a really helpful tutorial this is the first time i've tried to do some face framing layers that looks 100% legit and good
Nikki Speake: I am not a hairdresser, but tried this on myself and really loved it. Thank you.
Zoe MacDonald: Amazing! Loved the detail. Thank you so much hunni. All the best to you. xxxx
Sharon Stewart: You really did a great job! Loved watching and learned alot.
Alexa Rauccio: i am in love with this!!!! you are an amazing teacher! thank you so much, i am doing this cut today
Julie Kim: Thank God for educators like you! Thank you so much for the tutorial!!
Christina Marie: I freaking love this! You are a kick ass teacher!! What were the products you used in this tutorial? Been wanting this style but never how to explain it
Nery Hand: Fabulous! You did an amazing job in the cut, style and teaching!! (I wish I lived near you!) This is the cut I've tried to get many times but sadly ended up with a butchered cut everytime.
Yvonne: Love love this haircut.. I love razor cuts. I’m a hairdresser and I learned this in the 80s glad to see it coming back. I wish I could get someone to cut my hair that way. ✌️
God1preciousjewel: I love the feather look and how easy you sectioned the hair do makes the cutting super easy, you explained it simple and clear I’ll definitely will try the cut, and I would like to try it for the first time with the blade, but would you please tell me how to look for the blade? Thank you. I love the final result.
Holly Gamble: Please never stop doing your art, ma’am. You are very good at it. Much love from El Paso, TX
Mário Oliveira: Perfeito obrigado
Megan Higginson: This video was very informational! Thank you for sharing i will definitely be doing this haircut behind the chair you have helped me better understand this haircut now :)
Roo Bear: THANK YOU for the detailed tutorial ~ Looks great!
Smith A: I am literally considering flying out to Illinois to get this cut!!! It is EXACTLY what I want. I recently took this video into a high end salon in nj and the woman cutting my hair looked at it for 3 seconds telling me she could do it. I walked out of there with a legit mullet. I was so annoyed. Then the manager attempted to fix it and ended up cutting off my length. But now I'm afraid to go to another salon and ask for this.
Lorrie Deal: Finally, someone who can cut long hair without cutting it all off WOW
Blue Clipper: Very beautiful classic shag, lots of movement and easy to follow tutorial
Lori Bollinger: Love this style reminds me of the Farrah fawcett hair style of the late 7O’s with a modern twist . Beautiful, also love your hair style and the highlights , love to have my hair like yours
Cameron Tyson: You are an excellent teacher and very talented stylist!
Amanda Lee: I did this cut on my mannequin today and instantly booked an appointment! ❤️
Erin Niswander: I’m going to try this tonightit looks doable because she brings almost everything to the front, but my question is, how do I approach the crown part?? I LOVE that part and go figure it’s the only part she doesn’t bring to the front to cut so that’s the part I’m gonna have to improvise lol. But this is seriously amazing and so beautiful, and ridiculously easy to follow. She is an amazing instructor!!
Irene Whitsett: Thank you for this class, so much knowledge provided....I will definately continue to follow you
lulu's hair designs: Thank you so much ...you explained that so well ...deffo a very good motivating teacher ... and would be ace to see you do a take off the shag on the Bob ( short graduation ) ... Love it from North of Scotland
Sabrina and Riley: Love this cut...I would like to know what you would do differently for someone with a side part. I think you mentioned it at the beginning but you never finished explaining. I don’t have a lot of clients that have middle parts.
Lisa Eischens: Very cute! I wish I could do this too myself.
Jorde Pellegrin: So when you start doing the braided section and pull a little bit forward at a time, do you still go off of the shortest fringe in the middle or do you move down the fringe towards the ear as you pull sections further back using the longer part of the fringe as the guide?
Lisa Rios: This cut is absolutely gorgeous!!
Lorrie Deal: I absolutely love it, The best I've seen in 40 years
guardilla de ilusiones claud ara: Excelent class!!! Thank you!!
Donna Hartzman: Love this cut!!! When you brought layers forward you used the top middle of the fringe. But the last section you brought forward you didn’t use that? When did you stop using that? Thank you
Anne c: Thank you! this is exactly what I want!!
Sassi Llama: This is incredible♥️i wish you could do this to my hair!! It’s Perfectly beautiful
Anastasia M.: Well done, this haircut is beautiful!
Mm2325: This is the best tutorial for a modern shag!! Thank u!!
Elizabeth Schopen: Finally, a LEFT HANDED STYLIST I can follow!! Thank you, Thank you!
Barbara Bergeron: How inspiring !! I don’t cut hair but I feel like I could learning from you my dear ♥️.. love from Mississippi ♀️♥️
Chihiro: Wow looks fantastic! Definitely giving me Goldie Hawn vibes
paloma Spence: You did a beautiful job!!! They look gorgeous
Maritza Diaz: So beautiful ! , I enjoyed your tutorial very much.Excellente end result. FANTASTIC JOB
Tracey Manzano: Always interesting to see a lefty cut!
T Nicholas: Fantastic Educator!!! Please keep making more videos! ❤️❤️❤️ You are awesome thank you
Cindy Sayavong: Confident, skillful and amazing energy. Thank you for sharing
Tamara Kennedy: I love love love this cut....We are cutting mine like this after we go pick up a sharper razor. Fun really cute ill let you know how it comes out...looks amazing and darling!
Tammy Jablonski: Your a great hair stylist and we want to learn from you! Thank you!!!!!!
coca: Que fortuna tenerla de estilista jajaja moriría por ese corte de cabello, es increíble
Laura: Yes! I’d LOVE my haircut just like ThaT Lovely
Google Account user: Just got a razor and did this to my hair. I love it thank you for video!!
Shelly Conte: I like the way your hair is highlighted. Would like to see different ways to highlight with layers in the hair to make them show up even more. ❤️
Kathy Perkins: I want that cut now! So cute ❤️ ❤️
Anita Sheridan: Great teaching ..look forward to using techniques
Jersey Shore: Had a shag hairdo forever. I just saw the shullet, a shag and mullet cut. To me it's still just the shag. Love your video. ☮
Nando Frvtvoso: thank you so much for sharing your knowledge with us i loved the haircut❤️
Icecream Cake: Is it possible to do this while keeping a lot more of the total length? Down to the mid-back or so?
Linda Larsen: This haircut is the one I have wanted forever, but had never seen it till now. I have natural wave which NEEDS layers just like this. My hair is dry (moreso with age) and much thinner than it was when I was younger. I like to experiment with color(s) often, so I condition more, shampoo less, and avoid heat and unnecessary product., which seems to weigh down the waves. I think it would be great and easy just air dried. Wish you were cutting it!
Nhu To: You are so a great teacher for a haircut, I will do it at the salon now, I love the best class amazing. Thank you
Laura: You are Such a Great Teacher!! Thank You
Sheena Alger: Love this, great teaching,
Iper’s World: Awesome! This is what im looking for. I love that hair
Gladys Kennedy: I want my hair cut into a shag like this....your a great instructor!!!
makeuploveculture: so so helpful with the instructions for thin hair. Can this work for very thin and fine hair together and still be long? I am not a hairstylist I am learning to do this at home on myself.
Leslie Breeden: I wish I could do this on myself!
Neata Peace: Very good tutorial. Thanks for sharing.
bxboo823: I really like how you explained each step
Natasha Eccles: I’m gonna be needin’ that shaggy bob in a few days. Thank you!! @34:20
Lisa Eischens: I wish I had you here in MN to help me get this style. I’ve been cutting my own hair and have kinda screwed up my bangs a little. I watch one video that I try to follow and then I find another one like this great video and I try again.
Carmalitabonita: You are awesome! Can't wait to try this behind the chair!
BettyJo- Grisham Webb: I love this cut! I hope my hairdresser can duplicate it!
Babel el canal de la lengua: Todas las veces que lo veo tengo que decir Genia!!!!!!!!
Karma Lee Nash: Later tonight, I am trying this on myself at home. Shew! Maybe will do pro color next month, but for now, doing a shag at home!
#: Would this go well with wide faces? I have round wide face and I love the face framing.
grapefruit: Amaizing !!! i love it
Lana H: That's just lovely!
nicoleneduplessis: Could you cut this with a scissor. Or is it more advisable to cut with the razor?
Maria Alma: Finally : ); a longer, beautiful shag. This one is perfect for me. Do you happen to know any stylist in Lafayette Indiana, who is skilled in attaining this style?
sugarsparkles: i think this looks beautiful, i hate that some hairstylists i go to, i tell them that i want curtain bangs or a certain 70s style shag, and they're like "durrrrr i dont know what that is" so i have to plain out say to them "farrah fawcett hairstyle" since everyone should know who she is. ive worn that style of hair since i was a teenager and just love it dearly.