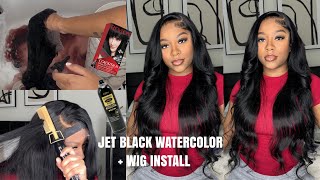
How To Dye Wig Jet Black In 10 Minutes | No Staining !
- Posted on 31 January, 2023
- 360 Lace Wig
- By Anonymous
Don’t forget to watch in higher quality (1080p)
***SHOP WIGS : https://darkanddeluxewigs.com
***VENDOR LIST : https://darkanddeluxewigs.com/products...
***AMAZON STOREFRONT : HTTPS://www.amazon.com/shop/1novianico...
Email for business inquires : [email protected]
Business IG : https://www.instagram.com/darkanddelux...
Foreign, hey y'all, welcome back to my channel. If you are new, welcome if you're, not new, then welcome back. So today's video I'll be showing you how to dye your hair jet black without staining your lace. This is the spray I will be using, and what I'm going to do is just spray. My lace with this got to be glue. It will will really like got to be spray, and I'm going to also spray the hairline of this as well. You don't have to spray the whole lace, but just a little bit above the airline and once you spray that first layer be sure to comb back the hair because it will get sticky. So just do that to ensure when you um rinse it out and everything. It'S a smooth transition, so I'm going to blow dry that first layer until it's dry, then I'm going to spray a second layer. We are going to do a total of three to four layers. This is transparent lace, so three to four layers is enough for me and I'm going to repeat the process of spring and blow drying, making sure that the lace and the glue is dry before you apply that second layer of spray but baby once you start feeling Your lace becoming more um hard. That'S how you know that the glue is doing what it's supposed to be doing. So once you finish your last layer, we are going to take this white big old bowl, and this is what I used to do all of my jet blacks, and this is the brand I'm using by Revlon. This is my favorite jet black dye to use and I'm going to fill my bowl up with water with hot water um, not too much because you don't want to like Fade Out your color by using too much water so and I'm going to just color one Wig, so this is enough for one week and I'm going to use two boxes of dye, making sure that you are wearing your gloves as well. I always shake up the color bottles because they have been sitting on the shelf, so this is just to get all the ingredients you know back together and once I mix them all up, I'm just going to pour them into my container and start the coloring process. Foreign foreign, your color into your container, be sure that it doesn't Splash a lot, because once this color um, you know like sits for a while, it's gon na stain black so make sure that you are very careful. Even though you can't see it when the splash. It will turn black once it starts oxidizing, so just be careful with that. Also, what you just see me do was take a little bit of the water and put it back in the bottle. This is just to make sure I get all my product out because yeah we're gon na get our money's worth. So I do that to both bottles and then once I put both bottles in there, I'm just going to Stir It Up with this spoon, and I let it sit for like a minute. You know just so it can oxidize and turn black, but you can really just put the wig in immediately. It really doesn't make a big difference. Wow I'm also going to be using this brush just to make sure that the color goes through all the hair. In this wig, so I'm just going to start dipping my wig into the color. You can already see it turning black instantly, so once I get to the top, I'm going to be very careful to not just drop the whole wig into the color y'all. Just don't don't be lazy. Okay, we are going to put the wig in there right right until we get to the hairline of the closure. So you will see me, do it, but first I'm going to brush all this color through the hair again to make sure that the hair is evenly saturated with the dye. You don't want any. You know black spots and brown spots that you might have missed. So I always use a brush to make sure I get every piece of hair, and so what you would see me do now is dip the closure in there, but not dipping the whole closure in there. I'M just dipping it until I get to the hairline like so and once I do that, I'm going to take it out brush it for a while and then I'm going to do it again and then I just let the wig sit in there. Keeping the lace like sticking out of the color, and I let it sit for about five to ten minutes and then I'll rinse it out it doesn't really take long like I died. So this is how the wig looks after about five to ten minutes, and you will see my cabinet and my sink has black on it. This is why I was saying to be careful because when it dries, it will turn black y'all. So please be careful. Please and just put on a shirt that you don't want to get dirty. Of course, now I'm going to rinse this wig out and also I'm going to rinse this bucket out. I don't even know why I still put this in the video but hey I'm gon na rinse this bowl out and then we are going to rinse this wig out. I was coloring about three to four wigs jet black, so yeah. I was rinsing for a while, but when you rinse, you would just rinse normally um rinse it out shampoo it if you need to. I did not shampoo it because I was going into bleach the knots right after you want to make sure that you bleach the knots after you color that way. You don't have to go back and bleach the knots again if you accidentally stain the lace, but with this method you will not stain the lace. If you do everything the right way, so I'm just going to rinse all these wigs out and again, I did not film The bleaching process, but I did bleach these knots once I finished coloring them here, I'm just showing you how the color turned out again. This is jet black, and these are the knots after I finished bleaching them looking like scalp, and I also have a bleaching nice tutorial. I will put the link in the description if you want to go check that out and the lace is still transparent. You guys. So I hope you enjoyed this video and learned something from it and I will see y'all in my next video


Comments
WOW Yummyyy: L I K E