How To Make Your Closure Look Realistic & Like Scalp | Bleaching & Plucking Knots | Kisslove Hair
- Posted on 06 March, 2023
- 360 Lace Wig
- By Anonymous
●▬▬▬▬▬▬▬▬▬ ❤Kisslove Hair ❤ ▬▬▬▬▬▬▬▬●
Shopping By Influencer,get 25% Off, Code:vivi25
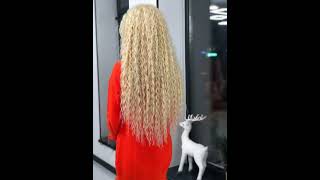
Hair Details: Double Drawn 5*5 HD Lace Wigs Jerry Curly Wave 14A,180% density 30 inch
Direct Link ➤https://bit.ly/3W2SnJ2
HD lace wigs: ➤https://www.kisslovehair.com/collectio...
Colored wigs: ➤https:https://www.kisslovehair.com/collectio...
360 lace wigs: ➤ https://www.kisslovehair.com/collectio...
New Arrivals: ➤ https://www.kisslovehair.com/collectio...
★ Kisslove Hair Official Website: https://www.kisslovehair.com/
Follow us for giveaways: IG @kisslovehair: https://www.instagram.com/kisslovehair...
Facebook: https://www.facebook.com/kisslovehair
Tiktok: https://www.tiktok.com/@kisslovehair
Pinterest: https://www.pinterest.com/kisslove_hai...
So what is up Africana fam in today's video, I'm gon na show you guys how to change your closure wig from looking extremely unnatural to it. Looking like your scalp, okay, I'm gon na show you guys how to make the supernatural how to bleach your knots. How to pluck them and also how to define your curls. So if you want to see how I achieved this entire look from start to finish, then keep on watching sewtably should not you're going to need a mixer bowl and a little whisk that I have. I got this off of Amazon you're gon na need your Clairol 30 volume developer and also your Clairol bw2. So I'm only going to go ahead and just use one scoop. I use one full scoop and then use about like three-fourths of the scooper to pour my developer inside and then I'm gon na go ahead and pour it inside the bleach and mix the two with the Whisk. It could get a little messy. So please put on some gloves. I didn't have any gloves. I just you know raw dug this entire situation, but yeah I'm gon na go ahead and whisk it until I get this nice, even consistency, you want to make sure that when you shake it, it does not drop. As you can see, it is not budging at all, so this hair is sponsored from kiss love hair. I have their 5x5 HD lace, Jerry curly, wave, wig and 30 inches. The density is 180, so this hair is super thick. So to prep this hair for the bleach, I'm gon na go ahead and use my hot comb on the hottest setting. I want to make sure that all of the hairline hairs are pushed back. You want to make sure that they are pushed back and um not falling to the side or anything, and I'm now using a plastic knife to apply the bleach onto the lace. And I like to start where the beginning of the hairline starts at just so that cup lasts the longest or that can bleach the longest, and I'm just applying that. With a very very gentle hand, you don't want to push it the bleach in because that it could cause the bleach to actually leak through the hair and then end up getting on the roots. And you do not want that at all foreign, and once I'm done with this, I let this sit for about 45 minutes. The knots did turn a nice Brown pretty fast, so I let it sit for about 45 minutes and I'm now going to go ahead and wash it off so right now, I'm just rinsing off the bleach want to make sure that all the bleach is removed from The lace before applying any shampoo or blue shampoo just so that the bleaching process can actually stop so I'm using some hot water just to stop the bleaching process and remove any excess bleach that I have on the lace and I'm using my joyco blue shampoo. You could get this off of Amazon, I'm going to apply this all over the lace just to cancel out any of the brassiness inside of the closure, and I let this sit for about 10 minutes and once the 10 minutes is up, I'm going to go ahead And rinse off that shampoo and I'm going to shampoo the rest of the hair off camera foreign parted in the middle part already um. This is where I wanted to be parted at and now on to plucking that hairline. So it could look nice and natural. So I'm gon na go ahead and use my hot comb on the hottest setting and before the plucking method. I like to just push the hair back and like Let It Be flat. So I can see exactly what I'm working with how the density in front of the hairline is looking once it is flat down. You can't really see it when it's like, you know, risen up, or you know, just kind of all over the place like how the other side looks like, but once you have it pushed back with it. How comb you can see exactly what you need to pluck and what you do not need to pluck. So, as you guys can see, the hairline is pre-plucked. It still needs a little bit more plucking if you're trying to get that frontal effect on the closure, but nevertheless you can still wear it like this. My rule of thumb is, I don't like plucking off too much anyways, because um the hair sheds over time - and you do not want to have a bald enclosure all right, but I'm gon na go ahead and just you know carve out those baby hairs or like The front row where it is less dense. I don't want to pluck that area out because it is already sparse as it is, and I don't want it to be bald. So I'm just going to remove those and then just get to the dense areas. I'M going to work on one side at a time once I remove the front of the hair, and I do like to pluck when the hair is wet. So I'm going in with my Erica J fluff stuff moves just to kind of wet the hair, a little bit foreign and now on to plucking. So I'm using my Revlon tweezers and you want to make sure that the tweezers is um slant down. So you want to make sure that the slant is against the lace and not the opposite way. You do not want to puncture holes and right what I'm doing is. I am plucking behind the hairline and I'm plucking, sporadically I'm not plucking in the same place. So pretty much wherever you see that it is still kind of like you know, dense I like to go in those areas and just you know, pluck in different areas in that section, and then I'm going to use my comb and then just comb it out and Then, once you see that that area is nice and less dense, I'm going to go ahead and cut out another section and then go um behind that section to pluck some more, and this will just help give that receding illusion in a good way of receding that, In a bad way, um but yeah, you want to give that gradient from, like you know, from sparse too thick so again, you're just going to make sure you pluck in different areas as you guys can see that hairline area is starting to thin out and you Want to make sure that you don't really touch the middle part area um. I know especially because sometimes you want to repart your hair and if you end up plucking near the middle part area um, the middle part can end up looking bald and you do not want that. So I just try to avoid the middle part area um. But right now to check my work, I'm just going to go ahead and just comb the hair back as you guys can see. This looks way better than how it looked like beforehand. Y'All can see that it gives more of a natural looking scalp effect, and you know to make sure that you know the work is done right. I'M gon na go back in with my hot comb and press it down just to see exactly what we're working with, and it looks good. This is how this side looks like. While it's worked on versus the other one, where it's not and we're just going to do the same thing on the exact opposite side and again, you just want to make sure you tackle the areas that are pretty dense, avoid the middle part area as much as Possible and then once that's done, I'm going to go ahead and use the hot comb just to press that hairline back, and this is the result, as you guys can see the before and after you can see like it's night and day. It just looks great y'all. All right so on to actually installing this bad boy onto my head. I already went ahead and tinted the lace off camera, with my secret lace, tint um, but yeah. So right now what I'm gon na go ahead and do? Is I'm gon na cut off the lace I like to cut in the middle and then use my eyebrow razor just to cut off the excess lace, and I apologize for my camera being off focus that was super annoying um. But yes, after I'm done with that, I'm gon na go ahead and now start carving out my baby hairs. I do want baby hairs all across my forehead, because I'm just that extra. You can totally skip this step if you want to and just leave it as is, but I definitely did want some baby hairs because I feel like baby hairs and curly hair just go hand in hand like it just gives it that nice look so right now. What I did is I kind of separated my baby hairs in three sections. I have the middle and the two tendril areas and for the middle part, I did cut it shorter than the two sides. The sides are a bit longer, so I would say, the middle is about an inch and the sides are about inch and a half and I'm just using my eyebrow erase just to cut it off. And I'm now going in with my tvx flat iron and I'm going to curl my baby hairs for the middle one, I'm curling it upwards and then for the ones on the sides. I Am Curling it um. You know downwards. Don'T ask me why I did this. I just feel like this kind of made sense and I feel like it did. I guess, but you can curl it all up rid of all downwards, but I think I did this just so. I can signify um. What'S the middle and what's the sides, I think that's why so yeah yeah, I just want to make sure y'all curling it extremely tight and now to suit the baby hairs. I'M going to use my Erica J, fluff, stuff mousse, and I am now going to apply some of it on the hairline and then use my baby hair comb just to swoop by baby hairs and again you just kind of want a swoop hold and play around With it, y'all you're not gon na get like the baby hairs perfect on the first try, because I definitely have to play around a lot in order for it to get to where I wanted it to see. I just keep on swooping until it falls into place for you now I went ahead and did my makeup off camera and I'm just fixing up my part because I did get some. You know leakage of the bleach onto the roots, but that was okay. I'M using my Clairol root touch up in the color dark brown and I'm just touching up those roots. So that part looks nice and tight now on to defining these curls yeah y'all see how luscious this hair look. I went ahead and wet this hair off camera. Imagine I can see this is just water by itself and it is still wet but to Define these curls I'm using my Nairobi setting lotion and I'm just going to go ahead and pump. Some on my hair use my fingers just to kind of finger comb them through and then I'm going to use my little fake, Denman brush from the beauty supply store and I am going to curl the hair with them. I'M going to brush and curl the hair with it, so my method is, you know I like to pretty much um. You know, use the brush going straight down and then towards the ending of the curls I like to curl it away or towards myself. So you guys are going to see how I do that foreign straight down. I do want to make sure that the product is distributed evenly into the hair first before I start, you know curling it down um words. So, as you guys can see, I comb it straight and then I kind of flip it. I kind of flip my wrist at the end of it just to make sure that those curls at the end get defined. I feel, like you know, curls look so good when, like it has like those little ringlets at the bottom, so if you're definitely looking for that, ringlet type of vibe go ahead and comb straight down and then curl at the ends and y'all. One thing I would definitely say about this: curly hair, this curly hair, barely shedded y'all like barely and it does not tangle at all. Y'All see those ringlets, though those ringlets is popping okay and I'm just gon na go ahead and follow that same speed. On the other side, you see what's going on versus the other side and again you just want to work that thought throughout the entire hair, but once I'm done with that, I'm now going to go ahead and brush out my baby hairs, because I do like my Baby hairs to be nice and fluffy, we love a good fluffy baby hair foreign, and these are the finished results. I hope you guys enjoyed this video like comment subscribe to my channel if you have not go ahead and click that Bell to get notified. When I drop videos and I'll see you guys in the next one later,
Comments
salem's revenge: you look beautiful girl I have watched a ton of videos when I lost my hair due to sickness. Installs, wig care, scalp care etc. I think you are an excellent teacher! you take the time to go through each step and have a pleasant voice. I am glad I found your channel!! I have learned a lot from you!
Chosen ByGod TV: Hey girl it's been a minute since I stopped by. Very detailed and entertaining video. Cheers
Zainab Jimoh: Gorgeous
Fidelis' World: Viv Darling your beautiful as always ❤
Dee Luther: Road To 400k Cute thumbNail Tho U DEFINITELY Slay This Look Damn You Gorgeous As Hell MakeUp Always LooK BomB Have a Fantastic Week Too Stay Bless N Be Safe Always
Flawlesswigsnmore: Swear to you. You thought me so much. I’m so happy to have found you on YouTube.
QuiQui: Makeup and wig❤
Veronique M: Always deliver
Jamaican fairy 🧚♀️: I was already on my phone, so I ran ♂️ over real fast
TheeArkandCovenantofBeauty: Awesome so glad I caught your video when it dropped . Where did you get your Selena shirt from ?
Brendah Cissy Moore: Thanks for the vid
Sammy Da Goat:
Brendah Cissy Moore: Why not just use foundation of your skin colour
Brendah Cissy Moore: Why is plucking needed
Urban Jae: Purrrrrrrr love you Africanaaaaaa
Brendah Cissy Moore: Why is bleaching needed