Start To Finish Frontal Install *Very Detailed *|14Inch 99J Brazilian Straight Unit Ft.Iseehair
- Posted on 22 April, 2021
- Bob Wig
- By Anonymous
Heey y’all ❤️ thank you for watching this video don’t forget to like comment subscribe and share THANK YOU FOR 100k❤️ On the Road to 200k
❤️TIME STAMPS ❤️
INTRO : 0:00
HAIR PREP/ BALD CAP :1:30
LACE TENTING : 10:53
INSTALLATION: 14:12
FINAL THOUGHTS: 32:49
♡H A I R I N T O D A Y' S V I D E O:
2021 Spring Sale , Up To 32% OFF. Get New Hair For New Season ! ! !
Buy now, pay later!
Pay in 4 interest-free payment available now on https://www.iseehair.com/
♡Use My Special Code: TymarrahGi Get $7 OFF !!!
The hair I'm wearing in this video is : https://bit.ly/3veZSQl
#ISEEPrincess
Density: 150% Density
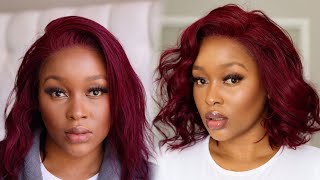
Texture: Color 99J Brazilian Straight
Length: 14inch
Cap Construction: 13*4 Lace Front Wig
♡2021 New Arrivals Highlight Wigs Brown And Blonde:https://bit.ly/3oNtkJl
Nice Packaging (Free Shipping ) 27mm 3D Eyelashes: https://bit.ly/3oK9BeW
♡Other Deals:
Brazilian Straight 13*4 Lace ront Wig: https://bit.ly/3vakw41
Brazilian Straight 4*4 Lace Closure Wig: https://bit.ly/3gu18e1
Brazilian Straight Headband Wig: https://bit.ly/32yUR8Q
Brazilian Straight Bundles With Closure Deal: https://bit.ly/3emFWEb
♡ C O N T A C T ♡
IG: @iseehairbeauty--http://bit.ly/2IyNNkJ
Email: [email protected]
Imessage/whatsapp: +86132
♥SHOP TYMARRAHGI THE BRAND ⬇️
Tymarrahgi
MORE INFO
AGE : 20
HEIGHT :5’1
CAMERA : SONY ZV1
EDITING : FCP
SOCIAL MEDIA
Instagram: @Ty.marrah
Twitter: @tymarrah__
Snapchat:Tymarrah22 5
Business email: [email protected]
PO Box
1785 E Park Pl Blvd
Box :870967
Stone Mountain, GA 30087
#WATCHIN1080P #TYMARRAHGI
#BLM.
What'S up you guys, it's your girl tomorrow, gi and we are back with another video in today's video i'll, be going into detail on how i install my frontal wigs, also i'll, be sharing a little tips and tricks on different things that i do to help me Along the way, let's get started so before i install my wigs when i'm using lace glue, i always make sure that i put on a ball cap. So before we put on the ball cup, you want to make sure that your hair underneath is slicked back so that when you are putting the ball cap on that, you do not get any glue on your hair and if you do get glue on your hair, Your hair is going to be slicked back, so it's going to be easier to take the ball cap off without it ripping off your edges. So, as you guys can see, i did use some gossipy glue, the black bottle - and i just put it on my hair and slicked it back now, i'm taking a scarf just to make sure that my hair is extra laid and then i'm going to go ahead And go over that with a blow dryer now, when i'm using my blow dryer, i don't do this for long at all. Maybe like five minutes, the gossipy glue really does dry pretty quickly. So, as you guys can see, i'm just blow drying it, and sometimes i use the cool setting or sometimes i just use any setting. Really it's just depending on how i'm feeling that day and as you guys can see, it is drying pretty quickly. So i am going to go ahead and take that off. As you guys see, everything is back. It'S not super super slick, but it's slick enough to wear it'll be fine, so, as you guys can see, i am using a just a regular beige, wig cap and you can find wig caps on amazon at your beauty. Supply store really everywhere. So i like to stretch my wigs out because my head is a little big and these aren't like pre-stretched for you. So i just like to stretch my wig cap out just to make sure that it will fit my head perfectly now putting a little wig cap over your eyes and stuff. I don't like that. It just feel weird, especially with my lash extensions. I don't do that. I just make sure it's on my head good enough to where it will be like a good size. So, as you guys can see, i did cut that small hole and put it around my ear now with cutting the hole i like to make the hole small and a little bit towards the top so that everything can be covered. And then i can have a flawless wig cap without it like showing my hair or anything. Sometimes, when i'm rushing and stuff sometimes the wig cap do be looking a little crazy, but i just be pushing with the flow, but if you're doing it the right way, none of your hair should be showing so some people use got to be glued spray or Hold sprays for their wig cap to hold it down. I preferably like using lace glue and i'm using the bold hole extreme cream for this lace glue today and i'm just spreading that lace glue on with the little popsicle stick, and i like to do one layer now, when you're putting the lace glue on, i would Suggest that you put it like a little before your rear hairline, where your hair starts, so that when you're, taking off your wig like when you're taking off your wig and it comes to taking off your wig cap, it will be a less chance of it. Snatching out your edges and stuff, but i do have ways that i use to like take off my wig cap and stuff without it snatching out my edges or anything, and i will be showing a video on how i do that shortly. But now what we're doing is just blow drying the ball cap, and normally it doesn't take pretty long for this to dry. It really dries fairly quickly and, as you guys can see, it's already turning this color now when it turns this color. That means that your wig cap is ready and you can go ahead and cut it off. Now i like to use scissors just to cut me in the middle, and then i like to take a razor, and these are three razors that you can use. This is more of like an eyebrow razor. This is one that i like using particularly and then, if i just need to raise it real quick, i always end up using the pink razor, but i really like the mint green razor that i'm using. I don't know why i really like it. I think i just like it because it folds, but i really like that razor now, it's going to be easier for you to cut, because you did put the glue like kind of according to your hairline. So all you literally doing is just cutting off all of the ball cap that doesn't have glue on it and that just makes the process so much easier, especially when you're using glue opposed to like a holding spray, because holding sprays do lift glue, will stay sticking On your forehead the whole entire time, so, as you guys can see, i'm just cutting the remainder of the wig cap that don't have glue on it and for the back. I just leave the back hanging like that. It'S okay, if it just hangs it's fine. So, as you guys can see right now, i'm just cutting off all the excess wig cap that doesn't have any glue on it all right. You guys so it's time for me to start talking for this part, because this part is where i tint the lace. So when i'm tinting my lace, i like to use this brush or any other flat brush. Just like this, i got this brush from my local beauty supply store, i'm not sure if you can get this stuff off of mine or whatever, but you know just a good flat brush that you can really like get into that's what i like to use now Today i did go to the beautiful store and i picked up some new things. That'S why you guys see me using the boldhold lace glue. I haven't used this style of glue before so i am, you know, trying some new things out, so you guys always have a lot of questions about me to take my lace and you know i do show you guys in some videos what i use, but i Know everybody doesn't watch like all of my videos, like some people, don't watch all my videos, so you might have not catched it in the last video, but to this this video, you guys, are going to know everything i use the ruby kisses 3d face creator. It'S like, i think, it's like a foundation. It'S really supposed to be a foundation, it's a cheaper foundation that you can get from your beauty supply store, or i think you can probably get it off amazon but um. I know they have like a big. They. I'Ve seen like a big like a big pan of all different colors from this, and i'm really really trying to find that because it will be much easier than just having these small little things. So i have the shades 14. So this is shade 14 and let me go ahead and open this, for you guys. I do fluctuate between the letters um i mean the numbers are the colors, because you know brown skins. You know we'd be switching okay, we lighter in the winter and darker in the summer, so this is number 14.. This is what it looks like and then this is what it looks like with it open. So these colors are more, you know chocolatier and stuff. So this is what those look like how i knew what my shade was off the back. I watched a lot of slay by jordan videos and i just look at the models that he used that were kind of close to my skin complexion and i just got the colors that he used. So this is number 12 and it does have more like a lighter thing in it. So this is white and this is like a little darker and then this is, you know, number 12, and then this is how some of the cases might look as well. They might look like this or they may look like the older version like this, but they are the same product. I'Ve been using 11 a lot recently and i've been mixing them together. So this is what 11 looks like this is 11 and this is what it looks like, and this is my old 11 that i still have my old 11 and i always for some reason, be breaking the top. So that's why i wanted to get some more. So this is 11, so these are the same and you know i kind of just morphed them together. So i might go between shades today and then this is an old 14 that i've been using. So you guys can see that i really have been using it. Go between 11 and 12 because i'm not sure i think 14 will be a little bit too dark for me, and i don't want my lace to look dark underneath here's, the 11 and i'm just gon na swipe, both shades. So i'm not sure which one is the lighter and which one is the dark. Okay, so the lighter one is on the left, no yeah. The left. This is my left. You guys is right, so wait yeah! My left, you guys is right. So the um lighter shade is on the left and the darker shade is on the right. So i just take from both - and i just kind of feel, like the 11 kind of gives me a nice blend, so you guys will see me putting it on as long as you really have everything majority like together, you should be fine. Everything doesn't have to be super dark, um, it's okay, if it kind of looks like this as long as you have a tinted ball cap, but this wig is from icy hair, and this is the box of the wig. This is a 14 inch wig and it is 130 density. So this is what the wig looks like. It is a pre-colored wig and they did a amazing job at coloring. This wig and i did bleach the knots and when i ran the water through the wig. No color came out the sink, so they did a excellent job because past companies that i've used, i never um. If you guys, if you guys been rocking with me, you know some units, some color units. I would tell you guys be careful because it will run on your shirt, and i know some people told me run it in cold water before you did that. So i did that just to see. I ran it in hot water just to see and no color came off, so that was really really good and i'm just going to show you guys it's a 13x4 wig. So this is what the inside and the construction of the wig looks like. But what we are about to do is we're about to do the same thing that we did for this ball cap for this um frontal part. I mean i have a lot going on you guys. You guys really don't see this part, because i i really have a lot going on over here when i'm doing this type of stuff, so i'm just gon na show you guys what i'm doing so. I'M gon na take my 11. So this is the 11 of the ruby kisses foundation and i'm just gon na dab it okay and then just put it all over. My lace do just fill in this color with the got to be glued spray, so i'm gon na go ahead and just spray. You don't want to coat it too much just a little bit blow dry, it on um low, so i'm blow drying on low and i'm pressed to cool. So i'm gon na just do that for a couple seconds and then, after that we are going to go into the installing so go ahead. A lot of people ask me what i do for the back of the wigs. As you guys can see it's an extra piece of lace on the back of the wig, i never do anything with the back of my wigs ever. I really don't want to put any glue to the back of my hair so, and it's not even enough to really put on the back of your hair, as you can see so only thing that i pretty much do for the back is i'll. Like put these clips like this clip i'll put it in the back or sometimes i will adjust these two, but one tip is don't adjust these before only if you try it on the wig and you feel like it's too big then adjust it. But what i find is when i used to adjust it before um the used to be hard for me to position my lace according to my hairline. So all i do is just cut this off. That'S all i do and i don't do anything for the back of my wigs. I don't do anything to secure the back of my wigs because i don't like i haven't been like doing anything to where i would have to secure it and most times, even when i used to do hair. I never touched the back of the wig because you really can't tell like you really even can't tell so it doesn't really matter honestly. Now, i'm just gon na go ahead and throw my wig on. So i cut the back, and this is what the back looks like so um. If anybody is confused about what i do to the back of my wigs, i answered hope i answered. I said i answer your question like like. I just knew. I answered your question. I hope i answered you guys this question about like the back of the week or whatever so now, we're on to the steps that you guys pretty much know because, like i don't do nothing pretty much different, but um we're just gon na go into the installation Process so i'm gon na go ahead and put this wig on my head, oh, like i said before, there is a reason why i do not tighten the back of my hair, be the back where that elastic thing is before i install, and that's because of this Right here, so i didn't tighten it and everything is positioning exactly the way i want it to so. I'M really happy about that and um this right here, don't do this. I used to do this a lot like doing this before i put on my wigs. Don'T do that just go ahead and do it before on your wig head just hot comb, um your hair, so that it can be pushed back before you put the glue on. I used to burn myself a lot of times doing that and that's why i have some burn marks. I mean they're going away, but let me see if there's a if y'all can see this white right here i have a burn. I have some burns right here. So just make sure that you don't burn yourself so now here comes the easy part, and this is really my favorite part because after this and you cut off that lace, child you're almost done so i'm happy. So! Okay, so, like i said before, if you guys didn't catch it, the first time i'm using the bold hold extreme cream um. This is the extreme hold, no odor humidity resistant, oily, skin proof and waterproof. So this is the bolt hole that i'm using today. You guys know i've been loving the bolt hole liquid gold, i've used bullet hole active before, but i haven't used this before and i got this from my local beauty supply store and if you cannot find at your bootspot store, you can go online and just type In boho just look search online y'all. You won't find it so um. What i'm gon na do is i like to do some dots around the hairline first and then you know go ahead and we're gon na go to the next step. So i'm gon na do some dots right on my hairline right, not the hairline, but right on. My wig cap and i don't do any dots right here. First, i leave those to like doing it last. So i'm just gon na do my little dots right on my hairline and then i'm gon na take my popsicle stick because i'm so tired of having glue everywhere having glue on a comb having just i'll be rushing sometimes i'll, be spreading. My glue with the bottom of this i'll be spreading my glue with my fingers and i'm just trying to make my installs as stress-free as possible. So this little popsicle stick works. I did the popsicle stick before, but i don't know why i stopped so, as you guys can see, i'm just spreading and um spreading it wide is really good, but this is just how it's looking right now, since i'm spreading it with this popsicle stick but um. I spread on my ball cap first and then um. I do a little bit before my uh ball cap and then there's no hair over here. So it really don't matter when you put it on your skin omg. I forgot the skin protect, really not supposed to do this, but i'm gon na cover my glue, and this is the skin protect from erica j um. You guys already know how i really feel about erica j products, but i like the skin, protect. So i'm just going to keep using it, so i won't waste my money. Let me just spray this ooh. I just spray my eye, oh, what's going on! Why is it spraying like this so spraying down? Y'All? Okay, whatever oh? Okay? Well, i know that's something that you were not supposed to do. Don'T put no skin protect on your glue but uh. I just had to put the skin protect on there, because i did not want to miss that step. But before i put your skin protect on before you even do anything so i'm gon na just fan it real, quick and then we're going to go on to our next layer. So i normally like to do. Sometimes i just turn the the blow dryer on and just get to blow drying, but um i'm going to put it on low and then do the cool settings i'ma just for the next um, the next layer. I'M going to put it like right here: try to glide your popsicle stick or whatever you're using across your hair, so that it will give the glue a fair chance of drying clear, opposed to drying white. So i'm about to put my hair in a ponytail. This is what i normally do and you guys i really am going over a lot of steps that i do some steps. I just let y'all watch and i don't explain, but i'm really taking my time out to explain to you guys today. So i like to just take a spray. This is the rs super hold spray. I didn't have this for a while. I really like this spray and it's really cool, so i just spray a little on my hair and then do this. So i didn't spray a lot, so don't swear a lot. I just sprayed a little bit just to get my hair back just to get it like back and then i'm gon na go ahead and take an elastic band and put it right where i'm laying my laces a bigger elastic band and i'm just taking a bigger One because it's longer and i can tie it quicker and we're not like we haven't - cut the lace yet so it's okay to just do this, like that, so um, what you can do is i like to blow dry a little bit walk around eat a little Bit you know, but not too much, i would say blow dry it for up to i mean you could blow dry, sometimes i'll be blow drying it for 10 minutes and it'd be stuck on there and i just go ahead, but for a full good dry. I would say at least 20 to 30 minutes or 20 minutes at the least or even 15 minutes. If your blow dryer is powerful, but i'm gon na just blow dry a little bit and i'm gon na go and do something real, quick and then i'm gon na sit under the dryer for probably like a good 15 to 20 minutes. And then i'm gon na come back, okay guys! So now it's time to cut off the lace and when i'm putting off the lace, you see me guys just cutting a little bit. First, that's just to give me a good little little area. I don't know what you want to call like a good little, a good little canvas for my razor when i'm cutting. So today was like a worse example of cutting lace. You guys but um. You just cut the lace and i'm just cutting it as good. As i can for right now, because there is some pieces that i did need to add some more glue on but um as you guys can see, i'm just cleaning up everything that doesn't have glue on it. That i feel like needs to be cut off because really, when you're installing a wig anything after you put the glue on it, any piece of lace that don't have glue on it, it would be best for you to cut it off. But you know some places that you probably missed, and you know when you're putting on the glue i like to put on the glue according to my hairline and not too much above, because i don't want to have glue stuck on my forehead. I don't have to clean it off and you're just rubbing stuff on the lace and it just becomes too much so i would rather have to go back and put glue in some areas rather than have glue like all over my forehead and places that it just Don'T need to be so, as you guys can see, i'm just going over different parts where i see that it needs to be cut and, like i said before, i don't like putting glue on the side of my sideburns, like on the first initial gluing. I just like to do that a little bit after and you guys are going to see me do that. But yeah like after you put the glue on you're cutting off your lace, just make sure you cut off everywhere and make sure it looks good to you and then go ahead and go back and put all of the glue in the areas that you would need To put the glue at okay so right here, what i'm doing this is just the other little stocking cap that was in my pack and i just needed something to use right then, and there so i just told i just chose the other wig cap, so i Did spray some puff it up spritz on there just so i can kind of the pump it up spritz when i spray on my hair, i kind of really don't like that. It'S just so like messy and stuff and pump it up. Spritz gets really sticky. So that's why i use it just to dab on there just a little bit. So this is the lifestyle edge wax stick type thing. I found this at the beauty spot store and i just wanted to use it just to kind of see how it was now. Um my opinion on this wet stick. I feel like it's a really good wax stick for like laying down your hair and stuff, but don't put too much. That was the mistake i made. I put like a little bit too much of the wax stick on my hair and it kind of made my hair a little stiff. So if you do want to use this wax, stick don't use too much because a little goes a long way and that's what i had to realize, but all in all i really like this wax stick. It says you post, you can use it for your edges and stuff, but you know um, i'm a black girl so um. I wouldn't trust a edge wax stick for my edges. I'M a stick with my wet lining stream for my little curly hair, but um as you guys can see, i'm just using my hot comb and just trying to get that area flat before i go ahead and start styling and stuff, because i am cutting this into A bob, so i did once like the side part little thing. I wanted the area to be as flat as possible and i did go ahead and part my hair off camera. So i'm sorry, if i didn't show the little parting, as you guys can see what i'm doing right now is just kind of like touching up the part trying to make sure it's to my liking, but yeah my camera died. So i couldn't really show you guys me cutting this side but um. What i can say is when i'm cutting my hair cutting hair to me is very foreign. I just do what works, because i'm about to go. Ask my mom to cut the rest of this. In the back, like i normally just ask my mom to cut the bag when i'm done cutting the front, but i'm gon na just show you guys me cutting this whole part and then we'll get to the baby hairs. So before my mom helped me cut my bob so um, just showing you guys what it looks like before. I even straighten it or whatever. No, it's not perfect, but it will get us where we need to go and we're just gon na go ahead and do these baby hairs. Okay, now before i did want to get started to do my baby hairs, i did want to kind of clean up the hairline a little bit with some more of that ruby, kisses foundation, cream stuff and um. I did that just a little bit just so. I can um, you know, morph the lace into my skin, but um now we're going to go ahead and start doing the edges now for me, preferably for this style i feel like i could have, did the edges a little better, but i'm just showing you guys What i'm doing and if you guys wanted to see like a more in-depth video on me doing my edges on videos i feel like i did them really good click the cards and there is a couple videos you guys can look at that. I feel like i really murdered and bombed the edges, like i feel like i was stepping on them edges. You know: okay, but um, i'm um what i'm doing right now, i'm getting off track y'all. What i'm doing right now is i'm just plucking behind my hair and the next hair install that i do that's coming soon. I will be really really really really plucking that unit really going to depth and plucking. Honestly, you guys i'll be feeling a little lazy, sometimes and sometimes i'll, be like man. I don't even want to pluck that much, but um plugging on your head and stuff is fine, but i just feel like if you do want to like a bomb bomb. Stick sleep bomb bomb install make sure you guys just take the time to pluck you guys i'll, be like a little lazy but, as you guys can see, i did cut my edges, the ones that i wanted to use and for this for today i'm i'm just Taking it section by section, i didn't section out all the the hair that i'm using for the edges right away and i'm just using some gorilla snot to lay these edges, and i honestly feel like using that little small straightener to curl your edges before is a Very, very bomb bomb way to do your edges. I forgot who i seen do it first? I think i've seen slay by jordan. Do it or i think i've seen somebody on instagram? Do it and i know after um, arrogant, tay's master class. A lot of people found out how to do it after that, and it was like arrogance. Hey came up with this and i'm like no, no, no y'all better, give whoever i seen do it that credit, because i see them do it first, but you guys, you know everybody just be doing anything. Don'T take me seriously what i'm saying like he didn't invent that or whatever, but you know um i for really forgot who i seen do it, but after that i tried it and it was so bomb but um as you guys can see what i'm doing right Here is, there was a little extra piece that i had to put take off like on the side where my sideburn was, and i just took that off and i just went ahead and did the rest of my edges off camera, because my camera died and i Was just like whatever but um now what i'm doing is just straightening my hair out and after my hair is straight. This will be the end of this install. So i hope i really kind of like answered a lot of you guys's questions on different things that i do with my installs for now on. I feel like most of my installs they're, going to be very detailed and i'm going to give you guys details every time and i'm trying to be like more interactive, because you know some of my installs. I just feel like. I was just showing you guys, and i feel like when i take the time to actually like give you guys different updates on what i'm doing and different things that i do, and you know just really engaging with you guys. I feel, like you, guys, appreciate that content a little bit more so from now on, when i do my installs, like i'm, going to really really put my all in every install and show you guys different things and interact more, so i feel like you guys, will Really really appreciate that and yeah i sprayed myself in the eye that was hurting real bad y'all. It really was like, oh my god, but yeah you guys. So i want to say that i really really appreciate you guys, and you know it's going to be more content coming soon as well and not just hair videos. You know it's going to be like a whole array of different things coming soon so yeah. So this is the final look that i have for this hairstyle and, as you guys can see, i kind of like did this to it and then brushed it over like this. I really like this hairstyle, it's so cute and i love the color and, like i said before, the color did not bleed on anything, and the only thing that i wish i could have did a little differently is not put too much edge. The um the wax stick, because the wax stick kind of made. This part over here like a little stiff but um. This hair is so bomb and i really really loved it um. I got some cute cute pictures with this hair and i just really like this color, it's really really cute but um. I don't like the fact that i put too much edge wax on here, which made it look like a little a little. I don't know. I don't know, but i really like this hairstyle, i'm feeling it um, like i said before this hair is a 13 by 4 frontal and it was 14 inches and i did cut it into a bob also. I would like to say thank you guys for getting me to 100k 100k. Giveaway information is coming very soon. Information for this hair will be down below so make sure you guys check the description box and you know check all that out. Thank you. I see here for sending me this hair. This hair is bomb as always. So if you guys, like this, video, don't forget to like comment and subscribe to your girls, youtube channel and don't forget to press the notification button, so you guys can see every time i post and we'll be back with more videos soon stay blessed.
Comments
Lani Chenelle: I love this video!! This really helped me install my first wig and it came out pretty good you’re so talented !
Kessh J: I just love these long install vids ❤️ very detailed and well explained !!! Keep it up girly I’m learning better from your vids than other YouTubers ❤️❤️
trinai02: This was one of the best, most easily to follow installation tutorials I have watched. Thank you!
It’s Azhane’: I’m so proud of your success I’ve watched you grow!
Icey Smith: I been trying to learn how to install my own lace frontal and your videos help me out so much Thankyou ❤️
Micheale' Mulder: lovee this install and how detailed the video is! thanks
Madison Allen: Girl look at you. I LOVE THE WIG AND THE BOB CUT YOU DID.
Fatuu West: This makes me excited to install my second wig
Alanna Copeland: You did so great at explaining I feel like I could start and go along with you for an install
Micah Scott: I love this video her personality is so transparent
Sundae Sundae: Umm, thank you! I have enough confidence now to try it on my own. Thank you thank you beautiful ☺️
Alyssa Golding: This wig is soo beautiful
Divinty Beauty: Yesss your channel is so inspiring girl thank uuuu
aurielmichelle: Your hair is everything✨
Louise: Beautiful I love this hair color. You did amazing job where did you order your wigs from
Imana Isis: So pretty and I luv the hair colour
Ayvah Mcgary: When I saw all her videos I'm like the lips are in every video love that ❤ love you tymarrah ❤
thejaylahmarie: girll ! i’m early and once again another slay , that is your COLOR !!
Life With Joo: Girl i’ve been watching your videos all night, I’m early with this one
Jewelz OverEverything: It’s the color for me! You did that
Alyssa Golding: It's the 100k looking sooo good for me
Bre'Ani Knighton: I know that I am late but I was wondering when you use the hot comb what setting as in heat wise do you put it on? I also want to say that I love to watch your videos
Penelope Machete: Beautiful!! next time please do a video of a wig reinstalling. A wig that's been cut already
Talayeh Bryant: How long do you bleach your knots?
Latresha Holman: I love your install I was wondering were you get your flat iron from mame
Shirley Sato: beautiful!!
_Mariannaj _: Plucking and bleaching video next!!!!❤️❤️❤️
Abi Gail: Is the details for me❤
Abi Gail: My girl is back ❤
itzzNiyla'sWorld: How fast was the shipping?
Stafien Bowie: You're so prettty!!!
Jazmine Alba: I’m a complete newbie to wigs and I was curious if you wear your wigs multiple days or if you take them out nightly? I’m 90% of the way through the video so I apologize if this was answered at the end. Thank you!
Janice Bowers: You have a lot of info you are very clear in giving instructions and you understood the assignment but please cut the talking down.
Junior Chaves o Picasso de Yahushua: You are such a beautiful woman ✨✨
Angel Lamae: hey love where do you place your wig at ..like on the hairline or?
Say TV.: Girl this would’ve looked even better with the swoop bang
Glory Gabs: Please is this glue preferable to ghostbond ? And what if the white keeps showing
Amxrii Monique: How do you fix wigs that are too big for your head ?
Slim Thim: What’s the name of that spray?
Journey:
Itzzzzzzzk: Scalppp
Shanay Brigante: What’s the Tea on you with Erica J products ( New Subbie )
L P: Waaaay too verbose!