This Is My Colour | *Detailed* 99J Wig Install | Berry'S Fashion Hair
- Posted on 17 August, 2022
- Color Lace Wig
- By Anonymous
Hey Dolls
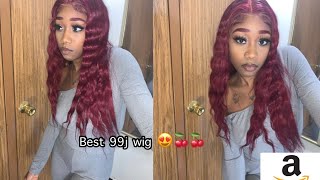
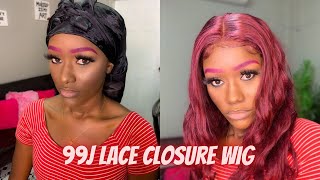
In this video I'm installing a 12” inch 99-J lace front wig from Berry’s fashion hair.
I hope you enjoy this video
WIG DETAILS
Using Special Code:Palesa17 To Get 17% OFF For Same wig in video➤ https://bit.ly/3p8mIbp
Hair info: #99J Bob Wigs Straight Transparent Lace 13*4 Frontal 12'' 150% #berrysfashionhair Website:❥ https://www.berrysfashionhair.com
● ▬▬▬▬▬▬▬▬▬ ♛ #BerrysFashionHair ♛ ▬▬▬▬▬▬▬▬▬ ●
Get $10 OFF For All Products, Code:Palesa10
➤Flash Sale 99J Long Wig: https://bit.ly/3zUKQDo
➤Hot Selling Bundles: https://bit.ly/3p8GF1A
➤Hot Selling Closure&Frontal: https://bit.ly/3QFNO5r
➤Hot Selling Lace Wigs: https://bit.ly/3dnulIi
● ▬▬▬ ♛Follow #BerrysFashionHair on social media ♛ ▬▬▬ ●
➤Youtube@Berrysfashionhair-Jamie: https://bit.ly/3axTGhE
➤Instagram@berrysfashionhair_jamie: https://bit.ly/3axTLBY
➤Facebook Page@Jamie-Berrys fashion hair: https://bit.ly/3PlZ7Pu
➤Facebook Goup@Berrys Fashion Hair Group: https://bit.ly/3P2qwGq
➤Pinterest@Berrys Fashion Hair: https://bit.ly/3P2gWTI
➤Tiktok@BerrysHair_: https://bit.ly/3nTNJ1k
➤Store Address: Atalanta, GA
Tel & WhatsApp: +8618126510557
Email: [email protected]
*FOLLOW ME*
Instagram: https://www.instagram.com/palesa.m._/
Twitter: https://twitter.com/palesa__m__/
Business enquiries : [email protected]
Hey loves: welcome back to my channel. My name is parissa m and welcome to this wig review video. If you're new to my channel, please don't forget to click that subscribe button. Don'T forget to hit the notification bell, so you know when i release a new video. Today'S video is all about this gorgeous gorgeous bob. It comes from berries, fashion, hair and they sent this to me to review. I did tweak the color a little bit. Please don't forget to leave me a comment down below. If you have any questions, i will leave all the details for you in the description box down below, enjoy the video this hair. So this hair is super soft. I'Ve experienced no shading. I haven't worn it yet, but this is what it looks like it's a frontal wig, and this is the color of the hair, very bouncy and flowy and full. I think so. This is what it looks like i'm going to try it on with you guys and explain to you why i'm going to be doing the tutorial with this hair. Okay. So this is what the hair looks like. The hair is a little bit too bright for my liking, like it's more on the reddish side than it is on the burgundy side, which is what most 99j rings look like and honestly, i don't feel like it suits me. I don't know like it's too bright for me type of situation. I hope you get what i'm saying so i am going to tone this down with hair dye and i'm going to show you guys the entire process of doing that. I prefer the hair darker, and that is what i am going to do with this hair, but yeah so to tone the hair i'm going to be using this renew die. It is the color 3.16, which is burgundy. I got two boxes. I wish i had gotten three in hindsight, because by the time i got to the frontal it was finished, so i'm just opening the bottles and i'm putting it in this little black mixable that i got from this camp and i'm just going to follow the instructions. Add the die and the developer, so i'm just going to add the second product from the second box. Add them all out together, try to scrape as much of the product as you can from those boxes, because every lost job counts and once i've opened all of them and put them in my bowl, i'm going to start mixing. I just mixed with the brush. That came with this bowl, it's like a dying brush, make sure you mix it, so you don't have any lumps and once it's mixed well, you will see the color does tend to change a little bit and if you leave it for a bit, it oxidizes and Actually turns a little bit burgundy, but yeah, that's all i did if you are working with color. I would highly recommend that you put on the gloves that come in the box because it will stay in your fingertips, even if you're working with bleach that tends to burn your skin. So all i'm doing is. I am going to apply the dye using the brush. You can see i've already put my hair in sections with these hair clips. It just makes it easier to work, and all i'm doing is i'm literally spreading the dye on the hair and then going in with my hands and just sort of making sure that all of the hair gets saturated in the dye mixture. So basically, that is all i did applying the dye mixture. My battery did die while i was doing this, but all i did was rinse out this dye with cold water. I did not shampoo the hair and then i used the pantene color treatment, um that i got from this cam and then i let the hair air dry as per usual. The next step is obviously installation, so i always start off with brushing my edges back with the soft and free edge gel. All this does is just move my edges out of the way, because i will be using a holding spray. You don't want to apply holding spray to your edges, because when you take your wig off chances, are it's going to come off with some of the hair from the hairline? So this is what the wig looks like after the dyeing process. It'S still on that reddish side, but then it's got this lovely like it's got now a purply burgundy like undertone thing like it's gone, a bit darker, which is exactly what i wanted. I'M just going to brush back the hairs position. The wig, this wig is a little bit big for my head, but i'm going to finesse it and i'm going to let it sit properly, so i can secure it and spray it down with the holding spray do so. This is easily the worst part of wig installation for me cutting the ear tabs, because sometimes i get it right, but sometimes i get it wrong, but it's very important because if you cut them correctly, they will easily lay on the sides of your face and that Will give you a flawless install, i am still learning to lay down side tabs, because mine always manage to lift some way, but practice makes perfect so simply cutting the lace i like to go in a zigzag motion. This is also boiling down to preference. I don't like to leave a lot of lace on my wigs, so i do leave like a bit of lace, but not too much, because then that kind of sticks out it doesn't melt as well. For me, then, i'm going in with my tresemme extreme holding spray. If you want to buy it, it's the black bottle with the pink and it has the number four on it. I have been loving this spray little to no crunch. It sticks very well, and it's not so harsh. On my hairline or my skin. I love love. Love this, i would highly recommend you get it. It is especially friendly for beginners and with the nozzle. I can aim it directly where i wanted to, unlike that other glue, i'm not mentioning any names. So after a few minutes, i'm going to pull off my um edge band, and this is what the hair looks like it melted very well, i like to go in with a comb and just gently lift up the hairs that got caught by the glue and just Brushing them back put your finger on the lace just so it doesn't lift. I went and did my makeup off camera and i'm just going to let the hair down. At this point, i really wasn't sure what i was going to do with the hair. So i just combed it a little bit messed around with it and then the idea hit me. Let'S add some curls to this, give it a nice bit of waves and let's see how it turns out, but i'm very, very happy with this hair. It does shed just a little bit, but that's what pre-colored hair does it's nothing to be alarmed about and using the brush i used to do my foundation. I am just tapping on the edges of the lace just so it blends in a bit better. So you guys know i'm a sucker for a middle part, so i decided today to try a side part. I think it's going to look cute. So what i'm doing is i'm just parting, the hair with a comb and because you can see that here is kind of stubborn, i'm going to go in with my hot comb just to help it lay to the side to style the hair i'm going in with My safeway curling tong and i'm literally just wrapping the hair around i'm not going for perfect curls because i'm going to comb them out. I just want the hair to have like a little bit of wave and that's all i'm doing it's literally so hard for me to curl here on my head, but i am trying today i curl better on a mannequin head, but it is what it is and Once i was done, i just took a comb that had like a white side with white teeth, and i literally just comb through that curling move my fingers through it try to place them, but you can see the bump at the top, looks a little bit like Too lifted for me, so what i'm going to do is i am going to keep curling the hair just so i can place it better. I didn't want to cut any layers in this wig because it is a short wig to flatten that curve right in the beginning. I just went in again with my hot comb and i just kind of pressed it down, so it would sort of sit better, but that is it for this tutorial. If you're new to my channel, please don't forget to click that subscribe button. Don'T forget to hit the notification bell, so you know when i release a new video. Please don't forget to leave me a comment down below. If you have any questions, i will leave all the details for you in the description box down below you.
Comments
Kutlo Masole: Looking great Palesa,i was super afraid of coloured hair,now you made me want to try it out♥️♥️
Mamma Leah: Wow girl the colour is soooo cute love it,and it suits you.❤️❤️
Talani Chauke: Love love this color on u hun
Lehakoe Lesetedi: The gorgeous gorgeous Bob suits so much... I hope on that day you and hubster went out for a date night because wow people needed to see you
Moitshepi Sparkles: It really suits you ❤️
Mantle Yekelo: It suits you perfectly
Esther Tibane: Gorgeous Gorgeous Bomb❤I love the dark color aswell Yeyii you looked absolutely GORGEOUS ❤
Zama_Omuhle: You really finnesed the hair,the color suits you
Busisiwe AB: Cute cute ❤️❤️❤️love the colour
Brendah Kekana: I remember when you used to be so afraid of coloured wigs....now look at you!