How To: Quickweave W/ Leaveout : Very Detailed Beginner Friendly
- Posted on 11 August, 2022
- Bob Wig
- By Anonymous
Welcome back to my channel. Here's another video for you ! Watch as I complete my Quickweave.
Comment, Like and SUBSCRIBE :)
Music by Ryan Little - Sweet Relief - https://thmatc.co/?l=0E2BAF65
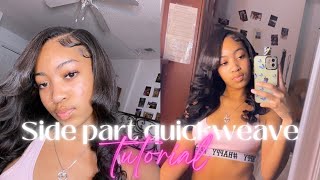
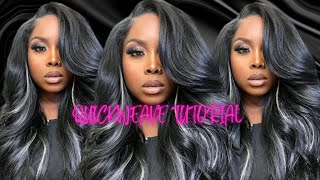
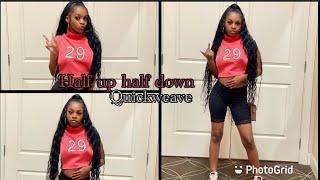
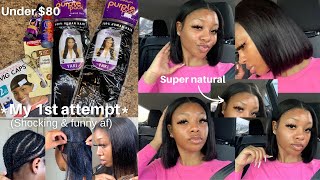
What'S up y'all welcome back to my channel, it's paige cheyenne! If you are new, just stopping by don't go too soon definitely continue to check me out press the subscribe button, hit the notification bell and leave a comment down below. So today i am doing a quick weave on myself started off as a side part, and there is a surprise at the end, okay, but i am doing a quick leave today, so i kind of want to take you all through the whole process with me. If you did not check out my bleach bath, video on my bundles definitely check that out, because i am using those same bundles in this video here. So i'm just going to start off with finding where i want to where i want my side part to be and how i kind of want it to lay um. Definitely try to give it that angle, so you can have it fall in your face. A little a little bit, if you are choosing to do a side part, i was really really really really contemplating. If i wanted a side part or a middle part, so yeah y'all, it was like the hardest decision, but whole story behind it. But once you find your part go ahead and make sure you have enough leave out to cover your tracks with a quick weave. You probably don't need that much leave out simply because um the glue allows you to get closer to your leave out area. So the less probably the better, however, if you want to be able to put it in a ponytail, if you want to wear it like a versatile, quick weave, you will need to leave out more. However, this is not. I repeat: this is not a versatile, quick weave. This is going to be a one part. Only quick weave. I did leave my perimeter out in the front. Just so can be natural if i do choose to pull it back, but all my back is actually braided up so um. I'M making sure that i leave enough out on my side too. So when i comb that back or when i curl it back, it's covered really good. Some people choose not to leave anything out on their sides and that's okay too. It just depends on how you're going to wear it. So if you know that you want to like do baby hair, if you want to comb it back, if the wind is blowing, if you want that natural more natural look, definitely leave out some on your perimeter, otherwise um you don't have to leave it out. So the way that i'm going to glue it in is going to allow it to fall over and still fall. In my face my now, i want to start my foundation. One thing about quick weaves for me: they're not made to last long. If i wanted something to last longer, i would have done a sewing, so i say that to say that my foundation, my braids, are going to be bigger. My parts are probably not even going to be straight, but if i were to do a sew in my foundation and my braids would be a lot smaller, a lot intact, a little more perfect right, quick weaves, i'm throwing a cap on and i'm glowing right on Top, so it's okay! If one is okay, if you don't know how to braid, you could even put it in a ponytail. If you really wanted to slick down the ponytail, but then bigger braids are also just absolutely fine, so it really depends on what you feel like doing, how much time you have how long you want it to last, etc. It also depends on the density of your hair, like if your hair was very very thick, and you wasn't able to slick it down in a ponytail to do a quick weave. Then i would say: do braids, but you might even have to do braids. That are a little bit smaller because of how thick your hair is. So it really just depends on what your hair is like. So just be mindful of that, as you can see, this braid is pretty big. I'M just going to continue to do this throughout my whole head connecting my braids and then i'm just going to bobby, pin it down. So this is the finished product of my braids. They are hot mess, they are not perfect, and that is okay. So i'm now going to um, i think i bobby pin them up. Yes, i'm going to bobby, pin them up and then i'm going to get ready to put my black wig caps on, i sprayed the guy to be spray because i think it gives it a little bit more security and stickiness for when you're going to put the Cap on now, when i put my first cap on i'm going to put it along the perimeter of my foundation, sometimes you can, and some people choose to do this as well. They pull it all the way over and then mold it down, and then they cut the perimeter um because i was at home and i wasn't at the salon, i didn't have a hooded dryer. I chose not to do that method because i knew it wasn't going to mold how i needed it to if that makes sense. So this is my first cap i am going to put a second cap on second cap. Just gives you a little bit more protection between the glue layer and your natural hair. So you can see that i have no back out at all. Look at my baby hairs and here's the second cat right here. So i'm going to use the concealer to outline where my leave out is, and it actually helps you know where you are gluing your tracks, um. I actually could not see where my leave out was so. I ended up taking off the second cap, then putting on the concealer and putting the second cap back on some people even just use one cap when they're doing a quick weave. I think, as long as you know how to protect your hair, that's kind of really all that matters, so i just use two because i know it's going to give me a little bit more protection from the glue to my natural hair. So this is me putting the second cap back on. As you can see, i can actually see where my leave out is and where that line is and then i'll do another outline with the concealer. Now i'm going to use the salon pro 30. Second, moroccan oil weave underwrap. This basically acts as a protector barrier between your hair and the glue. And what you do is you just take a color brush and you put it all over your wig cap. You do need to let it set and you need to let it dry really really good um, because if it's wet, i find that the glue mixed with the dampness from this product. It kind of just doesn't mix at all, so really make sure that it's dry. Now, granted um you're putting glue on the bundles itself on the weave itself, so you are going to get a little bit of glue on the cap. However, this just really helps um when it's time to take it off, it really helps it slip right off. So you just want to cover the cap completely make sure every spot is covered. I think, after this i even put more of the got to be spray on it too, and then i'm going to blow dry it until it's nice and dry. Try not to rush this process when you are blow drying really make sure that it's dry, because you kind of want it to be hard, because that's how you know that that cap is really sticking to your head. The last thing you want is to complete this whole process, and then it slips off so now we're going to get ready for our lovely bundles. So guys, if you didn't check out my bleach bath, video definitely go check that out. These are the results from the actual video. This is the very first one that i gave a bleach bag, which i actually left in the longest. So it is the brightest the next one i did was. Let me see hold on this one, which is a more chocolate brown um in my natural hair, the back is a chocolate brown and then the front is lighter, and then i went back in with highlights. So that's why i wanted to give it different tones and different dimensions. So this is the darkest one. So i want to put this in first and then this one i left it just a little bit longer, so you can see it's lighter than the brown, but it's not as bright as the blonde, so three different tones, so we're going to start with the brown First and they're all the same length so um. If i had different lengths, it definitely would matter but they're, not so that's, okay and i'm just going to start in the back i'm using the 30 second black hair glue, i'm using a nice fine layer along the weft. You do not want to over saturate the glue on the weft. One is never going to dry. Then it's going to end up slipping and two is just very messy. So just keep it nice and neat nice fine layer and take it all the way across. One thing that you can do when you are adding attracts is simply just putting a blow dryer right over it. It just kind of gives it a more tacky um. It helps it dry a little faster and it makes the glue a little more tacky. Another thing you can do is also spray that weft with the got to be right along it makes it stick a little bit more, so i'm just going to continue this process. As you can see, i am cutting from ear all the way up to here. So this is allowing the hair to fall in my face um to cover up kind of my perimeter a little bit, i'm moving on to the second bundle, which is the bundle that's kind of the in between color. So i'm going to have this sit in the middle, which is going to help it really blend very well. So just continue the process. Some people can get away with three bundles. Some people can get away with two bundles. It really determines how much hair you leave out how much of your natural hair, but then also how much fullness you wanted. So some people don't like a lot of hormones, so two bundles is actually enough if you were using packed hair. Most people use two packs of hair, but with the bundle hair, i think you do want to try to get three in because it still gives you a nice natural fullness to it. Now we're finishing off with the brightest bundle again, they're all the same length. So i can't even say the shortest bundle. It'S not, but this is the brightest bundle, as you can see, i'm taking it more in my face, so it hangs more of a bang so that fullness is there, but just continue the process. We'Re almost done. It'S actually a very fast process. I want to say to glue in probably took me 30 minutes if that so majority of your work is going to be your foundation and getting that cap to stay down do so this part, y'all y'all need to be very extremely careful. Okay, be careful when you are cutting out the cap where your leave out is because the last thing you want to do is cut your natural hair, so i fill around first, i lift the cap and then i take my scissors and i actually lift my scissors Up okay, so i don't leave my scissors straight back, because that can also give you just more opportunity to cut your hair, but i lift my scissors up going towards the sky or whatever and right here like you, can see it right here and then i cut. Okay, so just be very careful when you're doing this, it is not it's not hard to actually cut your hair. So just take your time so i finished taking off the cap and then i actually glued one lash track to my perimeter. Just so it has a nice blend. What i did realize is that i probably should have left some of the root on the bundle black, but that's okay, because my root will cover it up. My ends are going to definitely blend with the bundles, so this is the finished product of my side part, so i'm just blow drying to give it some extra security. If i was at the salon, i would actually go under the dryer for about 10 minutes to make sure it's dry dry. You see those black little specks on the bundles, be careful when you're gluing, your bundles, on making sure you don't get a bundle on a previous layer that you just did, because that's exactly what i did on accident. So i'm just going to take my hair out. Um, i think i show where i i probably don't so something's coming up here: okay y'all, so full disclaimer. Before i even take my hair down. I did my quick weave side part on a monday and i ended up taking it out the very next day, um. Something just wasn't right and i feel like the cat was lifting a little bit, so i ended up taking out the side part quickly that you just saw. However, i did put it back in today is now friday. This of the same week, i put it back in and now i have a middle part, so you will. When i take it down, you will see that i have a middle part. Um quick, weave, same concepts. Excuse me same concepts right as far as putting the wig cap on. I actually molded it a lot more this time, because i actually did it in the salon um, but i will definitely re-record how i did my middle part, but just so you're not surprised. So let's go ahead and take it down. I didn't curl it yet i do plan on curling it. So this is the finished results for my middle part and for the color color came out really really good. As you can see, it blends perfectly with my um with my color excuse that i'll fix it, but yeah i'm probably going to curl it um, because we are having a party for my grandmother. So i probably want to curl it i'll record that, but this is it so it's very natural looking this is a 20 inch. Let'S see, i definitely have to um, i'm definitely going to curl it. I love curl, hair. So y'all know that i didn't really press it press it out like i should have i've just been in a rush lately. I just really wanted to get it in. So when i curl it it's good to know so this is it. I hope you guys like it, you guys enjoy it. I will do the finished style in another video as far as curling, but i think this was really about just the install. So you
Comments
Shawn M. B.: Love it!
AzzyWrld: I love your natural hair
Morgan Jones: Looks awesome! I need to come sit in your chair.
alida wilkie: U and ur hair r gorgeous.
kayla G: Hi, are you in atlanta? and if so how can I book?
AzzyWrld: First comment?