How To: Water Wave Wig Installgorgeous Curls Ft. Yolissa Hair
- Posted on 05 October, 2022
- Bob Wig
- By Anonymous
Hey y’all! I hope everyone enjoyed this Hair tutorial ….Turn on your post notifications, like, comment & subscribe.
●▬▬▬▬▬▬▬▬▬♛Yolissa Hair♛▬▬▬▬▬▬▬▬●
Video Wig Shop Now➤https://bit.ly/3dCjA5p
Hair Info:#waterwave 13x4 HD Lace Front Wig 24inches 180% density
❤ #yolissahair Official Website:➤https://bit.ly/3LGoBpT
Yolissa Hair New Comer? Look Here!
Get ❗️$100 Coupon Package❗️Join in Yolissa group:➤https://bit.ly/3momOuu
Classic Wavy Curls
#yolissabodywave :➤https://bit.ly/3r1JemX
Follow Yolissa Hair On Social Media
Instagram: https://www.instagram.com/yolissa_hair...
Facebook: https://www.facebook.com/yolissa_hair/...
✔Wholesale Contact +86 15803834514
Follow me on my socials
* Instagram: https://instagram.com/me_heavenli?utm_...
* TikTok: https://vm.tiktok.com/TTPdMgf2s9/
* Twitter: https://twitter.com/me_heavenli?s=21
Email: [email protected]
*Intro beat by Mindz*
Shop my Amazon favorites!
http://www.amazon.com/shop/influencer-...
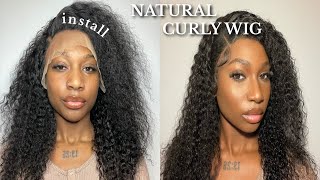
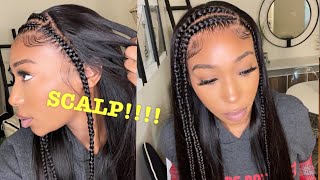
Hey uh welcome back to my channel if you're new, you're gon na love your hair and if you're returning what's up so as you can see, I have installed this water wave wig, it's giving very much scalp. This is this natural curl pattern. So after installing, I left it in this natural state. If you would like to see how I achieved this look, keep on watching laughs, foreign. I received it in this silk bag, with two wig caps: an edge brush, some lashes and an elastic band and of course, the 24 inch. 180 density, 13 by 4, HD lace, front water, wave, wig, okay, so I did about seven braids to the back and since I've had these braids in for a minute, I'm going to or my scalp before applying this wig foreign, I'm going to use my got to Be gel or you can use the spray I put a little on my edges and brush them back. That'S the last thing that I need in a way while applying these wigs, because I want to keep my edges once I apply the gel. I blow dry it down, so it can stay in place and then I repeat, the same process on the other side: foreign alcohol, in a cotton ball to clean off my forehead. This removes dirt oil makeup previous glue so that the wig can really stick and hold. So I put the wig on and put the wig in a ponytail just to make sure none of the hair is in the way foreign ly before cutting my ear tabs when cutting off your ear, tabs, you're, literally just cutting off the extra lace and hair. That is covering yours. I comb two part off the section. I just cut it off. I recommend you cut more than you think you need, because if the lace is cut too short and when trying to glue it down from ear to ear, the lace gets scrunchy and messed up at the top I'll point out. What I'm talking about later on in this video, and here I am repeating the process on the other side, although this week came pre-plucked, I like to pluck more to give it more of a natural look, and since I like to wear curly hair in its natural Poofy State, I think that plucking, it more is needed because when it's in its natural state, of course it's bigger - and I don't want my hairline to give chunky or Wiggy. If you get what I'm saying like, I still wanted to give scalp in its natural state. So here I am plucking it on the mannequin I felt like it was much easier this way, and this is all the hair that came out from plucking now, I'm using my hot comb to push all my hair to the back. This makes it much easier to glue the wig down. Thank you. The hair has to go in a ponytail when I'm gon na pull the scissors out. I'M sorry, but I cannot make any mistakes me personally, I like to cut the lace before gluing the wig down. As you can see, I'm taking my time with it cutting it in small sections. I don't like to cut too much lace off then again, I don't like to leave too much lace on. Thank you. So I was very excited to use this even tin spray. This is my first time using it. I usually use makeup, but this was much more convenient. It only took about five seconds. I was unable to show you all me spraying it on, but this is how it turned out very tinted. You cannot skip this step after spraying, the lace, the lace is wet, so you have to dry it with a blow dryer or you can air dry it, but you have to let it dry. So I put Clips on to keep the flyaways out the way. While I'm gluing the wig down, oh and excuse that lace, that's sitting on my head, I didn't even know that was there just like how I cut the lacing sections. I do the same when applying glue I like to take my time and make sure that the placement of the wig is how I want it. So I apply two layers of glue. I didn't record the first layer and then I let it dry until it's clear once it's clear you'll know that it's ready. That means it's tacky. You don't have to touch. It just lay the wig down. So here I am laying the wig down pushing it into my skin with my fingers. Most of the time I use an eyebrow pencil to Mark where I need to put the placement of the glue, then I wipe it off before laying down the wig foreign process. Applying my second layer of glue foreign earlier, I kind of cut my lace a little too short, so I was trying to get it to stretch from one ear to the next. So when I glued it down, I was stretching the lace, so it looks scrunchy at the top. But of course, I was able to fix it by using the adjustable straps in the back to tighten the wig and that flattened the lace out and it turned out much better foreign. This is also my first time using the lace tint mousse. I didn't put it on correctly because I just don't be reading directions, but I was supposed to pump it on my hand and then dab the mousse on the lace. With my finger, this mousse tint is, what's supposed to help me, get rid of the white cast on my lace, so it can look like the hair is growing out of my scalp. So here I am kind of brushing the mousse in I'm not gon na lie. At this point I wasn't having no hope in this mousse so, like I said before, I put the mousse on wrong, so I kind of felt the wig lifting a little bit. So I had to hurry up and put my elastic band on making sure to tie it very tight, because I want my lace to be laid. I went back in with the alcohol and wiped off the mousse. Then I used my blow dryer to dry the mousse down, I made sure to dry for a while because, like I said before, I felt like my wig was lifting, and the last thing I wanted to do was re-glue this wig down foreign. So, to make sure the wig was really secured, I used another elastic band on top of the first elastic band. I had both bands on for about 10-15 minutes, and here I am taking them off. As you can see, the mousse and the tint spray did exactly what they needed to do now. Moving on to my baby hairs, I usually do two swoops on each side. As you can see, I'm using my comb to part out the first section now, I'm parting out the second section I honestly wish I would have made my baby hers a little thicker and left out more hair, but SRA still turned out cute foreign combing, my hair, In a downwards Direction, this will make it easier when it's time to swoop my baby ears. Next, I cut the hair shorter, making sure that I keep the hair long enough before the swoops then later on, Cut to my desired length and then I'm going to repeat the process. On the other side, foreign ERS to curl the hair going upwards, I feel like curling it in that direction, makes it easier for me when it's time to swoop them before using any product. On my baby hair, I like to use a clean Edge brush to shape them exactly how I want them to look foreign with my got to be sprayed to mold the baby hairs down. I don't use, got to be gel or edge control on my baby hairs because it makes it very sticky - and I like for the baby hairs to look fluffy and soft foreign just repeating the process on the other side. Lastly, I use my got to be spray to brush the rest of the hair back, just to give it more of a cleaner look, like I said before, I like to wear curly hair in its natural state. So it usually looks big half the time and I feel like doing this step makes it look less messy, and that is it. For this tutorial, don't forget to check my description box below for the details on this water wave wig from yolissa hair and the Flash. I got a final look. I want to thank you all for watching, don't forget to like comment and subscribe, see y'all in my next video bye, ya.
Comments
Life As Diamond Gurl: The lace wigs be a struggle ! But you did amazing and thanks for sharing the real process. I might do one I’m just scared
Emon Chappell: did you have to bleach the knots of the wig?
Kaylee Sian: are you gonna do a video on your ginger hair?
GALAXY THE HAMBIE: You Should Collab With Avery B