Marchmadness Slay 2| Kinky Straight Bob Wig Install|Lace Melt Max Omgherhair
- Posted on 11 March, 2021
- Bob Wig
- By Anonymous
Welcome to IAmBeautifulHustler TV
Be sure to SUBSCRIBE & Turn ON Your Bells✨
The wig in the video is from: https://www.omgherhair.com/
Wig Link:https://www.omgherhair.com/ombre-light...
Coupon code " beautifulhustler10 " is valid for orders over $100
Ombre Light Yaki Bob 150% Density Lace Wig Indian Remy Hair [BOB06]
WIG LENGTH - 14 inch
DENSITY - 150%
COLOR - Ombre Color
SIZE - Medium
NATURAL: Pre-Plucked & Pre-Bleached
SECURE: Adjustable Strap & Elastic Band Added
HAIR QUALITY: 100% Human Hair
Cap Construction:4.5" inch parting lace in front wig cap
Pre-Plucked 360 Frontal Wigs: https://www.omgherhair.com/360-lace-wi...
More headband wigs link::https://www.omgherhair.com/headband-wi...
Affordable Bob Wigs: https://www.omgherhair.com/bob-wigs.ht...
Follow OMGHerHair on Social Media:
Instagram @omgherhair : https://www.instagram.com/omgherhair/
YouTube: https://www.youtube.com/channel/UCPY2...
TO PURCHASE MY HAIR & PRODUCTS FROM MY BRAND: (TheBeautifulHustlerBrand )
Use Link Below ⤵️
WWW.iBhSlays.com✨
We Ship Internationally ✈️
TO CONNECT WITH ME ✨
Personal IG: Iambeautifulhustler
Business Instagram:_Beautifulhustler & @thebeautifulhustlerbrand
Twitter:_Beautifulhustl
YouTube: IAmBeautifulHustlerTV
CONTACT ME✨
☎️ 786-571-1313
Email : [email protected]
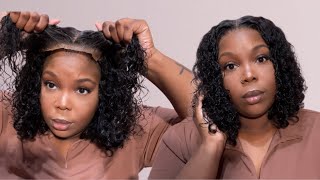
Hey guys and welcome back to my channel today, we are back with a new episode to our march madness, slay series and today we'll be doing a bob uh lace, wig look and today's hair is provided by omg, her hair i've worked with this company many times Before and today um they sent over this ombre kinky straight wig and for those who are not really familiar with, you know like what the kinky straight wig is um. It'S a wig, that's um straight, but it's more kinkier. So it has more of a natural look to it, so once you actually install it and then you um, like press it out and everything it gives you like, they're, really like natural leave out type of look like it looks very, very realistic. So today we'll be taking that bob - and you know this bob wig, which is about like a 14 inch um as far as length, but we're going to transform it into a side. Part asymmetrical cut, which is aka, meaning a short um on one side and long on the other side. Bob now we're going to use shot before this look today. She has never done a ball before like never um, and i realized that she never did a ball before so i said you know what it's been a minute since i've done a bob on my channel and since it's your first time, let's just go ahead and Do it so, as you can see at the bottom left, i have the unboxing you know of this wig, so it came with a few goodies in the bag, and i got straight into the installation part now. I did go ahead and clean her skin with 99 alcohol, and i also used the beautiful hustlers uh skin protectant and i sprayed her hair in line with the protectant, and i will be using the um, newest and um improved formula of the lace adhesive. The max lace, milk, max the maximum strength - and this is the glue i will be using from now on. As you guys know, we had a sale already, which was to buy one, get one freestyle. So if you missed out, i'm sorry, but it is over and now we're getting ready to get our new shipment, which will be here this week. So i hope you guys are ready to make your purchases on march 14th, which will be my actual birthday and we'll be having the new sale of this new release of this top-tier quality. So either ways um we're gon na go ahead and go in with three layers. Only use three layers today and her wig was super melted, super secure and i went ahead and applied all three layers: um about half an inch onto the cap and the other onto her skin. Just a little bit past her hairline and now that that glue has turned clear, i'm gon na go ahead and just begin to take down my wig and, as you will see in this video um, she won't even really need to hold this wig at all. And i know usually when i do this, i have the clients hold each side, but i would like to show you guys how strong this glue is. So if you are doing your own installation - and you don't have anyone to help you - you will not need any help with this new and approved formula like your week is going to be secure on its own once you place it down. So, as you can see, it's stuck, it didn't move, it didn't lift, and now i'm just gon na go ahead and have her hold it down as i blow dry and you know hot comb everything into place and then tie it down with that melt belt. So i hope you guys enjoy this video keep watching and stay tuned. So now that meltdown has sat and it really secured that lace, some more we're going to go ahead and begin to cut off the extra lace now. For starters, i'm just going to get those side tabs off that way. The wig can lay completely flat around the ears. Now you can choose to do this after you glue um, you know everything or you can um. You know cut the extra off the sides first and then glue everything down either way. It gives you the same results, but you know just you know whichever you prefer, but i'm gon na go ahead and get that extra lace from around the ears. And then i'm gon na go ahead and proceed to cut the extra lace off using a very fresh lace, glider and um. Also inside um of this wig, it does have like those uh sewed in scrap parts. Like you know the thick black square ones, that you know you put in there for the elastic band um yeah. Sometimes they can get in the way of the wig. But if you need to you can just go ahead and cut those out that worry. You know that way. You don't have to worry about any irritation or anything like that, but um nevertheless, and i'm going to go ahead and pull down everything, that's not needed for her hairline and that's also not glued down and using a fresh lace. Glider i'm going to go ahead and razor all of that extra lace off and it's just going to come off so easy, so peasy, because that razor is fresh and you can see we are giving the girls scalp. So, let's get into this sleigh honey because it's about to get serious so because this is actually like a middle part wig. As far as the parting space, we're gon na have to do her side, part like higher up versus like a deep side part. So i'm going to um, you know just pull down the baby hair section for this side, because the other side would just be like long and hanging in the face, because it would be the longer side of the bob. But i'm just going to still do her. A nice curved part, the parting is not going to be as low as i really wanted it to be, but we will still make it do what we have. So i'm just going to still go ahead and, like i mentioned and create that curved part and just taking that wax stick in the hot comb. I'M just going to sneak all of that down around the parting area to prepare for uh the bob cut in the long run, and then i'm also going to um. You know prep it for the baby hairs. You know, tie down spray, the lace and everything else. Like that, so just keep watching and now that we have all of that out of the way i'm just going to go ahead and take some foundation and spray across the hairline and then spray it with the isoplus holding spray and just tie it down really quickly And let that dry and just carry in, but actually all you know you guys can already see it is a scalp situation, so we're just adding a little more. You know extra on top of the milk - that's already there so now that we went ahead and removed that meltdown for the second time i'm going to go ahead and before i even get into the cut just slay the baby hair and get it out the way And i will be using the got to be gel for the baby hairs, but y'all can see. We are melted honey. When i tell this lace, milk adhesive maximum strength is no joke. Okay, it is no joke. It is not to be played with after round with, like i am telling y'all like it, is the s s-h-i-t for real, and it's just like. Oh my god, it's just everything like it's everything i needed to be period and i'm going to do a video later. You know telling guys exactly all the difference and everything so just wait for that as well, but i'll probably just explain it in like one of my next tutorials but baby. This glue is not to be messed around with okay, but right now, i'm just going in with that got to be gel and i'm just doing three little school baby hairs of this look. I would not be doing any baby hairs on the other side because she's just going to wear it in her face down and you don't even have to waste time or product. You know slaying a side, that's not even going to show so that just you know, that's just me just being real but um after i get these baby hairs done. I'M gon na go ahead and get into the cut and i did not do any special technique. I didn't use no razor clips uh razor clippers. I didn't use like razor comb. I just literally went in with scissors and if you have a good like i don't know, i don't want to say eye job. But if you have like a good visual um and you can just do like clean cuts with scissors alone, then do it if you can and you have to use a clippers, do it if you have to use the razor comb first, do it do whatever works Best for you this just what um you know works best for me. I use all techniques depending on the style, the look. If it's going to be, you know more blonde. If they wanted more layer like it all depends it's a million and one ways to do different bobs and different bob looks, but for this one i'm just going to take the scissors and just do a nice and clean cut so um, like i mentioned it, will Still be asymmetrical, so that means the side. With this push back is going to be shorter and then this part in the front is going to be longer and to be honest, when i'm doing asymmetrical cuts, i like to cut the longer side first and then i work my way over to the shorter side. So i'm going to start by cutting the front and an angle, so you guys will see that. Oh, this just looks so good already, but you guys will see exactly what i mean. I'M going to start by cutting the front part and the angle first, and then i will make the size in the back of that cut, match everything else, so just keep watching how i'm doing it and you guys will get a nice understanding. So, as i mentioned, i said i start cutting from the longer side first, so once i get the perfect angle on the longer side and i reach the desired shortness, that's when i just go ahead and blunt the cut the rest of the way all around and You just want to take your time, make sure you are grabbing all of that hair. That'S why i make sure i have my hand underneath all the tracks or whatever, and i just match that um guideline cut all the way around. So that's just pretty much what i'm going to do until i get all the way to the other side - and here is the finishing look after i finished cutting nice and cute nice and blunt, but now i'm just going to go ahead and go with the uh Big flat iron and just you know, go ahead and get that you know slightly bump not too much, because i still want to keep it pretty straight, but you know just curved enough to give the bob a look. So i'm just gon na go in with my infinity pro flat iron, which you can purchase at walgreens or walmart. It'S about 40 bucks at most, it's really really hot 450 um and i'm just going to you know just go ahead and press those not really press. It, but you know, press it, but give it like a slight bump underneath all the way around, so so now that the bob is all pressed out. I just like to go in, and just you know make sure it's perfect pretty much laid to you know to perfection. You can wear it above the ear. You can push it back wherever all behind your ear is up to you is your preference. Is that well technically it's your client's preference but um, whether they want to wear it regular or behind the ear. So once you get that final desired, look, you can go ahead and conceal your part, so i'm definitely just going to go in with some concealer. You know what you call: it conceal the part making sure it's nice and curved and clean, because right now it's giving very dull, but once i go in with that foundation and conceal that part with that angle, brush it's going to pop, you know even more and Then, of course, um we're gon na end up pulling that side behind her ear, but for the most part this is the completed. Look um just stay tuned for the very, very grand finale finish, and let me know what you guys think down below in the comments about this bob look overall um, if you have not done so already be sure to subscribe. Turn on your bells turn on every notification um on my socials as well, because i do post about the restocks and everything there, even in the community section here on youtube, i posted so just make sure your bells are on make sure you subscribe make sure you, Like this video make sure you comment and let me know your thoughts down below and you know thank you guys for tuning in. I hope you enjoyed this look and stay tuned for more videos, because we will have some back-to-back uploads. So thank you guys for tuning. In and see you next time, you
Comments
crenecia cook: yes mam i love it !!! you always bringing the heat !
La Kevia Thompson: I've been wanting my hair like this.
Shakita Brown: Loving it Lilsis great job!!
Kemo Bennett: job well done per usual.. ..love it
Catina: And she look gorgeous I love bobs never go out of style
Miracle Burns: Yesss!!! Keep the slays coming
Christine Zapata: Love it!!!
Tisha Duncan: Thank you for showing me what True Professional High-End Quality...When it Comes to Human Hair Art. Thank You ❣️
Indi Jax: Keep um coming
Toyia: Friendddd!!!!! Your bday is almost here!!! Of course this look is fire.
Mariah J. Milan Dior: the slayage is real
Divine: Love your work !!!!!!!DOLL
Rita Frimpong: Where did you get your background decorations, very beautiful ❤
❤️manifest abundance ❤️: I was waiting on a video like this right on time
Sam Willis: By far the best on YouTube ! I can’t wait till 2mrw
modelchiic17: U out did yo self AGAIN !!!!!!❤️❤️
Tricia Matthews: What shade of make up you use on her, your work is bomb btw
Valerie Naylor: Beautiful period pooh
Life With Dahje’: i miss the lives
jv: Lil girl so cute lov the hair color
I am Gary Wyatt: beautiful
Destiny Green: slayedddddddd
Sandra Brooks: Hi how can I purchase your glue?
JADAMALISSA: we have the same birthday #piscesgang
Jaleacia Morris: What scissors are you using?
QueenTera: U kno i fwu girl
Prettiest Gemini:
Xo Ovo: She just aged to 35
deseraymiles87:
Philisa Love:
tosin idris:
Angie: Smash the LIKE button
ADoseOfKiyaa: yes maaaaaaaam !