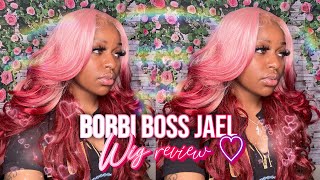
New Miranda Lite By Jon Renau In 30A27S4 Shaded Peach, Wig Review & Comparison With Original Miranda
This is a wig review of the new Miranda Lite by Jon Renau in the color 30A27S4, Shaded Peach. Miranda Lite is an elegant style that is low density and has loose waves, ear-to-ear lace front, and a perfect hairline!
In this video I'm also comparing Miranda Lite to the original Miranda and discussing the color details for Shaded Peach. I'm including styling tips for how to keep the fibers out of the face and showing how I style Miranda Lite into a ponytail and a French twist. Lastly, I show Miranda Lite in outdoor lighting.
Where I purchased items in this video:
1. Miranda Lite in 30A27S4 from Wig Studio 1
2. Miranda in 8RH14 from wigs.com
3. NYX PROFESSIONAL MAKEUP Ultimate Shadow Palette, Eyeshadow Palette, Warm Neutrals from Amazon
4. "isteam Steamer for Clothes" from Amazon
5. Timoo Metal Spring Wavy Hairband Hair Hoop, Headband from Amazon
Links to previous videos:
1. Wig steaming video - https://www.youtube.com/watch?v=jcDltc...
2. Shaded Peach and Strawberry Syrup comparison - https://www.youtube.com/watch?v=qvDqEp...
My head measurements are:
Circumference 22”
Ear to ear 12.25”
Forehead to nape 14.5”
Hairline to bottom of chin 7.25”
I can be reached at [email protected]
Follow me on Instagram @micheleswigreviews
#wigreview #jonrenauwigs #jonrenau
Hi everyone i'm michelle, welcome back to my channel today, i'm so excited to be able to show you this brand new style. This is miranda light by jon renau from their smartlace light collection in the color shaded peach, an improved color shaded peach, and i can't wait to show you all the details, but i wanted to ask if you haven't done so already. Please subscribe down below like and comment and we'll get started. Okay, so miranda light is just a stunning style. I i had a feeling i would love her because i adore the smart lace: light collection by jon, renau, the the cap, construction and the lace front are just magnificent and uh. This is a long style as well, so you can do all those wonderful styling options with her that i love to do so. I knew i would love her and i do um so first, let's go ahead and look at miranda light right out of the box. I haven't done anything but put her on the zigzag. Parting is still in place, so i wanted to show her to you right out of the box um. Let'S take a good look at her, so we have that gorgeous lace front and i released a video uh. Yesterday on youtube about um the improved color shaded peach and i will post a link down below in the description box, so you can watch the details if you're interested in that. But what i love about it are the light fibers that they've introduced to the hairline. Even though shaded peach is a rooted color, you now have this gorgeous lace front. So here we go. There'S a good look at that and those invisible knots, an extremely natural looking hairline. We will do the parting space a little later and take a look at that. Then so, let's go ahead and take a look at her from all sides. So you can see this beautiful, color right out of the box and the wave pattern. So here she is from the right and the back and the left just a stunning stunning style, low density and plenty of style, just very natural. Looking. So next we will look at the cap construction. We will compare miranda light to miranda. We will do some styling options and customization and lastly i'll take her outside, so you can see this gorgeous color in natural light. Okay. So let's look at the cap construction. So to me the most impressive part of this cap is this extended lace front and when i say extend it, i mean extended all the way to the bottom of the ear tabs on both sides. So that is just so luxurious. It allows you to style this wig away from the face and have that natural appearance of hair growth all along that area, um, so that that is just wonderful and i love pulling my zara light into a ponytail because it just looks so natural and i can't Wait to try that with miranda light, so then you have a mono top, so you can part this wig center left or right, whichever you prefer. You have these polyurethane ear tabs with metal stays inside and what's nice is. These are a little less bulky and also you can use wig tape or any other kind of adhesive for extra security in this area. If you like, we have a fully hand tied back here and sides stretchy, we have an extended nape, and this is a silicone material covering that there and that will help grip will help with security and also again, you could attach adhesive in this area. Then you have these velcro adjusters, so you can adjust her to your circumference, so really luxurious cap construction. That will allow you to style this wig in so many ways. So now we're ready to do some customizing. I like to change the zigzag parting and create a left side part, and i like to steam the fibers away from the face, so i don't get as much of this happening. Some people like to just rub their hands together and apply little heat. That way, i find that the steaming uh is a little more permanent, so let's go ahead and do that together. So i have parted miranda light where i would like her to be parted. You can see that and there is a piece of silicone tape under there. So now we need to make sure that this will stay there and i will go ahead and clip that back. So we can steam the part and steam the fibers away from the face. So, first i'm going to apply a little bit of matte eye shadow to that part line so that we can get a good look at that. You have the rooting and i definitely like to show a little bit of scalp appearance. So here we go a little bit hard to see in the camera here, but especially with that dark rooting, i'll do my best. This is just powder, so it can easily be removed all right. We can touch that up more later, but that gives us an idea for where that part line will be i'll, pat, that a little get rid of any loose powder and if it ever appears too extreme. You just remove the silicone tape and start over. That will take care of any white lines that you feel are too extreme looking. So let's take her off and go ahead and steam the part in place and steam the fibers away from the face here we go. I have my block head here and i have my ice steam steamer all right and next we'll go ahead and work on steaming these fibers away from the face. I feel like on the left side there. It doesn't need any steaming. But, however, on this side we do so i create my sections and i have a video all about steaming that i will include in the description box below okay. So i'm going to let this cool and we'll put her on and see what we've got. Okay. So, let's see what we accomplished with our steaming, remove the clips there and it's nice and cool. You absolutely need to let it cool before you do this, because that's how the style sets. Oh yeah, yep yep! That'S how i like it - and this will now stay in place - the part will stay in place and the fibers will stay much more away from the face, as you can see, and i have not added any product to it. That would need to be washed out. Eventually, so i just love this beautiful style all right. Well, let's go ahead and work with some styling options if you're working throughout the day and really just want to ensure that you don't have any fibers flopping in your face, you can do the tuck very cute. Also on the left, and because this is a low density style, you can really tuck those fibers behind your ears without getting any kind of bulging there fantastic next um. I thought we would try one of these metallic headbands. I got this uh on from amazon and i think it's kind of an edgy cool look. So, let's see what that looks like with this style, not even sure how much i see you, it kind of pulls the fibers back like that gosh, that's kind of a cool look, i'm not sure i've applied this correctly. Maybe you should get rid of the part line, but just an idea for how to use a headband with this style. Now i want to point out that lace front. I did go ahead and trim the lace front and i might need to do a little more. There, but look at that natural, looking hair growth here, so you have the lighter fibers that end right here and then here we have rooting. Let me lift that just so you can see. So that's where the ear tab hits on me and again that extended lace front goes all the way down to there on both sides. So you can see you can create an extremely natural looking hairline all across the front here and sides which i love. So i think that's a fun little edgy style a little difficult to remove and then, of course you can do, let's test it, and this is my first time trying it the ponytail. Now i do have my bio hair, my very fine and thin bio hair um. That'S out it's not tucked under and let's go ahead and gather these gorgeous waves and delicate fibers and i'll just do a low ponytail gather that all the way around make it as smooth as possible and i'm going to pull the nape down a little just to Give me better coverage back there and also so that i don't have any kind of a too much of a poof there if it wants to ride up all right - and i have my hair tie - see how many times i wrapped that around there yeah i'll. Do three times it's low density, so it does need three wraps there. That is pretty darn cute and i don't have any root powder on my bio hair. You can do that if you'd like to blend it a little more with the fibers. So, let's see we do have a little bit of face framing layers. That is also very cute. You can leave that out or you could tuck it behind your ear or pin it with a bobby pin, i kind of like a sleek looking ponytail style the front. However, you like, let's give that a look from all sides here. She is from the right and the back and the left such a fun, little ponytail and then last but not least, let's do the claw clip and i don't have any kind of wig clip or adhesive on right now so we'll see if this pulls back and If i wish i'd put some wig tape on the lace front, but we'll go ahead and gather all the fibers again just like we did before - and this is just a quick messy style - we are not going for perfection here and then i wrap it twist it. I mean and leave a little fluffy piece on top. There have a little few pieces hanging down and attach the claw clip make sure we've got good coverage all right. Let'S take a look at that from all sides here it is from the right and the back and the left just a wonderful casual style. So next we're going to go ahead and compare miranda, light to the original miranda and then we'll take miranda light outside okay. So here i have the original miranda and let's go ahead and do a side-by-side comparison of these two styles miranda and miranda light so first, of course, miranda is higher density than miranda light. She is a bit full and has a beautiful wave pattern. The same style, though the the long layers and gorgeous loose waves and uh she also is parted on the left. Interestingly, this part came straight, not zigzagged, so i haven't done anything with this wig, but let's go ahead and look at it side by side. So you can compare the density and the curl patterns here we are and then from the right and the left and then the back so very similar um. I will just say that it absolutely feels more sleek miranda. Light feels more sleek than miranda and miranda has some permatease. I can definitely feel it here on the crown and miranda light has no permatease whatsoever, so you will get more volume with miranda than you do with miranda light. Now, let's look at the cat construction, because that is the main place where you will see the differences okay. So here you have the cap construction. You have a left mono part, not a mono top like with miranda light. You have an extended lace front that goes halfway down the ear tabs, but not ear to ear, like you do with miranda light you have this lace portion and, i believe, there's the permatease. Under there you have an open, wefted cap instead of a hand tied cap. You do have an extended nape, like you do with miranda light, but no silicone, you have ear tabs and metal stays, but not polyurethane. So those are the differences in the cap construction between the two and i absolutely think they are both lovely options. Obviously, miranda is a little bit more affordable and miranda. Light has a lot of fabulous features if you're interested in styling her away from the face and having a very natural density. So those are the main differences between the two next we'll go ahead and take miranda light outside, and i want to show you this gorgeous shaded peach in natural light. Okay, so here we are outside this. Color has been improved, as i mentioned before, and we have gorgeous light fibers now along the hairline here, jon renau mentioned on instagram that they are doing that with the smart lace, light collection. So let's hope we see it on other styles as well. Let'S uh look at the details, so this is shaded peach, which is 38 27 s4 and i have the sample from the coloring here. So you can see the colors a bit there, but let's go ahead and look at each color individually. This is the 30a. So you can see that is blended in there. What we have is a blend of the 30a and the 27. This is the 27, which is more of a strawberry blonde, so these two are blended together throughout, so you don't really get much of a highlighting effect. You just have this gorgeous blend and then you have the number four and that is the rooting there. So let's read the description. I have the description here from wig studio, one. It is a medium red and medium red gold blend, and then you have the shading or the rooting which is dark. Gold brown according to wig studio. One - and i absolutely agree - i think, that's what you have. You have a very natural looking short root. Not not a long root, you have the gorgeous blended colors and i'm going to show you this from all sides and then you have the wonderful hairline. So let's look at the details. First again, this is my favorite part. Look at that hairline, even though this is a color rooted with a four that is stunning and natural. Looking i just love it and uh. Then you have the part line and i did apply that powder and the tape underneath. So that's why you have you can really see that part line and, let's take a look from all sides here. She is from the right and the back and the left. This is just a stunning and natural looking despite the fact that you have pretty extreme color differences going on there. I just think this is a stunning natural, looking auburn and i'm absolutely in love with this color. Okay, so final thoughts, miranda light is just perfection. It really is uh. This is what i always wished. My hair could have accomplished and never could uh. It is a very natural. Low density style doesn't look wiggy at all in the least it has these gorgeous loose waves and layers. It looks like you spend time. Styling, your hair, and yet it is humidity and rain proof because this style is baked in this cap. Construction is fantastic. If you want to style this beautiful style away from your face, you easily can because of the ear to ear lace, front and natural hairline, the shaded peach. I just can't rave enough about that. It is stunning with this new hairline, so you have the the best of both worlds. You have a gorgeous root and a natural hairline in a deep auburn. Well, the rooting is dark brown anyway and then the auburn color. So i'm blown away, i'm blown away by the style and the color a plus for jon renau. Thank you so much. I will be wearing this quite a bit. In fact, i don't want to take it off uh, and i hope that if this is a style that you're interested in that this review has been helpful and informative and as always, i look forward to seeing you next time. Bye, bye,


Comments
Miryana Curcic: Loved it in the claw clip style, you really looked elegant Michele. Thanks for the detailed review, lots of information. Have a nice day.
Teena Covert: Stunning is the perfect word for you in this wig in shaded peach! In my opinion, Jon Renau has hit it out of the park with the lite styles. This one is a little long for me, but I am still on the fence about buying it to wear in a clip or ponytail. The lite wigs are the only ones I can wear for 18 hours with no problem. They don’t seem hot, and I forget that I’m wearing one of them. Thanks for your wonderful review!
Debbie Hall: Another beautiful style! Great review!
Trish Hegarty: Beautiful on you !What is the piece of silicone tape you mentioned a couple of times ?Thank you !